Click LIKE & follow us on Facebook for recipe updates

COOK WITH LOVE FOR A HAPPY HIM

Singapore home cooking/ baking/ food & recipe blog features more than 500 tried & tested, quick & easy kid friendly recipes with steps by steps tutorial.


Follow us on Instagram: mfa_dingoozatfood


If you're a company looking for possible collaboration, feel free to send me a message via Miki's Food Archives Facebook Fan Page or email to miki9mak@gmail.com


Search This Blog

Friday, 11 March 2022

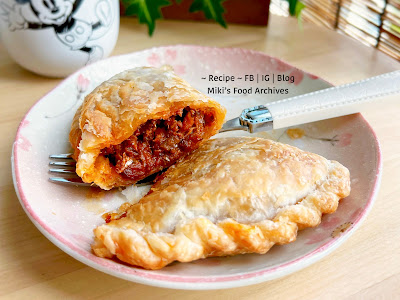
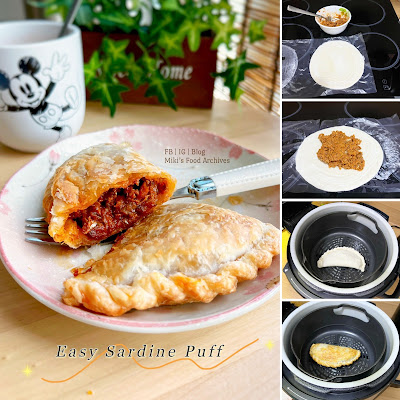
Easy Sambal Sardine Puff 沙丁鱼千层酥/ 酥皮沙丁鱼派【简易、零难度做法】


This is super easy to prepare using canned sardine and frozen paratha, it tastes good and is great for a quick-fix breakfast, light meal, or snack any time of the day! It can be baked in an oven or air-fryer.


Ingredients: 
中文食谱:请在网页的右边点击Translate,然后选择中文翻译

Frozen Paratha


1 small can of Sardines 


1 tbsp Sambal Chili

(alternatively, this can be replaced with some chopped shallots, chili, salt, and pepper add to taste)


If you are sharing this recipe/ blog content, kindly attach the link to this blog instead of screen capture/ copy & paste/ use in your blog. No parts of the content of this blog may be reproduced without prior written permission from Miki's Food Archives. All rights reserved. Thank you. 

如果您要分享此食谱/内容,请联系这个部落格的相关链接。敬请不要复制或改篇为自己的食谱。谢谢!


Method: 

1. 
Mash the sardine and mix well with sambal chilli. 
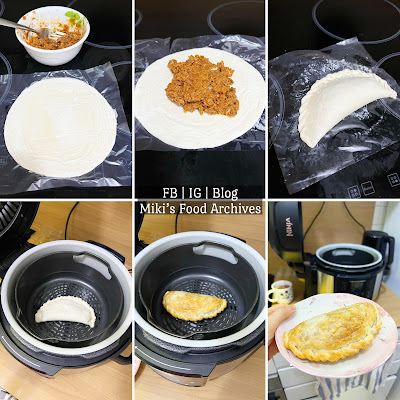

2. Wrap in filling and air-fry 180'C 8 minutes or until golden and crisp. 
若喜欢我的食谱,可以LIKE和追随我的面书专页,不要错过最新食谱发布。If you like my recipe, click hereLIKE & follow Miki's Food Archives Facebook page or follow us on Instagram: mfa_dingoozatfood  to receive more recipe updates. Don't forget to favourite my pages if you wish to see my post on your news feed. 

Korean Spicy Cucumber Salad 韩式小菜|凉拌黄瓜


This crunchy cucumber salad is super easy to prepare, it's great to serve as a side dish to add delicious spiciness to any meal.

Serving my homemade spicy cucumber salad with Air-fried Turmeric Chicken and otah-otah


Ingredients: 
中文食谱:请在网页的右边点击Translate,然后选择中文翻译

250g Cucumber 


1 tsp Salt 


Salad Dressing: 


4 tsp Korean Chilli Paste/ Gochujang 


1 tbsp Roasted Sesame Seeds


*1 1/2 tbsp Sugar


3 tsp Apple Cider Vinegar


1 tsp Sesame Oil


*Note: I like my salad to have a tad of sweet taste, do adjust the seasoning to your own preferences. 


If you are sharing this recipe/ blog content, kindly attach the link to this blog instead of screen capture/ copy & paste/ use in your blog. No parts of the content of this blog may be reproduced without prior written permission. All rights reserved. Thank you. 如果您要分享此食谱/内容,请联系这个部落格的相关链接。敬请不要复制或改篇为自己的食谱。谢谢!


Method: 步骤

1. Combine salt and cucumber, let it sit for 10 minutes, discard the excess liquid.


2. Mix the cucumber with salad dressing, serve right away or chill before serving.  
若喜欢我的食谱,可以LIKE和追随我的面书专页,不要错过最新食谱发布。If you like my recipe, click hereLIKE & follow Miki's Food Archives Facebook page or follow us on Instagram: mfa_dingoozatfood  to receive more recipe updates. Don't forget to change the setting to 'SEE FIRST' and "FAVOURITE" the page if you wish to see my post on your Facebook news feed. 

Sunday, 6 March 2022

Snow Fungus & Lotus Seeds Sweet Soup 银耳莲子羹 [滋阴润肺、养颜美容等功效]


This delectable Snow Fungus & Lotus Seeds Sweet Soup, aka Lian Zhi Geng 莲子羹 is an old-fashioned Chinese sweet soup that my mom used to cook for us. It tastes good when served warm and it's cooling and refreshing when served chilled. The conventional/ stovetop method usually takes at least 2 hours of slow simmering to soften the lotus seeds. In this blog post, I'm sharing a quick and easy method using a pressure cooker. No need to stand by the kitchen to "watch fire" 不需要看火. :D  The result is satisfying, with the right texture and consistency that I like! 


Ingredients: 
中文食谱:请在网页的右边点击Translate,然后选择中文翻译

90g Lotus Seeds

(soaked overnight in hot water or use fresh lotus seeds)


110g Dried White Fungus, soaked and torn into smaller pieces


8 Red Dates


20g Dried Longan


Rock Sugar, add to taste


Water, 10 cups level


If you are sharing this recipe/ blog content, kindly attach the link to this blog instead of screen capture/ copy & paste/ use in your blog. No parts of the content of this blog may be reproduced without prior written permission. All rights reserved. Thank you. 

如果您要分享此食谱/内容,请联系这个部落格的相关链接。敬请不要复制或改篇为自己的食谱。谢谢!


Method: 

1. Add the first 3 ingredients and water to the pot.

2. Close the pressure lid, seal. Set Pressure Cook (HI)for 20 minutes.


3. After natural pressure release, bring to a boil, add in the remaining ingredients, cook for 10 minutes. Serve warm or chilled.
若喜欢我的食谱,可以LIKE和追随我的面书专页,不要错过最新食谱发布。If you like my recipe, click hereLIKE & follow Miki's Food Archives Facebook page or follow us on Instagram: mfa_dingoozatfood  to receive more recipe updates. Don't forget to favourite my pages if you wish to see my post on your news feed. 

Friday, 4 March 2022

Easy Mala Xiang Guo aka Sichuan Spicy Stir-fry 麻辣香锅【家常简易食谱】


Mala Xiang Guo aka Sichuan Spicy Stir-fry is strongly flavored with Mala spices stir-frying with assorted meat, vegetables, noodles etc... Sharing here is an easy method that I normally do using store-bought Mala sauce, it's simple and tasty! This is a less-spicy recipe, if you like it more spicy, feel free to add more dried chilies. ;)

Ingredients:
中文食谱:请在网页的右边点击Translate,然后选择中文翻译

100g Pork Belly


6 Shrimps 


2 Fish Cake


1/2 section Lotus Root


1 Carrot


5 Button Mushroom


1 Onion


6 Dried Chili


6 cloves Garlic


6 slices Ginger 


100g Mala Paste


Handful of Coriander 


Some oil for cooking 


If you are sharing this recipe/ blog content, kindly attach the link to this blog instead of screen capture/ copy & paste/ use in your blog. No parts of the content of this blog may be reproduced without prior written permission. All rights reserved. Thank you. 

如果您要分享此食谱/内容,请联系这个部落格的相关链接。敬请不要复制或改篇为自己的食谱。谢谢!


Method:

1. Blanch lotus root and carrot, set aside. Add oil in the wok, turn on medium heat. Stir fry onion, ginger, and garlic until fragrant, add in pork belly, stir fry until half cooked, stir in dried chili, mushroom, and shrimps. 

I cooked this dish using Song Cho stainless steel wok, a multiply stainless steel wok without chemical coating, it's safe to use in any cooking including deep-frying. 
For more information about the product, visit Song Cho e-shop for details.


2. When the pork and shrimps are cooked, stir in fish cake and Mala sauce. Add carrot and lotus root, mix well. Garnish with coriander, serve right away.  

若喜欢我的食谱,可以LIKE和追随我的面书专页,不要错过最新食谱发布。
If you like my recipe, click hereLIKE & follow Miki's Food Archives Facebook page or follow us on Instagram: mfa_dingoozatfood  to receive more recipe updates. Don't forget to change the setting to 'SEE FIRST' if you wish to see my post on your Facebook news feed. 

Enjoy!

Wednesday, 2 March 2022

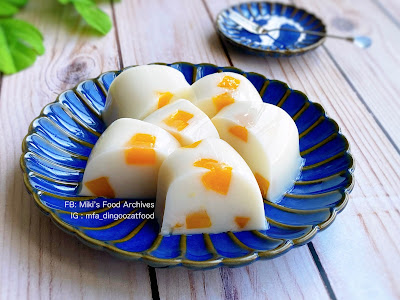
Mango Coconut Milk Jelly 芒果椰奶冻


A delicious and refreshing jelly combining mango and pandan-infused coconut milk, this is definitely a crowd-pleasing dessert!


Ingredients: 
材料

200g Coconut Milk 椰奶 200克

300g Fresh Milk 鲜奶 300克

500g Water 水 500克

10g (1pkt) Konnyaku Jelly Powder 蒟蒻果冻粉 10克

200g Sugar 细砂糖 200克

5 Pandan Leaves 班兰叶 5片

1/2 Mango, cut into cubes


If you are sharing this recipe/ blog content, kindly attach the link to this blog instead of screen capture/ copy & paste/ use in your blog. No parts of the content of this blog may be reproduced without prior written permission. All rights reserved. Thank you. 如果您要分享此食谱/内容,请联系这个部落格的相关链接。敬请不要复制或改篇为自己的食谱。谢谢!


Method: 步骤

1. In a bowl, mix sugar and Konnyaku jelly powder. 
细砂糖和蒟蒻果冻粉混合均匀。


2. Heat up water and pandan leaves until fragrant. Add in coconut milk and fresh milk. Gradually stir in (1).
将水和
班兰叶加入锅里加热。加入椰奶和鲜奶。慢慢加入(1),不断搅拌。

3. Continue stirring. Bring to a boil, turn off the heat and constantly stir till the jelly powder is fully dissolved.
继续搅拌,加热至煮滚/烧开。熄火,继续搅拌至果冻粉完全溶解。


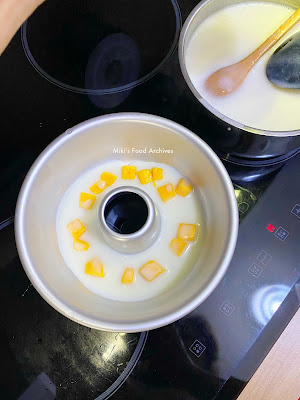
4. Place mangoes and the jelly mixture into jelly mould/ cups/ tray. Let it cool, cover and keep in the refrigerator for 4 hours. Serve chilled.
和芒果一起加入模里待凉后盖好放进冰箱。四小时后即可享用。
若喜欢我的食谱,可以LIKE和追随我的面书专页,不要错过最新食谱发布。If you like my recipe, click hereLIKE & follow Miki's Food Archives Facebook page or follow us on Instagram: mfa_dingoozatfood  to receive more recipe updates. Remember to "FAVOURITE" my pages if you wish to see my post on your news feed. 

By readers: Feedback from those who have tried this recipe

By Oo Phaik Lay


Monday, 28 February 2022

Homemade Air-Fried Seaweed Shaker Fries 自制海苔薯条【免油炸】


If you love Mcd shaker fries, here's a recipe for you to try making a healthier version at home without deep-frying! It's really easy to make using frozen fries or if you have time, make it from scratch using the recipe below. 


Ingredients:
中文食谱:请在网页的右边点击Translate,然后选择中文翻译

2 Potatoes

Seasoning:

Few dashes of Seaweed Powder, Garlic Powder, Salt & Pepper, add to taste


If you are sharing this recipe/ blog content, kindly attach the link to this blog instead of screen capture/ copy & paste/ use in your blog. No parts of the content of this blog may be reproduced without prior written permission. All rights reserved. Thank you. 如果您要分享此食谱/内容,请联系这个部落格的相关链接。敬请不要复制或改篇为自己的食谱。谢谢!

Method:

1. Steam or pressure cook the potatoes for 15 minutes. Cut into sticks, spray/ coat with some oil. 


2. Air fry  200'C for 10-15 minutes, tossing halfway. Add seasoning and serve right away as a side dish or snack. These homemade shaker fries are crispy and absolutely tasty! 
Note: Do adjust the cooking time according to the size/ thickness of the potatoes.若喜欢我的食谱,可以LIKE和追随我的面书专页,不要错过最新食谱发布。If you like my recipe, click hereLIKE & follow Miki's Food Archives Facebook page or follow us on Instagram: mfa_dingoozatfood  to receive more recipe updates. Don't forget to favourite my pages if you wish to see my post on your news feed. 
Homemade Air Fried Shaker Fries, serve with Dry Rub Grilled Chicken
Tap here for << Dry Rub Grilled Chicken Recipe >>  


Thursday, 17 February 2022

Salted Egg Yolk Chicken Wings 咸蛋黄鸡翅【免油炸 Air-fryer Recipe】


Salted egg yolk sauce goes well with almost anything! One of my favourite recipes is this salted egg yolk chicken wings that we could enjoy with less guilt knowing that it did not come out from a deep fryer filled with oil. The preparation is easy - steam salted egg yolk, air-fry chicken wings until golden crisp, then cook the sauce.


Ingredients: 
中文食谱:请在网页的右边点击Translate,然后选择中文翻译

8 Chicken Mid Wings


Marinade:


1 tsp Corn Flour


1/2 tsp Salt


Dash White Pepper


1 tsp Sesame Oil


1 tsp Light Soy Sauce


1/2 tsp Onion Powder


Salted Egg Yolk Sauce:


3pcs Salted Egg Yolk, steamed and mashed


1/2 tsp Sugar


1/2 Red Chili/ or 1 Chili Padi


1 sprig Curry Leaves


1 tsp Curry Powder


10g Butter 


A pinch of Salt 


If you are sharing this recipe/ blog content, kindly attach the link to this blog instead of screen capture/ copy & paste/ use in your blog. No parts of the content of this blog may be reproduced without prior written permission from Miki's Food Archives. All rights reserved. Thank you. 

如果您要分享此食谱/内容,请联系这个部落格的相关链接。敬请不要复制或改篇为自己的食谱。谢谢!


Method: 

1. Combine chicken wings and marinade ingredients, let marinate for 2 hours or overnight. Coat the wings with corn flour.

2. Preheat air-fryer 200'C 3 minutes. 


3. Air-fry the wings 200'C 12 minutes. Note: Spray/ brush some oil on the chicken wings and basket before cooking. 


4. Heat butter, curry leaves, and salted egg yolk, stir in chili, sugar, and salt, mix well. Add chicken wings, coat with sauce, and serve right away.若喜欢我的食谱,可以LIKE和追随我的面书专页,不要错过最新食谱发布。If you like my recipe, click hereLIKE & follow Miki's Food Archives Facebook page or follow us on Instagram: mfa_dingoozatfood  to receive more recipe updates. Don't forget to favourite my pages if you wish to see my post on your news feed. 

Tuesday, 15 February 2022

Lucky Bag Pumpkin Steamed Bun/ Pau With Curry Potato Filling 福袋南瓜包子【咖喱马铃薯馅】


Happy Chap Goh Meh! Made another batch of pumpkin steamed buns, this time I used a lucky bag mould to shape the dough, added curry potato filling. The texture is super soft and fluffy, tastes so good! 


If you are sharing this recipe/ blog content, kindly attach the link to this blog instead of screen capture/ copy & paste/ use in your blog. No parts of the content of this blog may be reproduced without prior written permission. All rights reserved. Thank you. 如果您要分享此食谱/内容,请联系这个部落格的相关链接。敬请不要复制或改篇为自己的食谱。谢谢!


Tap the link below for recipes:


Thanks for reading, I hope you are inspired after reading my blog. If you love to see my food, click hereLIKE & follow Miki's Food Archives Facebook page or follow us on Instagram: mfa_dingoozatfood  to receive more recipe updates. Don't forget to change the setting to 'SEE FIRST' if you wish to see my post on your Facebook news feed. 

Enjoy!

Tuesday, 8 February 2022

Pork Jerky/ Bak Kwa, Potato & Mushrooms Rice 肉干马铃薯焖饭


Pork jerky aka Bak Kwa is a popular snack during Chinese New Year celebration, it tastes good on its own and it's a versatile ingredient to be used in cooking and baking. This is one of the recipes that I've created, it's very easy to cook, delicious and flavourful one-pot pork jerky rice, potato and mushroom rice. 


Ingredients:
Yield 3 servings
中文食谱:请在网页的右边点击Translate, 然后选择中文翻译

2 & 1/2 slices Pork Jerky 


1 Potato 


1 pkt Shimeji Mushroom


1 & 1/4 cup Rice 


1 & 3/4 cup Water


1 stalk Spring Onion


Seasonings:


3 tbsp Light Soy Sauce 


2 tsp Brown Sugar


2 tsp Caster Sugar


2 tsp Sesame Oil


1 tbsp Rice Wine


1/2 tsp Garlic Pepper


1/2 tsp Garlic Salt


If you are sharing this recipe/ blog content, kindly attach the link to this blog instead of screen capture/ copy & paste/ use in your blog. No parts of the content of this blog may be reproduced without prior written permission. All rights reserved. Thank you. 如果您要分享此食谱/内容,请联系这个部落格的相关链接。敬请不要复制或改篇为自己的食谱。谢谢!

Method:

1. Add all ingredients to the inner pot of the rice cooker. 

Delicious one-pot pork jerky rice cooked using Song Cho IH rice cooker. 


2. Select <RICE> <STANDARD> .


3. When the cooking has completed, garnish with spring onion, serve warm. 

若喜欢我的食谱,可以LIKE和追随我的面书专页,不要错过最新食谱发布。
If you like my recipe, click hereLIKE & follow Miki's Food Archives Facebook page or follow us on Instagram: mfa_dingoozatfood  to receive more recipe updates. Don't forget to change the setting to 'SEE FIRST' if you wish to see my post on your Facebook news feed. 

Enjoy!

By readers... Some feedback from those who have tried this recipe:

By Liwei Chua


Sunday, 30 January 2022

Cute Tiger Pumpkin Steamed Buns 超萌小老虎造型南瓜馒头


Usher in the year of Tiger with some cute and yummy tiger theme pumpkin steamed buns. 
These steamed buns are soft and fluffy with a tad of sweetness. Made using my usual steamed bun recipe, added some fresh pumpkin in the dough to get the bright natural colour. 

My kid loves this so much that he can't bear to eat the tiger face! 😝

Cute tiger steamed bun with sliced luncheon meat for the kid.

My boy says it's too cute, he can't bear to eat the face >.<


Ingredients: 

65g Pumpkin Puree 南瓜泥 65克

10g Sugar 细砂糖 10克

1 tsp Oil 油 1小匙

150g Plain Flour/ Pao Flour 中筋面粉/包粉 150克

1/2 tsp Instant Dry Yeast 即溶酵母 1/2小匙

Some Milk 牛奶 适量


If you are sharing this recipe/ blog content, kindly attach the link to this blog instead of screen capture/ copy & paste/ use in your blog. No parts of the content of this blog may be reproduced without prior written permission. All rights reserved. Thank you. 如果您要分享此食谱/内容,请联系这个部落格的相关链接。敬请不要复制或改篇为自己的食谱。谢谢!


Method: 步骤

1. Combine dough ingredients, knead the dough until glossy and smooth.
将所有面团材料放进搅拌机搅拌成团至光滑。


2. Shape as desired, use picture above as reference. 
分割后造型, 可参考上图。

3. Let it proof doubled in size. Steam for 15 minutes. When it's done, turn off heat. Let it sit for 5 minutes before removing/ open the lid. 
做好后发酵至双倍大。蒸15分钟。 蒸好后熄火,待5分钟才把馒头拿出, 即可享用。若喜欢我的食谱,可以LIKE和追随我的面书专页,不要错过最新食谱发布。

If you like my recipe, click hereLIKE & follow Miki's Food Archives Facebook page or follow us on Instagram: mfa_dingoozatfood  to receive more recipe updates. Don't forget to change the setting to 'SEE FIRST' if you wish to see my post on your Facebook news feed. Enjoy!


Related Posts Plugin for WordPress, Blogger...