Click LIKE & follow us on Facebook for recipe updates

COOK WITH LOVE FOR A HAPPY HIM

Singapore home cooking/ baking/ food & recipe blog features more than 500 tried & tested, quick & easy kid friendly recipes with steps by steps tutorial.


Follow us on Instagram: mfa_dingoozatfood


If you're a company looking for possible collaboration, feel free to send me a message via Miki's Food Archives Facebook Fan Page or email to miki9mak@gmail.com


Search This Blog

Monday 30 November 2015

Air-fried Crispy Kale Chips 香脆羽衣甘蓝


These leafy greens are very high in antioxidants such as beta-carotene and vitamin C. Kale is packed with nutrients that benefit our health. 

Kale itself doesn't really taste good, it tastes a little bitter. So seasoning is a MUST when making these green chips. And, the most important part is to cook until crispy. Here's a video to show the texture of my air-fried kale chips. 


If you can achieve this texture, your kale chips are successful and it's gonna be super delicious. Otherwise, it would turn out bitter and chewy. If you have a picky eater that doesn't like vegetables, you can give this a try. This is something that my son would munch and munch without me reminding him to EAT THE GREENS ;)


羽衣甘蓝,营养价值高。这个菜本身的味道有点苦。但是经过调味后气炸得香脆,味道和口感就像海苔零食。大人小朋友都爱!


Ingredients: 材料


100g Kale (discard the stems) 羽衣甘蓝 100克

Seasoning: 调味料

1/2 tsp Pepper Salt 椒盐 半小匙


Some Olive Oil/ Cooking Oil 油 适量

Crispy kale chips served with Tortilla wrap for the kiddo's breakfast.
Photo updated: Dec 2023

If you are sharing this recipe, kindly attach the link to this blog instead of screen capture/ copy & paste/ use in your blog and claim as your recipe! Thank you.

如果您要分享此食谱,请联系这个部落格的相关链接。敬请不要复制或改篇为自己的食谱。谢谢!


Method: 步骤 

1. Place kale in the Ninja Foodi Cook & Crisp basket.
把羽衣甘蓝洗净,滴干/擦干水份,去除硬梗。把叶子放进气炸锅里。

About Ninja Foodi Multi-Cooker: The Ninja Foodi that I'm using is a combination of a pressure cooker and air fryer in one appliance, it's super-efficient and time-saving. Besides pressure cooking and air frying, there are other functions such as steam, slow cook, sear/ saute, bake/ roast, grill, dehydrate, sous vide, yoghurt, and keep warm. This cooker helps prepare quick meals without hassle, which I highly recommend to everyone who loves easy and hassle-free cooking with fewer pots and pans to wash.

Ninja Foodi is available in Singapore and Malaysia. If you're interested, you can use our exclusive discount code to buy at the best market rate. The discount is valid for orders from Singapore and Malaysia via Ninja Kitchen Website with 1-year warranty + home delivery (usually takes about 4 working days). I've attached the details and links below for easy reference.

SINGAPORE:
Ninja Foodi can be purchased from Ninja Kitchen Official Website. Cart out with Promo Code: MIKISNSG to get a 10% discount for any Ninja-Shark products via their website.

MALAYSIA:

Ninja Foodi can be purchased via Ninja Shark Official Website. Cart out with Promo Code: MFAOP300 to get the lowest price deal.


2. Drizzle some oil, add the rest of the seasoning ingredients.
加入少许油和调味料。


3. Gently toss with hands.
用手轻轻搅拌均匀。

4. Cook using Ninja Foodi AIRCRISP mode 160'C for 6-8 minutes or until crisp, serve right away. 
盖上,气炸6-8分钟或至香脆,即可享用。

<< Click HERE >> to view more Ninja Foodi recipes and cooking videos, including easy one-pot-meal, chicken curry, roast chicken, roast pork ribs, crispy chicken, porridge, fish recipes, bread, kid-friendly snacks, and many more...

若喜欢我的食谱,可以LIKE和追随我的面书专页,不要错过最新食谱发布。If you like my recipe, click hereLIKE & follow Miki's Food Archives Facebook page or follow us on Instagram: mfa_dingoozatfood  to receive more recipe updates. Don't forget to change the setting to 'SEE FIRST' if you wish to see my post on your Facebook news feed. 


Tuesday 24 November 2015

Nutella Filled Pancakes 煎松饼(Nutella馅)


If you are following my post on Facebook, you'll know my house is on a pancake craze lately. We had been eating pancakes for breakfast for weeks! Food that I had been cooking again and again, I'd make it in all kinds of flavours. The latest craze was Cinnamon Swirl Pancakes (click here for recipe), strawberry and Ribena pancakes. Perhaps that's the reason why my boy asking for the same food (yet not the same taste) again and again ;D 


This time I made something similar to Mr. Bean pancakes. Well, actually none of us like the Mr. Bean version. I only imitate the look, not the taste. My version was filled with Nutella, the top and bottom crust are crispy, with the runny Nutella oozing out! Yummlicious to the MAX! but I must warn you before you get started, this method need some skill and patience to achieve this result. Not recommended for a beginner home cook ;) 


**********************************


Here's the picture to show the method:


Click here to choose a basic pancake recipe. Happy cooking ;) 

Charcoal Baguette 碳粉法国面包


I don't expect a 'WOW' from the audience who saw this picture. But I can expect a 'WOW' from the taster who tasted this baguette! The look is deceiving, the taste is seriously delicious! Crispy crust with a soft and slightly chewy bread inside. My boy and I finished one loaf right after I snap this picture. We ate it plain without anything else! Simply delicious ;)


Ingredients: Yield 4 medium baguette


500g Baguette Flour 

1 tsp Salt

10g Castor Sugar

1.5 tsp Instant Yeast

370g Water (adjust accordingly)

2 tsp Charcoal Powder

3 tbsp Oil


If you are sharing this recipe, kindly attach the link to this blog instead of screen capture/ copy & paste/ use in your blog and claimed as your recipe! Thank you.

如果您要分享此食谱,请联系这个部落格的相关链接。敬请不要复制或改篇为自己的食谱。谢谢!


Method:

1. In a stand mixer, mix all dry ingredients except charcoal powder. (Kitchenaid speed 1)

2. Mix in water (Speed 1). Knead for 20 minutes (Speed 2). Stop the mixer, carefully add in charcoal powder, continue to knead for another 5 minutes. Gradually add in oil. Knead another 5 minutes until the dough is glossy and elastic. 

3. Cover with cling wrap. Let it proof for 60 minutes or doubled in size.

4. Transfer to a floured work top. The dough is very sticky, make sure to use generous amount of flour to handle the dough.

5. Divide dough into 4 portions. Shape as desired. I didn't slit the dough, I made it twisted instead. Place on a lined baking tray. I don't have baguette tray, so I used aluminium foil to divide the baguette. 

6. Cover with cling wrap. Let it proof for 30minutes. 

7. Bake in a preheated oven 200'C for 20 minutes.


Monday 23 November 2015

The Best Heat Cough Remedy - Pear & Honey Dates Sweet Soup 蜜枣雪梨水 - 清热除痰, 润燥止咳,适合身体燥热, 喉干口渴, 咳嗽时痰多/ 痰黄


Hmm... let me simplified the Chinese explanation on the title. This is the remedy for:

~ cough with thick and yellow phlegm


~ Dry Throat ( When I had sore throat, I feel better after drinking this soup. It soothe my throat.)


~ Reduce body heat


~ Prevent/ helps to soothe cough. 


However, do not drink this for 'cold cough'. This remedy only works for 'heat cough'. If you are not sure what cough you've got, visit a doctor ;)


Well, all the above are based on my personal experience. No scientific proof. I had been taking care of my boy since day 1 he was born, so I know what is good for him. Every individual is different, do your own judgement or consult a doctor if you have cough. 


When my boy was younger, he didn't like this drink. Probably it's the taste of the honey dates. But now he's growing up and understand that when he cough, he needs to drink this to stop the cough. He never reject this drink anymore. 

If you don't like honey date taste, click here for the recipe cooked without honey dates. 


Ingredients:

6 Honey Dates (or 8 honey dates if omit figs) 
六粒蜜枣(如果没放无花果,就用八粒)

3 US Figs 三粒无花果

3 - 4 Asian Pears 三至四粒雪梨(似乎大小,自己衡量)

Handful of Chinese Almond (Nan Bei Xing) 少许南北杏仁

1.5 Litre Water 热水


If you are sharing this recipe, kindly attach the link to this blog instead of screen capture/ copy & paste/ use in your blog and claimed as your recipe! Thank you. 

如果您要分享此食谱,请联系这个部落格的相关链接。敬请不要复制或改篇为自己的食谱。谢谢!


Method:

1. Add in all ingredients in a slow cooker. Cook with high heat for 4 hours. Serve warm or chilled.

把全部材料放进锅里,炖四个小时以上。即可!若喜欢我的食谱,可以LIKE和追随我的面书专页,不要错过最新食谱发布。


If you like my recipe, click herefollow my facebook page to receive more recipe updates. If you already LIKED my page but did not see my recipes on your Facebook News Feed, click here, go to my page:

~ select FOLLOWING (next to LIKED)

~ change the setting to SEE FIRST


Enjoy!


Thursday 19 November 2015

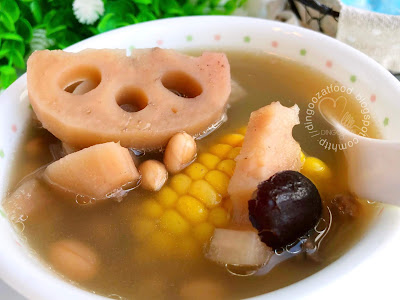
Lotus Root, Sweet Corn & Peanut Pork Ribs Soup 玉米花生莲藕汤-滋补,开胃清热,营养价值高


Nourishing and nutritious home-style soup use only simple ingredients. Kids love this soup for its natural sweetness. 


这是一道非常滋补,味道清甜,营养丰富的汤。莲藕具有排毒减肥、健脾开胃、调经止血的功效。玉米有助增强新陈代谢,美容养颜的功效。排骨和花生的营养丰富,具有滋阴壮阳,益精补血的功效。这些材料一起搭配,可以补充丰富的维生素和营养物质,调理气血,也可以有补血养颜,缓解疲劳的功效


Ingredients: (Yield 2-3 servings)
材料

300g Pork Ribs 排骨 300克

1 section/ 200g Lotus Roots (peeled and cut into chunks) 莲藕 200克,去皮,切厚片

1 Sweet Corn 玉米 1条,切段

40g Peanuts (soaked and drain) 花生 40克,浸泡,滤干

5 Seedless Red Dates 红枣 5粒

Some salt to taste 盐 适量

Note: Add 1pc of dried cuttlefish for greater flavour. 可以随意加一片鱿鱼干,味道会更浓郁。如果煮给幼童喝的,可免。


If you are sharing this recipe, kindly attach the link to this blog instead of screen capture/ copy & paste/ use in your blog and claimed as your recipe! Thank you.

如果您要分享此食谱,请联系这个部落格的相关链接。敬请不要复制或改篇为自己的食谱。谢谢!

Method:
步骤

1. Rinse the ribs with hot boiling water. Transfer to a pot. Add in the rest of the ingredients except salt.
将排骨用热水烫过。将所有材料(除了盐)放进锅里。


2. Add 2L hot water, bring to boil. Cook with high heat for 30 minutes. Reduce heat and simmer for 60 minutes.
加入两公升热水,大火煮滚。中大火煮30分钟,转小火煮60分钟。

3. Add salt to taste, cook another 30 minutes. Serve warm.
加少许盐调味。继续以小火煮30分钟即可。若喜欢我的食谱,可以LIKE和追随我的面书专页,不要错过最新食谱发布。


If you like my recipe, click hereLIKE & follow Miki's Food Archives Facebook page to receive more recipe updates. Don't forget to change the setting to 'SEE FIRST' if you wish to see my post on your Facebook news feed. Enjoy!

Friday 13 November 2015

Cinnamon Butter Sugar Swirl Pancakes 肉桂糖卷松饼


Pancake with cinnamon butter sugar swirl. Crisp on the outside, soft and sweet on the inside. No syrup needed, these pancakes are easy to make and they tastes awesome! Simple pancake recipe great for holiday/ weekend breakfast. 

There are 2 ways to serve these delicious pancakes. 

Option 1: Serve the pancakes right away. Crisp, spongy and delicious.


Option 1, made without glaze.
Photo updated on 11 March 2017


Option 2: Make the glaze, drizzle over the pancakes. Serve it this way if you like sweet pancakes. ;)


Option 2, with glaze.
Cinnamon Swirl Pancakes with my son's favourite 'Eating Plant'. 

Don't ask me what is that, I got the idea from his drawing ;)
Created in November 2015.


I have many pancake recipes shared in this blog, if you like to have something different from your ordinary pancakes with maple syrup, this is the recipe that you MUST try! 


我有很多松饼食谱,这个配搭是最好吃的。外层有焦糖脆脆的口感,加上肉桂的香味,这松饼比一般配糖浆/蜂蜜的松饼特别,特别美味。

Ingredients: 

Pancake batter:

For pancake recipes, I have the healthiest, simplest or buttermilk options, you may choose from here. On a lazy weekend morning, I normally use the simplest method, click here for recipe. Alternatively, you can use pancake mix, just add on the cinnamon swirl. ;)


Cinnamon Swirl:

30g Unsalted Butter (softened)

35g Brown Sugar

1 tsp Ground Cinnamon


Glaze: Optional

4 tbsp Icing Sugar

15g Unsalted Butter (softened)

Some Hot Water


If you are sharing this recipe, kindly attach the link to this blog instead of screen capture/ copy & paste/ use in your blog and claimed as your recipe! Thank you.

如果您要分享此食谱,请联系这个部落格的相关链接。敬请不要复制或改篇为自己的食谱。谢谢!


Method:

1. Prepare the cinnamon filling - Mix together all cinnamon swirl ingredients in a bowl. Transfer to a piping bag, snip a small hole at the tip of the piping bag. 

2. Prepare and cook the pancakes as indicated. When the bubbles appeared on the pancake, add the filling. 


3. Start from the centre of the pancake, squeeze the filling in a swirl pattern. 


4. Let it cook for a minute or until the bottom is lightly brown, flip the pancake and continue to cook until both sides are nicely brown, caramelise and crisp.


5. Transfer the pancake to a serving plate. Wipe the pan with kitchen towel, repeat for the rest. Serve right away.

Optional: To repare the glaze - Mix icing sugar and butter in a bowl. Gradually add in hot water (little by little) until you get the desired consistency. Drizzle over the pancake and serve warm.


If you like my recipe, click hereLIKE & follow my facebook page to receive more recipe updates. Don't forget to change the setting to 'SEE FIRST' if you wish to see my post on your Facebook news feed. Enjoy!

Note:

Omit sugar in pancake batter, just add a pinch of salt.

Some feedback from those who have tried this recipe:

By Rosalind Ang

Related Posts Plugin for WordPress, Blogger...