Click LIKE & follow us on Facebook for recipe updates

COOK WITH LOVE FOR A HAPPY HIM

Singapore home cooking/ baking/ food & recipe blog features more than 500 tried & tested, quick & easy kid friendly recipes with steps by steps tutorial.


Follow us on Instagram: mfa_dingoozatfood


If you're a company looking for possible collaboration, feel free to send me a message via Miki's Food Archives Facebook Fan Page or email to miki9mak@gmail.com


Search This Blog

Friday 22 December 2023

Easy Baked Potato With Ham & Cheese 芝士火腿焗马铃薯


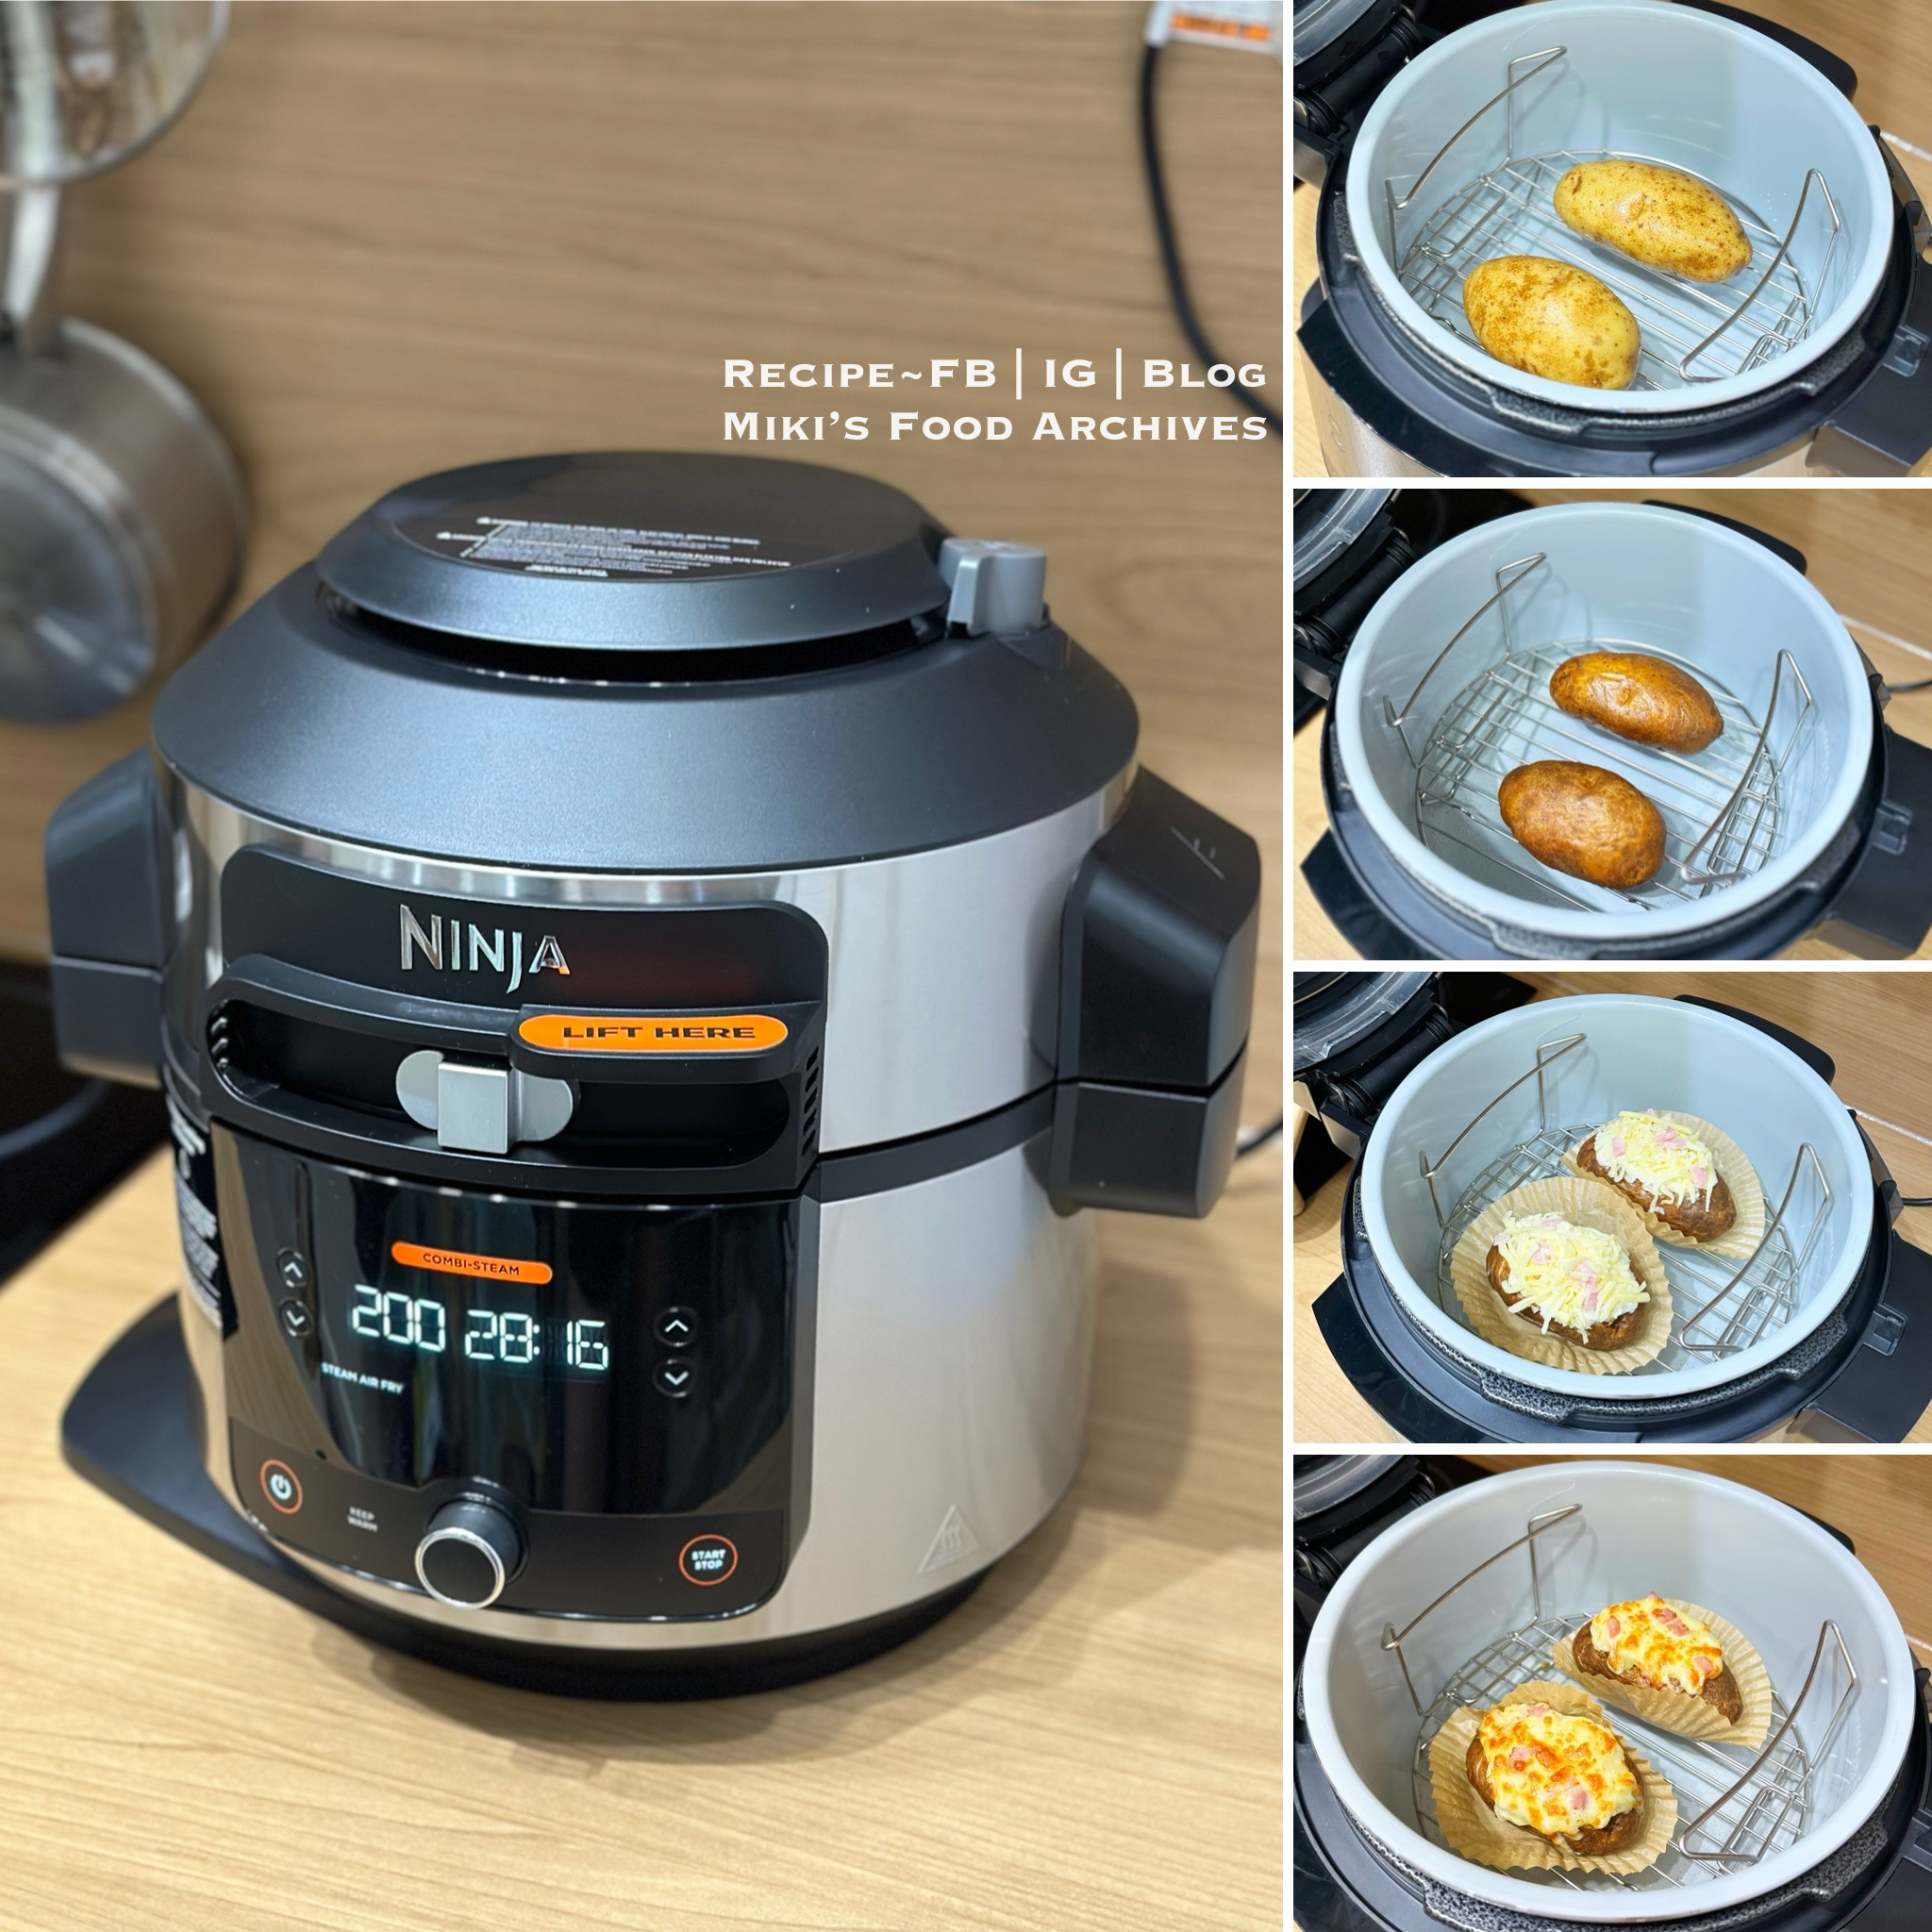
This ham and cheese baked potato is a great side dish served with your lunch and dinner or as a light meal on its own. While a baked potato made in an oven is undeniably good, a baked potato is even more scrumptious when it’s made in Ninja Foodi 11-in-1 SmartLid Multi-Cooker using the new innovative Combi Steam cooking function that crisps the skin of the potato to perfection while also creating moist, tender and fluffy insides, all ready in a fraction of the time (35 minutes in Ninja Foodi VS 2 hours in oven)


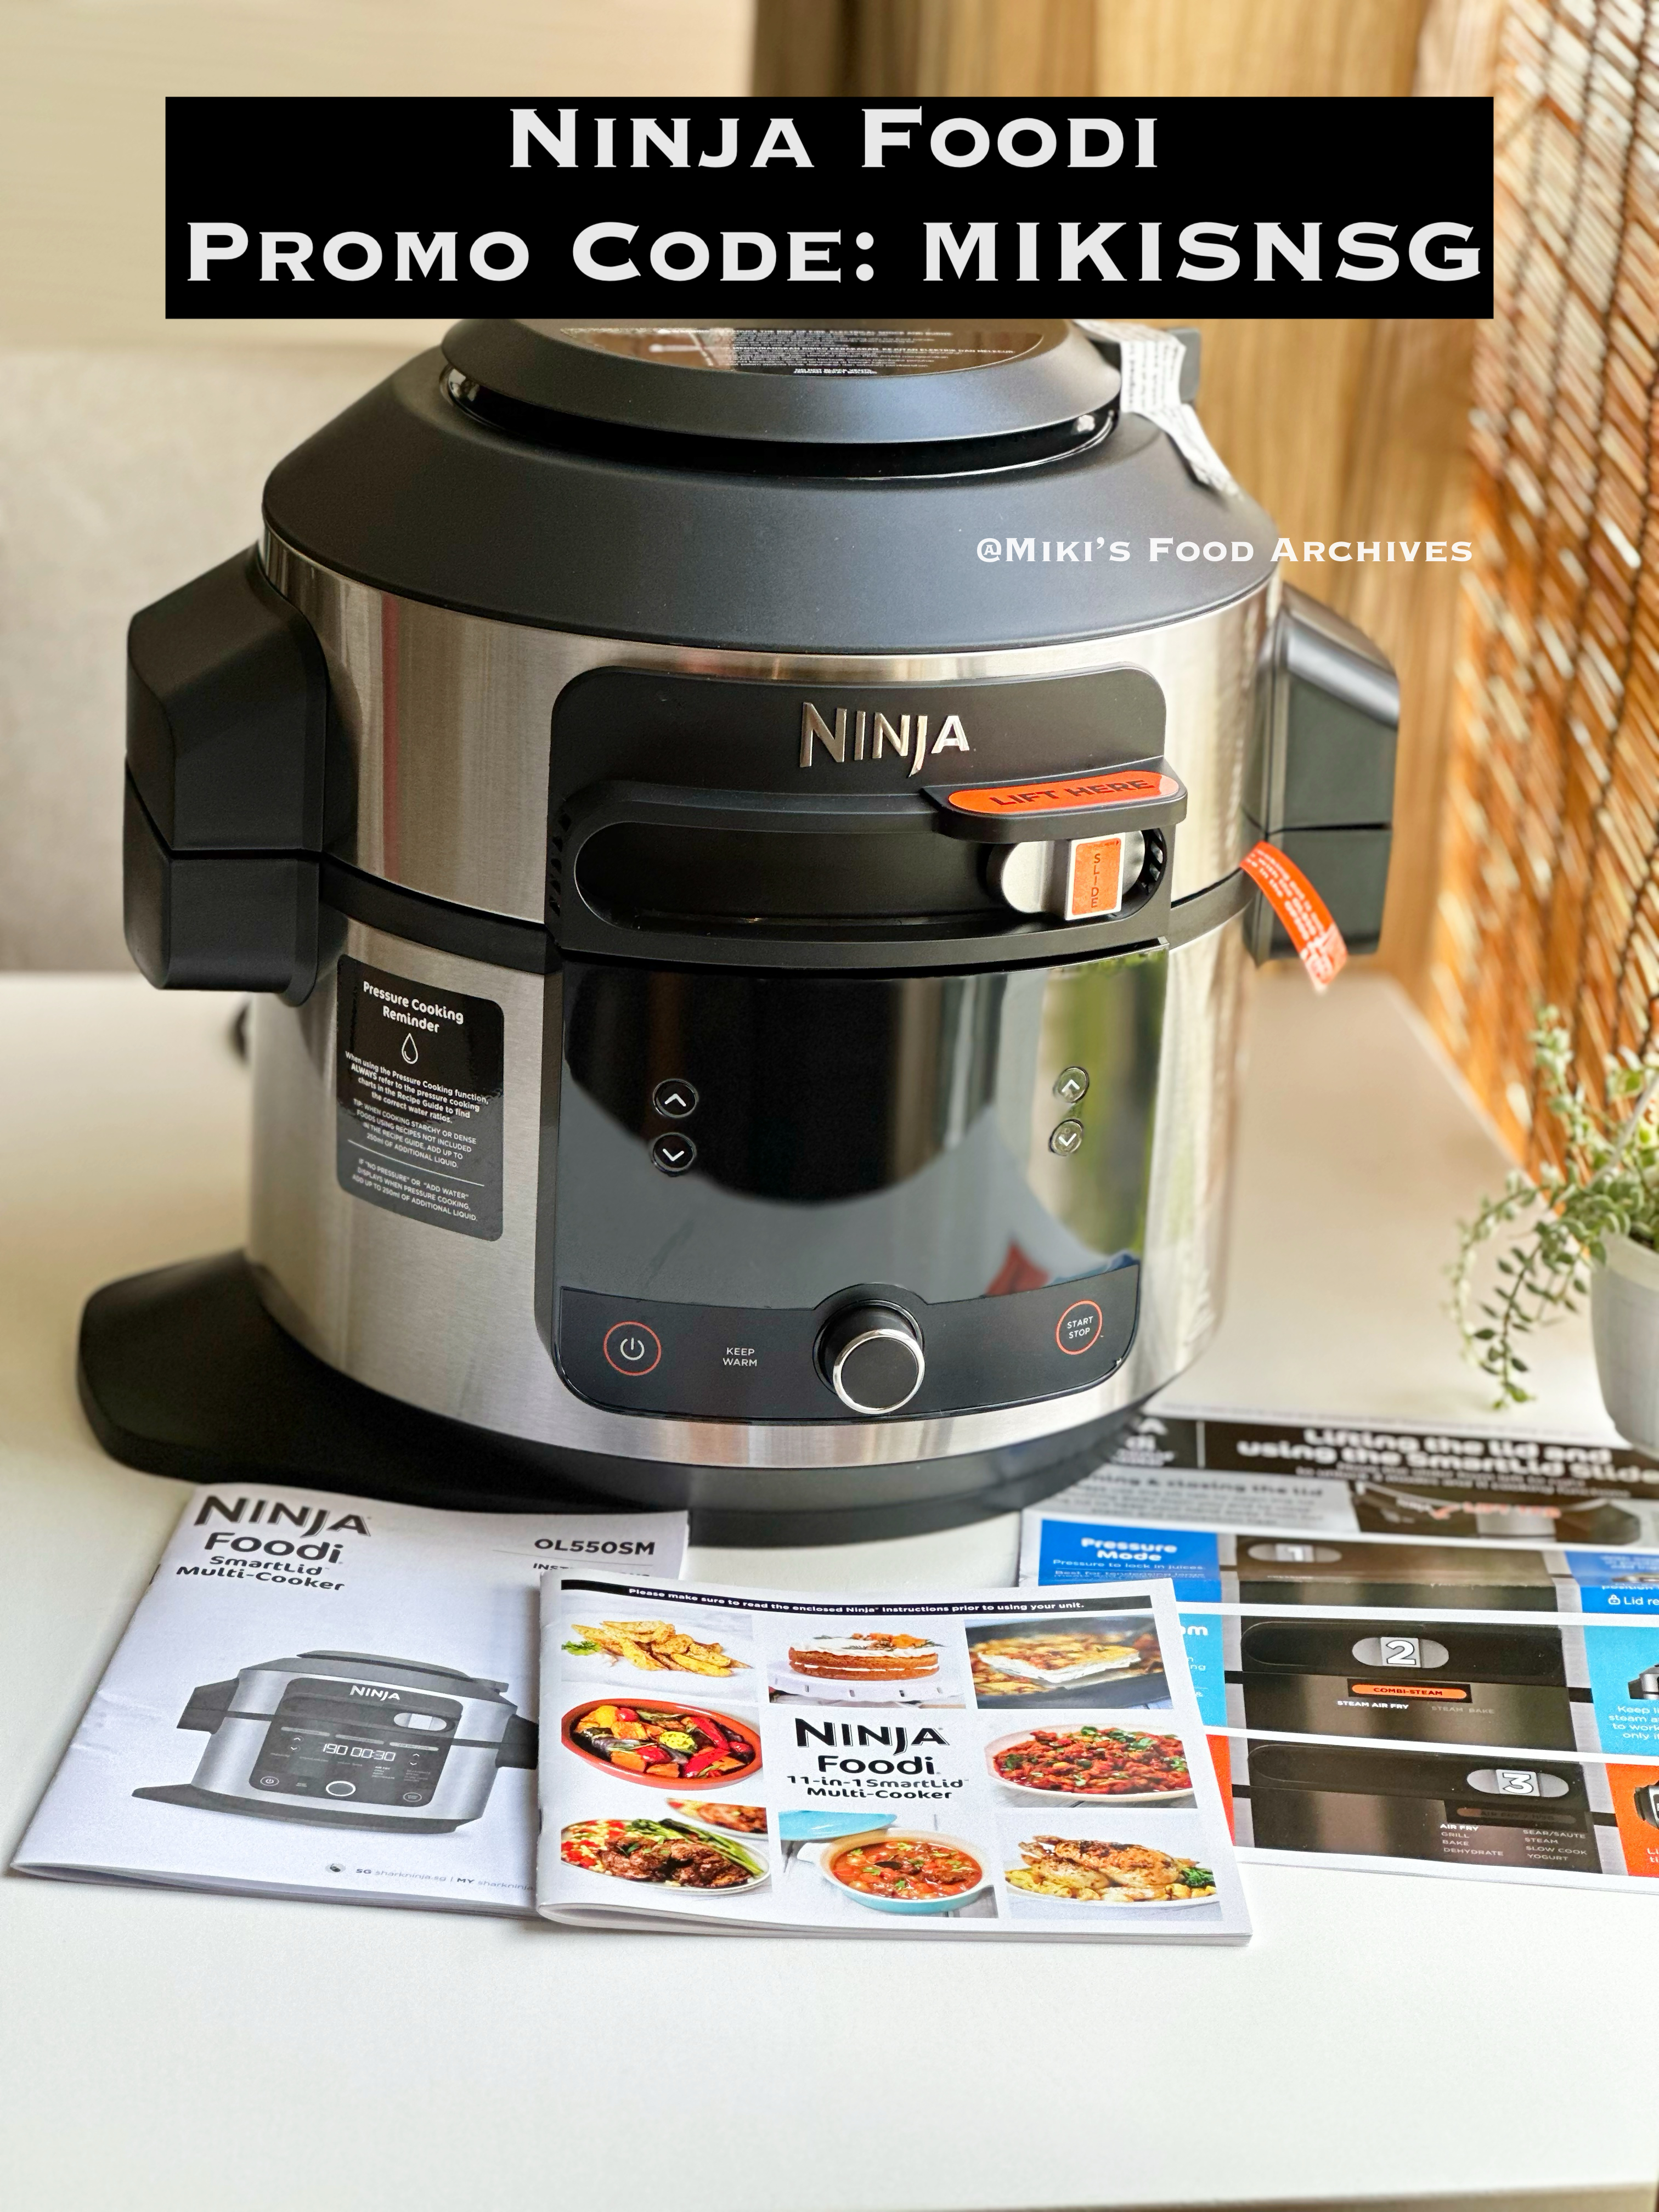
About Ninja Foodi 11-in-1 SmartLid Multi-Cooker: Featuring a remarkable 11-in-1 functionality that includes: Pressure Cook, Air Fry, Grill, Bake, Dehydrate, Sear/Sauté, Steam, Slow Cook, Yoghurt, and two new innovative Combi-Steam functions - Steam Air Fry and

Steam Bake. The multi-cooker incorporates a new SmartLid Technology that allows one to toggle easily between the different cooking functions at one go, all under a single cooker lid. 

Ninja Foodi 11-in-1 SmartLid Multi-Cooker OL550 
Cart out with Promo Code: 
MIKISNSG to get a 10% discount for this new arrival and any Ninja-Shark products via Ninja Kitchen Official Website


The new multicooker is set to equip one with the ability to cook an even greater variety of healthy and delectable dishes effortlessly, which is easy to use and helps save time by simplifying cooking routines. Furthermore, the pressure cooking and air frying in one pot is now under one SmartLid that you can start with Pressure mode and then slide to Air Fry mode without having to swap lids which saves on storage. If interested, you can use our exclusive discount code to buy at the best market rate. Cart out with Promo Code: MIKISNSG to get a 10% discount for this new arrival and any Ninja-Shark products via Ninja Kitchen Official Website

Ingredients: 
中文食谱:请在网页的右边点击Translate,然后选择中文翻译

2 Russet Potatoes - cleaned, rub with cooking oil and some salt if needed.

2 tbsp Cooking Cream


1/2 tbsp Mayonnaise 


2 tbsp Ham, plus more for toppings


Salt and pepper, add to taste


1-2 tbsp Shredded Cheese, plus more for toppings


If you are sharing this recipe/ blog content, kindly attach the link to this blog instead of screen capture/ copy & paste/ use in your blog. No parts of the content of this blog may be reproduced without prior written permission. All rights reserved. Thank you. 
如果您要分享此食谱/内容,请联系这个部落格的相关链接。敬请不要复制或改篇为自己的食谱。谢谢!

Method: 

1. Steam Air Fry the potatoes 200'C for 30 minutes using the Ninja Foodi 11-in-1 SmartLid Multi-Cooker. The Combi-Steam modes combine steam and convection to produce juicy,
speedy and crispy results. 
Ninja Foodi 11-in-1 SmartLid Multi-Cooker OL550 comes with Steam Air Fry, Steam Bake, Air Fry, Bake/Roast, Grill, Pressure Cook, Steam, Slow Cook, Dehydrate, Sear/Sauté, Yoghurt and Keep Warm functions. 
Cart out with Promo Code: 
MIKISNSG to get a 10% discount for this new arrival and any Ninja-Shark products via Ninja Kitchen Official Website


2. Remove the inner part of the potatoes, mash and mix with the remaining ingredients. Top each potato with more cheese and ham, bake in the Ninja Foodi 180'C for about 5 minutes. CLICK HERE to watch the cooking video.

<< Click HERE >> to view more Ninja Foodi recipes and cooking videos, including easy one-pot-meal, chicken curry, roast chicken, roast pork ribs, crispy chicken, porridge, fish recipes, bread, kid-friendly snacks, and many more...

若喜欢我的食谱,可以LIKE和追随我的面书专页,不要错过最新食谱发布。If you like my recipe, click hereLIKE & follow Miki's Food Archives Facebook page or follow us on Instagram: mfa_dingoozatfood  to receive more recipe updates. Remember to favourite my pages to see my recipe posts on your news feed. Enjoy!


Friday 8 December 2023

Egg, Bacon & Cheese Breakfast Pocket 鸡蛋培根芝士口袋饼


This delicious tortilla pocket is stuffed with bacon, gooey melted cheese and egg. It's quick and easy to make, you can throw anything you fancy inside...


Turned the breakfast pocket into an adorable Rudolph the Red-Nosed Reindeer
for Christmas Day!
Photo updated 25 Dec 2023

Ingredients: 1 serving

中文食谱:请在网页的右边点击Translate,然后选择中文翻译


1pc Tortilla Wrap

2pcs Bacon, pan-fried

1 Large Egg, season with some salt & pepper, and pan-fried.

1pc Cheese 

Sauce: Ketchup & Dijonnaise/ Dijon Mustard 


If you are sharing this recipe/ blog content, kindly attach the link to this blog instead of screen capture/ copy & paste/ use in your blog. No parts of the content of this blog may be reproduced without prior written permission. All rights reserved. Thank you. 如果您要分享此食谱/内容,请联系这个部落格的相关链接。敬请不要复制或改篇为自己的食谱。谢谢!

Method:

1. Place the cheese on the tortilla wrap, put the warm egg on top, add some sauce and top with bacon. Wrap it up as shown in the pictures below.


2. Lightly pan-fry the tortilla pocket until crispy and serve warm. 若喜欢我的食谱,可以LIKE和追随我的面书专页,不要错过最新食谱发布。
If you like my recipe, click hereLIKE & follow Miki's Food Archives Facebook page or follow us on Instagram: mfa_dingoozatfood  to receive more recipe updates. Remember to favourite my pages if you wish to see my posts on your news feed. 

Enjoy!

Tuesday 5 December 2023

Rice Cooker Minced Pork & Potatoes Rice 马铃薯肉碎焖饭【电饭锅食谱】


A hearty minced pork and potato rice you can easily make in your rice cooker. Simply load all the ingredients in the rice pot and let the rice cooker do all the cooking. 


Ingredients: 2-3 servings
中文食谱:请在网页的右边点击Translate, 然后选择中文翻译

200g Japanese Rice (soak 30mins)

250g Water

2 Potatoes 

1 stalk Spring Onion for garnishing 

150g Minced Pork

Marinade:

1 tbsp Light Soy Sauce 

1 tsp Sesame Oil 

1 tsp Tapioca Flour

A dash of White Pepper 

Seasonings:

1 tbsp Light Soy Sauce

1 tbsp Fish Sauce

1/2 tbsp Dark Soy Sauce 

1 tbsp Mirin/ Rice Wine


If you are sharing this recipe/ blog content, kindly attach the link to this blog instead of screen capture/ copy & paste/ use in your blog. No parts of the content of this blog may be reproduced without prior written permission. All rights reserved. Thank you. 如果您要分享此食谱/内容,请联系这个部落格的相关链接。敬请不要复制或改篇为自己的食谱。谢谢!

Method:

1. Combine the pork and marinade ingredients, let marinate for 15 minutes. Peel and cut the potatoes into wedges.


2. Place all ingredients into the inner pot of the rice cooker. Cover with double lids set <RICE> mode. I'm using Song Cho Claypot Rice Cooker.


3. When the cooking has completed, garnish with chopped spring onion and serve warm.
若喜欢我的食谱,可以LIKE和追随我的面书专页,不要错过最新食谱发布。
If you like my recipe, click hereLIKE & follow Miki's Food Archives Facebook page or follow us on Instagram: mfa_dingoozatfood  to receive more recipe updates. Remember to favourite my pages if you wish to see my posts on your news feed. 

Enjoy!

Tuesday 21 November 2023

Ondeh-Ondeh Muffins 椰香班兰椰糖馅麦芬


This is a super easy recipe that is doable even for beginner bakers. Inspired by the local traditional Ondeh Ondeh kueh, this is an East-meets-West kind of Pandan flavour muffin filled with fragrant coconut palm sugar and a sprinkling of desiccated coconut on top. 

Pandan paste is added to the muffin batter to resemble the same flavour and colour as the traditional treat. Added Gula Melaka cube to the muffin giving it moisture and elevating the taste. It has an earthy aroma and deep caramel flavour that pair well with the Pandan muffins.


These muffins were baked by my 14-year-old son while he was practising for his FCE-EOY exams. This would be his last FCE project, no more culinary lessons at school as he will be in science stream next year. Hopefully, he will still cook and bake at home:) 

This was one of the ondeh-ondeh muffins he baked at school during FCE exam.
He brought it back home and had it for breakfast the next day!
 

Ingredients:
中文食谱:请在网页的右边点击Translate,然后选择中文翻译

100g Self Raising Flour 


50g Castor Sugar 


50ml Milk


1 Egg


3 tbsp Melted Butter 


1/4 tsp Pandan Paste


1/4 tsp Salt


4pcs Gula Melaka Cubes 


Handful of Desiccated Coconut 


If you are sharing this recipe/ blog content, kindly attach the link to this blog instead of screen capture/ copy & paste/ use in your blog. No parts of the content of this blog may be reproduced without prior written permission. All rights reserved. Thank you. 如果您要分享此食谱/内容,请联系这个部落格的相关链接。敬请不要复制或改篇为自己的食谱。谢谢

Method:

1. Mix milk, egg, sugar, melted butter and pandan paste.

2. Sift flour and salt in another bowl. Combine both mixtures, do not overmix the batter.


3. Line the muffin tray with muffin cases. Fill a quarter of each case with the batter, add a piece of Gula Melaka cube and fill each case evenly with the remaining batter. Sprinkle some desiccated coconut on top. Bake in a preheated oven 180'C for 15 minutes or until cooked through. 若喜欢我的食谱,可以LIKE和追随我的面书专页,不要错过最新食谱发布。
If you like my recipe, click hereLIKE & follow Miki's Food Archives Facebook page or follow us on Instagram: mfa_dingoozatfood  to receive more recipe updates. Remember to favourite my pages if you wish to see my posts on your news feed. 

Enjoy!

Friday 17 November 2023

Basic Plain Bagel Recipe 原味贝果【基本直接法面团】


This easy bagel recipe yields soft, chewy and delicious bagels every time, you can simply make them in your own kitchen with a few basic ingredients and baking tools.  


Made luncheon meat and egg sandwich using homemade bagel.
Reheated the bagel for 3 minutes to crisp-up the exterior, simple yet delicious!


Ingredients:

中文食谱:请在网页的右边点击Translate,然后选择中文翻译


Dough:


200g Bread Flour 


50g Cake Flour


1/2tsp Instant Yeast


1/4 tsp Salt 


20g Sugar


165g Cold Milk


12g Butter


Syrup:


1 litre Water


30g Sugar


If you are sharing this recipe/ blog content, kindly attach the link to this blog instead of screen capture/ copy & paste/ use in your blog. No parts of the content of this blog may be reproduced without prior written permission. All rights reserved. Thank you. 如果您要分享此食谱/内容,请联系这个部落格的相关链接。敬请不要复制或改篇为自己的食谱。谢谢!


Method:


1. Mix all dough ingredients (except butter) and knead till smooth. Add in butter and continue kneading till the dough is elastic and smooth. Set aside to rise to double about an hour.


2. Divide the dough into 4 equal portions (about 110g) and shape them round, rest for 20 minutes then shape (refer to the pictures below) - roll out the dough - roll it up like a Swiss roll - flatten one of the ends - join the ends to form a circle. 


3. Let the bagels rest for 30 minutes. Bring water and sugar to a boil then lower the heat. Gently boil the bagel one by one, 30 seconds on each side. Remove the bagel with a slotted spoon. Bake at 220C for about 10 minutes or until golden brown. 


Note: Boiling the bagels before baking gives them a crave-worthy chewy texture, do not skip this step.


若喜欢我的食谱,可以LIKE和追随我的面书专页,不要错过最新食谱发布。If you like my recipe, click hereLIKE & follow Miki's Food Archives Facebook page or follow us on Instagram: mfa_dingoozatfood  to receive more recipe updates. Remember to favourite my pages if you wish to see my posts on your news feed. 

By readers: some feedback from those who have tried this recipe

Feedback from cicie99


Tuesday 7 November 2023

Birthday Pancakes | Rose Syrup Pancakes 粉色松饼【玫瑰糖酱口味】


Today we celebrate me 🎉 Never happier than having these lovely pink pancakes made by my son early in the morning and unboxing my new bb! Go to my Instagram to see what I've got for my birthday present! <<Click HERE to view>>


He made his favourite pancakes for me using the simplest pancake recipe that I taught him when he was 5yo (如果我没记错). That's what kids do most of the time... they think you'll like what they liked! LOL... Thank you son, you've made my day! 


About the pancakes: Bandung flavour pancakes made with 1 part self raising flour + 1 egg + 1 part milk and rose syrup. Click the link below if you'd like to try out the recipe:

If you are sharing this recipe/ blog content, kindly attach the link to this blog instead of screen capture/ copy & paste/ use in your blog. No parts of the content of this blog may be reproduced without prior written permission. All rights reserved. Thank you. 如果您要分享此食谱/内容,请联系这个部落格的相关链接。敬请不要复制或改篇为自己的食谱。谢谢!

These are my 5 delightful birthday cakes😍

Thanks for reading, I hope you are inspired after reading my blog. If you love to see my food, click hereLIKE & follow Miki's Food Archives Facebook page or follow us on Instagram: mfa_dingoozatfood  to receive more recipe updates. Remember to favourite my pages if you wish to see my post on your news feed. 


Saturday 4 November 2023

Bubble Waffle aka Egg Waffle With Meat Floss & Cheese 芝士肉松鸡蛋仔【章鱼烧烤盘版】

Bubble Waffle aka Egg Waffle "Gai Daan Jai" 鸡蛋仔 is a popular street food in Hong Kong made in a special honeycomb mould. My son and I love this delicious snack very much and I've always wanted to try making it at home. I don't have a proper mould at home, however I've tried making this couple of times using my Takoyaki hotplate. Unlike traditional egg waffles, I used pancake mix for the batter and added sweet and savoury fillings for our quick breakfast. 


Sharing here is the meat floss and cheese version that we both loved! Not 100% taste like egg waffles but they're really easy to make and they looks cute and fun for breakfast or snacks. 


Ingredients:

中文食谱:请在网页的右边点击Translate,然后选择中文翻译


1 large Egg (70g with shell)


12g Castor Sugar


200g Milk


150g Pancake Mix


15g Salted Butter (melted)


Optional Toppings:


Handful of meat floss, seaweed, toasted sesame seeds, Tempura scraps/ Tenkasu, cheese


If you are sharing this recipe/ blog content, kindly attach the link to this blog instead of screen capture/ copy & paste/ use in your blog. No parts of the content of this blog may be reproduced without prior written permission. All rights reserved. Thank you. 如果您要分享此食谱/内容,请联系这个部落格的相关链接。敬请不要复制或改篇为自己的食谱。谢谢!


Method:


1. Whisk together all 5-ingredients. Preheat the Takoyaki hotplate (low-heat) and brush a thin layer of oil.


2. Pour all the batter to the hotplate, cover and let it cook until the top is almost set. 


3. Add toppings and layer the cheese on top. When it's cooked through, cut and fold as shown in the picture above. Serve right away while it's crisp on the outside and fluffy inside! Leftover can be kept frozen, reheat before serving. 


若喜欢我的食谱,可以LIKE和追随我的面书专页,不要错过最新食谱发布。If you like my recipe, click hereLIKE & follow Miki's Food Archives Facebook page or follow us on Instagram: mfa_dingoozatfood  to receive more recipe updates. Remember to favourite my pages if you wish to see my posts on your news feed. Enjoy!
Related Posts Plugin for WordPress, Blogger...