Click LIKE & follow us on Facebook for recipe updates

COOK WITH LOVE FOR A HAPPY HIM

Singapore home cooking/ baking/ food & recipe blog features more than 500 tried & tested, quick & easy kid friendly recipes with steps by steps tutorial.


Follow us on Instagram: mfa_dingoozatfood


If you're a company looking for possible collaboration, feel free to send me a message via Miki's Food Archives Facebook Fan Page or email to miki9mak@gmail.com


Search This Blog

Showing posts with label Tried & Tested By Readers 读者试过都说好. Show all posts

Friday, 17 November 2023

Basic Plain Bagel Recipe 原味贝果【基本直接法面团】


This easy bagel recipe yields soft, chewy and delicious bagels every time, you can simply make them in your own kitchen with a few basic ingredients and baking tools.  


Made luncheon meat and egg sandwich using homemade bagel.
Reheated the bagel for 3 minutes to crisp-up the exterior, simple yet delicious!

Made Cheeseburger Bagel for breakfast using homemade bagel. Click here for homemade meat patty recipe. Photo updated: October 2024


Ingredients:

中文食谱:请在网页的右边点击Translate,然后选择中文翻译


Dough:


200g Bread Flour 


50g Cake Flour


1/2tsp Instant Yeast


1/4 tsp Salt 


20g Sugar


165g Cold Milk


12g Butter


Syrup:


1 litre Water


30g Sugar


If you are sharing this recipe/ blog content, kindly attach the link to this blog instead of screen capture/ copy & paste/ use in your blog. No parts of the content of this blog may be reproduced without prior written permission. All rights reserved. Thank you. 如果您要分享此食谱/内容,请联系这个部落格的相关链接。敬请不要复制或改篇为自己的食谱。谢谢!


Method:


1. Mix all dough ingredients (except butter) and knead till smooth. Add in butter and continue kneading till the dough is elastic and smooth. Set aside to rise to double about an hour.


2. Divide the dough into 4 equal portions (about 110g) and shape them round, rest for 20 minutes then shape (refer to the pictures below) - roll out the dough - roll it up like a Swiss roll - flatten one of the ends - join the ends to form a circle. 


3. Let the bagels rest for 30 minutes. Bring water and sugar to a boil then lower the heat. Gently boil the bagel one by one, 30 seconds on each side. Remove the bagel with a slotted spoon. Bake at 220C for about 10 minutes or until golden brown. 


Note: Boiling the bagels before baking gives them a crave-worthy chewy texture, do not skip this step.


若喜欢我的食谱,可以LIKE和追随我的面书专页,不要错过最新食谱发布。If you like my recipe, click hereLIKE & follow Miki's Food Archives Facebook page or follow us on Instagram: mfa_dingoozatfood  to receive more recipe updates. Remember to favourite my pages if you wish to see my posts on your news feed. 

By readers: some feedback from those who have tried this recipe

Feedback from cicie99


Thursday, 5 October 2023

Miso Pork Stew With Potatoes & Carrot 味噌马铃薯萝卜焖炒肉片


This is a simple yet very delicious pork stew loaded with tender pork and vegetables. It's packed with umami-rich sauce and perfect over steamed rice. 


My son loves miso-anything! This Miso pork stew with vegetables is of his most-loved dishes that I cook at least once a week. 


Panda Bento for the kiddo, packed with his favourite Miso Minced Pork Stew, veggies and egg. A simpler way to make cute lunchbox without the need to shape rice ball. 

Ingredients: 
中文食谱:请在网页的右边点击Translate,然后选择中文翻译

250g Shabu-shabu/ Sliced Pork Collar

1 tbsp Garlic

1 Onion

1-2 Potato

1 Carrot

Some water & oil for cooking 

Marinade:

1 tsp Tapioca Flour 

1 tsp Sesame Oil

1 tbsp Light Soy Sauce

1/8 tsp White Pepper

1 tbsp Sake

Sauce:

1 tbsp Miso Paste

50g Mirin

1 tbsp Light Soy Sauce


If you are sharing this recipe/ blog content, kindly attach the link to this blog instead of screen capture/ copy & paste/ use in your blog. No parts of the content of this blog may be reproduced without prior written permission. All rights reserved. Thank you. 
如果您要分享此食谱/内容,请联系这个部落格的相关链接。敬请不要复制或改篇为自己的食谱。谢谢!

Method: 

1. Combine pork and the marinade, let marinate for 30 minutes. Heat some oil in the cooking pot, stir-fry the garlic and onion till aromatic. I'm using Ninja Foodi pot <SEAR/ SAUTE> functions. 
About Ninja Foodi Multi-Cooker: The Ninja Foodi that I'm using is a combination of a pressure cooker and air fryer in one appliance that comes with other functions such as steam, slow cook, sear/ saute, bake/ roast, grill, dehydrate, sous vide, yoghurt, and keep warm. This cooker helps prepare quick meals without hassle, which I highly recommend to everyone who loves easy and hassle-free cooking with fewer pots and pans to wash. If interested, you can use our exclusive discount code to buy at the best market rate. I've attached the details and links below for easy reference.
SINGAPORE:
Ninja Foodi can be purchased from Ninja Kitchen Official Website. Cart out with Promo Code: MIKISNSG to get a 10% discount for any Ninja-Shark products.
MALAYSIA:

Ninja Foodi can be purchased via Ninja Shark Official Website. Cart out with Promo Code: MFAOP300 to get the lowest price deal.

2. Stir-fry the pork followed by the potatoes, add a few dashes of black pepper while stir-frying. 


3. Add carrot, stir in sauce and some water. Cover and pressure cook for 3-5 minutes (NPR) or simmer until the potatoes are tender. Adjust the cooking time according to the thickness/ size of the ingredients. Serve warm with steamed rice.

Note: If you're using shabu-shabu pork, just simmer till all the ingredients are cooked through. Use pressure cook function if you're using sliced pork which is thicker/ tougher and takes longer time to tenderise. Use the reversible rack if you're cooking it together with rice. Adjust the taste with more/ less light soy sauce.

<< Click HERE >> to view more Ninja Foodi recipes and cooking videos, including easy one-pot-meal, chicken curry, roast chicken, roast pork ribs, crispy chicken, porridge, fish recipes, bread, kid-friendly snacks, and many more...

若喜欢我的食谱,可以LIKE和追随我的面书专页,不要错过最新食谱发布。If you like my recipe, click hereLIKE & follow Miki's Food Archives Facebook page or follow us on Instagram: mfa_dingoozatfood  to receive more recipe updates. Remember to favourite my pages if you wish to see my recipe posts on your news feed. Enjoy!

By readers: some feedback from those who have tried this recipe
By theagakcook

By Chen Siew Lei


Tuesday, 3 October 2023

Lemongrass & Taucu Bean Sauce Braised Chicken 香茅豆酱焖鸡


A very flavourful and delicious lemongrass bean sauce braised chicken, filled with the aroma of lemongrass, Taucu bean sauce and Gula Melaka. This dish goes very well with steamed rice.

Ingredients:
中文食谱:请在网页的右边点击Translate,然后选择中文翻译

400g Bone-in Chicken 


2pcs Lemongrass


5 cloves Garlic, minced


1 Red Chili 


2 Potato 


1 tbsp Bean Sauce/ Taucu


25g Gula Melaka/ Coconut Palm Sugar


1/2 tsp Dark Soy Sauce 


1 tbsp Light Soy Sauce 


Some water and oil for cooking 


Marinade:


1/2 tbsp Corn Flour


1 tbsp Light Soy Sauce


1/2 tbsp Sesame Oil


If you are sharing this recipe/ blog content, kindly attach the link to this blog instead of screen capture/ copy & paste/ use in your blog. No parts of the content of this blog may be reproduced without prior written permission. All rights reserved. Thank you. 
如果您要分享此食谱/内容,请联系这个部落格的相关链接。敬请不要复制或改篇为自己的食谱。谢谢!


Method:

1. 
Marinate the chicken for 15 minutes. Heat some oil in a wok, fry the garlic and lemongrass until aromatic, add chicken, bean sauce, Gula Melaka and stir fry for a minute. 

I cooked this dish using Song Cho stainless steel wok, a multi-ply stainless steel wok without chemical coating, it's safe to use in any cooking. 
For more information about the product, visit Song Cho e-shop for details.

2. Stir in dark soy sauce and light soy sauce. Add water to cover the ingredients, bring to a boil then lower the heat and simmer until the chicken and potatoes are cooked through. Add red chilli, garnish with spring onion (optional) and serve warm with steamed rice.

若喜欢我的食谱,可以LIKE和追随我的面书专页,不要错过最新食谱发布。
If you like my recipe, click hereLIKE & follow Miki's Food Archives Facebook page or follow us on Instagram: mfa_dingoozatfood  to receive more recipe updates. Remember to favourite my pages if you wish to see my recipe posts on your news feed. 

Enjoy!

By readers: some feedback from those who have tried this recipe

By Bee Lay


Monday, 10 April 2023

Old-school Curry Potato Bun 古早味咖喱马铃薯软面包


This is one of my childhood favourite bread and now this has become my son's favourite. These soft and fluffy bread are stuffed with flavourful and aromatic curry filling, it's non-spicy and thus kid-friendly. A simple yet delicious treat for breakfast or snacks.


If you'd like to try making it at home, tap the link below for recipes.


Click here for Curry Potato Recipe << Easy Chicken Potato Dry Curry Recipe 鸡肉马铃薯咖喱馅食谱 >> 点击进入

If you are sharing this blog content, kindly attach the link to this blog instead of screen capture/ copy & paste/ use in your blog. No parts of the content of this blog may be reproduced without prior written permission. All rights reserved. Thank you. 如果您要分享此内容,请联系这个部落格的相关链接。敬请不要复制或改篇为自己的食谱。谢谢!

Thanks for reading, I hope you are inspired after reading my blog. If you love to see my food, click hereLIKE & follow Miki's Food Archives Facebook page or follow us on Instagram: mfa_dingoozatfood  to receive more recipe updates. Don't forget to favourite my pages if you wish to see my post on your news feed. 

Enjoy!

By readers: Some feedback from those who have tried this recipe

By Cheryl Ho


Sunday, 26 March 2023

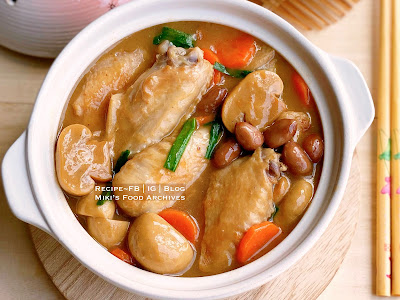
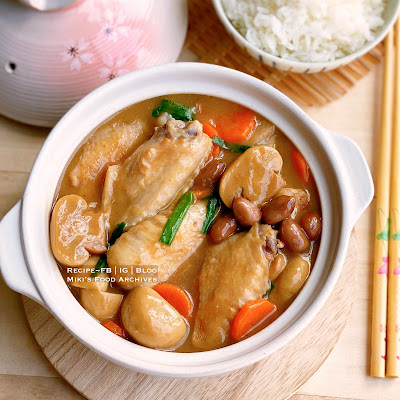
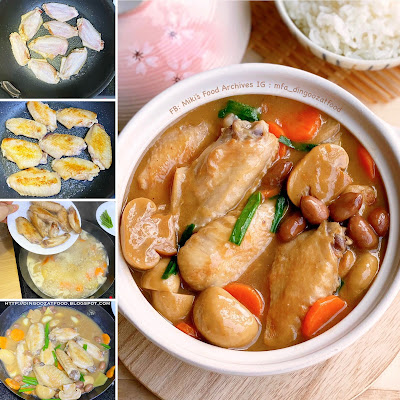
Braised Chicken Wings With Mushrooms & Peanuts 蘑菇花生焖鸡翼


A hearty, warm and comforting meal-in-one packed with juicy chicken wings and veggies in flavourful gravy well-seasoned with a rich taste.

Ingredients:
中文食谱:请在网页的右边点击Translate,然后选择中文翻译

8 Chicken Mid-Wings


1 thumb-size Ginger, sliced


4 cloves Garlic


1 tbsp Rice wine 


4pcs Canned Mushrooms, cut half 


1 can Chicken Broth 


1/8 tsp White Pepper 


1/2 Carrot, sliced


1 can Braised Peanut 


1 tbsp Corn flour + 2 tbsp water


1 stalk Spring Onion 


Marinade:


1 tsp Corn Flour


1 tsp Sesame Oil


1 tsp Light Soy Sauce


1 tsp Oyster Sauce


Dash of White Pepper


If you are sharing this recipe/ blog content, kindly attach the link to this blog instead of screen capture/ copy & paste/ use in your blog. No parts of the content of this blog may be reproduced without prior written permission. All rights reserved. Thank you. 如果您要分享此食谱/内容,请联系这个部落格的相关链接。敬请不要复制或改篇为自己的食谱。谢谢!

Method:


1. Combine chicken wings and marinade ingredients, let marinate for 1 hour. 


2. Heat some oil, sear chicken wings on both sides, set aside. Stir-fry ginger and garlic until fragrant, add in mushrooms, stir fry for a minute. 


3. Add in rice wine, chicken broth, and carrot, bring to a boil. Add chicken wings, season with white pepper, simmer for 5 minutes, add braised peanut and stir in corn starch. Garnish with spring onion and serve warm with steamed rice.

Note: I'm using flavoured chicken broth in this recipe, if you're using unflavored broth, add some salt to taste.

若喜欢我的食谱,可以LIKE和追随我的面书专页,不要错过最新食谱发布。If you like my recipe, click hereLIKE & follow Miki's Food Archives Facebook page or follow us on Instagram: mfa_dingoozatfood  to receive more recipe updates. Don't forget to favourite my pages if you wish to see my post on your news feed. 


By readers: some feedback from those who have tried this recipe


By Winnie Lai


Monday, 6 March 2023

Mushroom & Chestnut Sesame Oil Rice 香菇栗子麻油饭


This fragrant mushroom and chestnut sesame oil rice is nutrient-packed, tasty and easy to prepare. It's a vegan-friendly one-pot meal conveniently cooked in a rice cooker.

Ingredients:
中文食谱:请在网页的右边点击Translate, 然后选择中文翻译

1 tbsp Sesame Oil + 1 tbsp Cooking Oil

1 thumb-size Ginger

6pcs Dried Shiitake Mushrooms, soaked and reserved the water

1 pkt Shimeji Mushroom 

100g Roasted Chestnuts 

1 cup Rice

1 & 1/4 cup Water/ the reserved mushrooms water

2 tbsp Oyster Sauce

1 tbsp Mirin/ Rice Wine

1 tbsp Light Soy Sauce 

1/2 tsp Dark Soy Sauce 

Optional: some spring onion and red chilli for garnishing


If you are sharing this recipe/ blog content, kindly attach the link to this blog instead of screen capture/ copy & paste/ use in your blog. No parts of the content of this blog may be reproduced without prior written permission. All rights reserved. Thank you. 如果您要分享此食谱/内容,请联系这个部落格的相关链接。敬请不要复制或改篇为自己的食谱。谢谢!

Method:

1. Heat the cooking oil and sesame oil, fry the ginger until aromatic, stir fry mushrooms, season with a pinch of salt and pepper. 

I'm using Song Cho IH rice cooker
Click here for product details

2. Add all ingredients to the rice cooker pot. Select <RICE> <STANDARD>.


3. When the cooking has completed, garnish with spring onion and chilli, if using. Serve warm.

Optional: Drizzle 1 tsp sesame oil for extra flavour!

若喜欢我的食谱,可以LIKE和追随我的面书专页,不要错过最新食谱发布。
If you like my recipe, click hereLIKE & follow Miki's Food Archives Facebook page or follow us on Instagram: mfa_dingoozatfood  to receive more recipe updates. Don't forget to change the setting to 'SEE FIRST' if you wish to see my post on your Facebook news feed. 

Enjoy!

By readers: some feedback from those who have tried this recipe:

By Linda Bee


Related Posts Plugin for WordPress, Blogger...