Click LIKE & follow us on Facebook for recipe updates

COOK WITH LOVE FOR A HAPPY HIM

Singapore home cooking/ baking/ food & recipe blog features more than 500 tried & tested, quick & easy kid friendly recipes with steps by steps tutorial.


Follow us on Instagram: mfa_dingoozatfood


If you're a company looking for possible collaboration, feel free to send me a message via Miki's Food Archives Facebook Fan Page or email to miki9mak@gmail.com


Search This Blog

Showing posts with label Egg White Recipes. Show all posts

Friday, 30 June 2023

Meringue Cookies aka Meringue Kisses 法式马林糖|蛋白糖霜【轻盈香甜、入口即化】


These beautiful meringue kisses are light and crisp with just the right hint of sweetness that'll melt in your mouth the moment you pop them in. Made with a few simple ingredients, this recipe is versatile, you can add any flavour or colour as you desired. Have fun baking!

Strawberry Flavour Meringue Kisses

Ingredients: 
中文食谱:请在网页的右边点击Translate,然后选择中文翻译

60g/ 2 Large Egg White

1/4 tsp Lemon Juice/ Cream of Tartar

70g Castor Sugar

10g Corn Flour


If you are sharing this recipe/ blog content, kindly attach the link to this blog instead of screen capture/ copy & paste/ use in your blog. No parts of the content of this blog may be reproduced without prior written permission. All rights reserved. Thank you. 如果您要分享此食谱/内容,请联系这个部落格的相关链接。敬请不要复制或改篇为自己的食谱。谢谢!

Method: 步骤

1. In a mixing bowl, beat the egg white until foamy, add lemon juice/ cream of tartar then continue beating and gradually add sugar. 


2. When the mixture reach stiff peak, add corn flour and whisk to mix well. Mix in flavoring/ colouring, if using. 


3. Transfer the meringue mixture into a piping bag with a fitted nozzle and pipe on a lined baking tray. Bake in a preheated oven 100'C for 30 minutes or until crisp, the baking time depending on the size of the meringue cookies. Leave them to cool in the oven and store in an air-tight container so they will stay crisp for a long time. 若喜欢我的食谱,可以LIKE和追随我的面书专页,不要错过最新食谱发布。

If you like my recipe, click hereLIKE & follow Miki's Food Archives Facebook page or follow us on Instagram: mfa_dingoozatfood  to receive more recipe updates. Don't forget to favourite my pages if you wish to see my post on your news feed. Enjoy!

Friday, 18 November 2022

Coconut Egg White Pudding 椰汁鲜奶炖蛋白


If you're looking for a healthy, yummy and low in calories dessert, here's a simple recipe for you. This smooth and silky coconut egg white pudding is easy to make by combining coconut water and milk with egg white and then steam, chill it and enjoy!

Ingredients: 
中文食谱:请在网页的右边点击Translate,然后选择中文翻译

115g Coconut Water

75g Milk

75g Egg White

1-2 tbsp Sugar, add to taste


If you are sharing this recipe/ blog content, kindly attach the link to this blog instead of screen capture/ copy & paste/ use in your blog. No parts of the content of this blog may be reproduced without prior written permission. All rights reserved. Thank you. 如果您要分享此食谱/内容,请联系这个部落格的相关链接。敬请不要复制或改篇为自己的食谱。谢谢!


Method: 步骤

1. Heat coconut water and sugar until dissolved, let it cool.

2. Combine all ingredients and pour through a sieve. 


3. Cover and steam for 20-30mins or until set. 
若喜欢我的食谱,可以LIKE和追随我的面书专页,不要错过最新食谱发布。If you like my recipe, click hereLIKE & follow Miki's Food Archives Facebook page or follow us on Instagram: mfa_dingoozatfood  to receive more recipe updates. Don't forget to "FAVOURITE" the pages if you wish to see my post on news feed. 

Wednesday, 20 October 2021

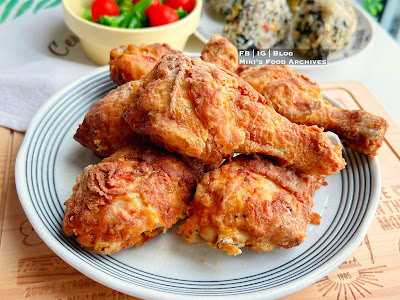
Homemade KFC | Air Fried Crispy Chicken 香料炸鸡【免油炸】


Homemade KFC... not Kentucky Fried Chicken, this is my Kid's Favourite Chicken (KFC) :P

A simple version of crunchy fried chicken marinated with aromatic spices, cooked in the Ninja Foodi multi-cooker without deep-frying to achieve the crunchiness with minimal oil used. This air-fried version tastes as good as deep-fried, and the best of all, it's all done in one pot that makes cleaning a breeze. The Ninja Foodi deep pot could prevent oil/ residues splatter all over the crisping lid making it easy to maintain and clean. No oily food and greasy stove-top! 


The Ninja Foodi multi-cooker that I'm using is a combination of a pressure cooker and air fryer in one pot, it's super-efficient and time-saving. The heat distribution is even and it heats up real fast compared to my other air fryer. Besides pressure cook and air frying, there are other functions such as steam, slow cook, sear/ saute, bake/ roast, grill, and keep warm, just like a portable kitchen with a rice cooker, pressure cooker, air fryer, oven and stovetop functions, reasonable price, and highly versatile. 


Ingredients: 
中文食谱:请在网页的右边点击“Translate”,然后选择中文翻译

6 Chicken Drumstick 

1 Egg White

Crispy Flour (enough to coat the chicken drumstick)


Seasoning:

1/2 tsp Onion Powder

1 tbsp Curry Powder 

Some Rotisserie Seasoning + Garlic Salt, add to taste

1 tsp Corn Flour

Note: The drumsticks sizes may vary, do adjust the amount of flour and seasoning accordingly.

Homemade Air Fryer KFC - wannabe Crunchy Fried Chicken 


If you are sharing this recipe/ blog content, kindly attach the link to this blog instead of screen capture/ copy & paste/ use in your blog. No parts of the content of this blog may be reproduced without prior written permission. All rights reserved. Thank you. 如果您要分享此食谱/内容,请联系这个部落格的相关链接。敬请不要复制或改篇为自己的食谱。谢谢!

Method:

1. Combine chicken drumsticks and the seasoning ingredients, let marinate for at least 1 hour or overnight. 


2. Coat the chicken drumsticks with egg white and flour. Preheat Ninja Foodi AirCrisp mode 180'C 3mins. 

You can deep-fry the chicken but I'd suggest using the easier and tastier air-fry method. I'd highly recommend cooking this in the Ninja Foodi, much lesser oil used, the air-crisp chicken turned out so crunchy on the outside and juicy inside. If you're interested to purchase the Ninja Foodi, here's a special deal for our readers:

SINGAPORE:
Ninja Foodi can be purchased from Ninja Kitchen Official Website. Cart out with Promo Code: MIKISNSG to get a 10% discount for any Ninja-Shark products.

MALAYSIA:

Ninja Foodi can be purchased via Ninja Shark Official Website. Cart out with Promo Code: MFAOP300 to get the lowest price deal.


3. Spray/ brush some oil on the Cook & Crisp Basket, place chicken on the basket, spray/ brush some oil on the chicken, AirCrisp 180'C 15mins. Serve right away. 

若喜欢我的食谱,可以LIKE和追随我的面书专页,不要错过最新食谱发布。If you like my recipe, click hereLIKE & follow Miki's Food Archives Facebook page or follow us on Instagram: mfa_dingoozatfood  to receive more recipe updates. Don't forget to change the setting to 'SEE FIRST' if you wish to see my post on your Facebook news feed. 

<< Click HERE >> to view more Ninja Foodi recipes and cooking videos, including easy one-pot-meal, chicken curry, roast chicken, roast pork ribs, crispy chicken, porridge, fish recipes, bread, kid-friendly snacks, and many more...

By readers... Some feedback from those who have tried this recipe:

By S_leng16


By Kelly Kin


Tuesday, 6 July 2021

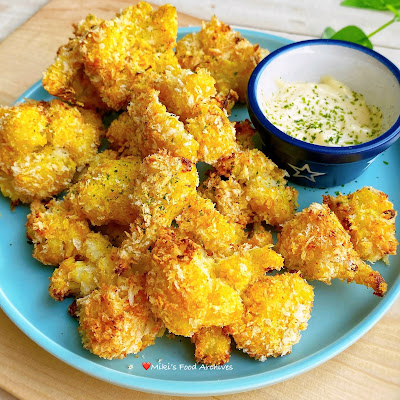
Air-Fried Crispy Breaded Cauliflower Bites 香脆花椰菜 【免油炸】


Cauliflower is my favourite veggie but the little one at home hates it. The only way to make him eat cauliflower is to transform this veggie into crispy bites that are flavourful and don't taste much like veggies. There are many methods for making crispy cauliflower, the method that I'm sharing in this blog post is simple and quick to make without deep-frying, it's healthier and incredibly delicious, even the most carnivorous meat-eating kids won't be able to resist these crispy, spiced cauliflower bites.


Here's the super-easy method - Pressure Cook and AirCrisp in the Ninja Foodi multi-cooker without deep-frying to achieve crispiness with minimal oil used. This air-fried version tastes as good as deep-fried, minus the oil and best of all, it's all done in one pot that makes cleaning a breeze. The Ninja Foodi deep pot could prevent oil/ residues splatter all over the crisping lid making it easy to maintain and clean. No oily food and greasy stove-top!


Ingredients:
中文食谱:请在网页的右边点击Translate,然后选择中文翻译

1 medium Cauliflower Head

1 Egg White

50g Bread Crumbs

Some Plain Flour


Seasonings:

1/4 tsp Turmeric Powder

1/4 tsp Garlic Powder

1/4 tsp Onion Powder

1/2 tsp Curry Powder

1/2 tsp Salt


If you are sharing this recipe/ blog content, kindly attach the link to this blog instead of screen capture/ copy & paste/ use in your blog. No parts of the content of this blog may be reproduced without prior written permission. All rights reserved. Thank you. 如果您要分享此食谱/内容,请联系这个部落格的相关链接。敬请不要复制或改篇为自己的食谱。谢谢!

Method:

1. Combine bread crumbs with seasonings, set aside. Add 1 cup water into the Ninja Foodi inner pot. Pressure Cook (Low) for 3 minutes, quick pressure release. 


Sprinkle some garlic salt on the cauliflowers if you like it more flavourful.

2. Coat the cauliflower with flour, egg white, and bread crumbs. Preheat Ninja Foodi AirCrisp mode 180'C 3mins. The Ninja Foodi that I'm using is a combination of a pressure cooker and air fryer in one appliance, it's super-efficient and time-saving. Besides pressure cooking and air frying, there are other functions such as steam, slow cook, sear/ saute, bake/ roast, grill, dehydrate, sous vide, yoghurt, and keep warm. I'd highly recommend cooking this in the Ninja Foodi, with much lesser oil used, the cauliflowers turned out so crispy on the outside and tender on the inside.  If you're interested to purchase the Ninja Foodi, here's a special deal for our readers:

SINGAPORE:
Ninja Foodi can be purchased from Ninja Kitchen Official Website. Cart out with Promo Code: MIKISNSG to get a 10% discount for any Ninja-Shark products.

MALAYSIA:

Ninja Foodi can be purchased via Ninja Shark Official Website. Cart out with Promo Code: MFAOP300 to get the lowest price deal.


3. Spray/ brush some oil on the Cook & Crisp Basket, place cauliflower on the basket, spray/ brush some oil on the cauliflower, AirCrisp 180'C 10mins, serve right away with your favourite dipping sauce. 

若喜欢我的食谱,可以LIKE和追随我的面书专页,不要错过最新食谱发布。If you like my recipe, click hereLIKE & follow Miki's Food Archives Facebook page or follow us on Instagram: mfa_dingoozatfood  to receive more recipe updates. Don't forget to change the setting to 'SEE FIRST' if you wish to see my post on your Facebook news feed. 

<< Click HERE >> to view more Ninja Foodi recipes and cooking videos, includes easy one-pot-meal, chicken curry, roast chicken, roast pork ribs, crispy chicken, porridge, fish recipes, bread, kid-friendly snacks, and many more...

Saturday, 3 July 2021

Air-Fried Taiwanese XXL Chicken Cutlet 台式炸鸡排 【免油炸】


Ever heard of the famous Taiwanese street food XXL fried chicken aka 豪大大鸡排? This Taiwanese Fried Chicken Cutlet comes in a huge flat piece of chicken with a crunchy coating seasoned with spices. It's actually pretty easy to make this at home by marinating the chicken meat, coat with flour, and deep-frying it till golden. 

When making it at home, I'd go for a simpler method cooked in the Ninja Foodi multi-cooker without deep-frying to achieve the crunchiness with minimal oil used. This air-fried version tastes as good as deep-fried, and best of all, it's all done in one pot that makes cleaning a breeze. The Ninja Foodi deep pot could prevent oil/ residues splatter all over the crisping lid making it easy to maintain and clean. No oily food and greasy stove-top! 


The Ninja Foodi multi-cooker that I'm using is a combination of a pressure cooker and air fryer in one pot, it's super-efficient and time-saving. The heat distribution is even and it heats up real fast compared to my other air fryer. Besides pressure cooking and air frying, there are other functions such as steam, slow cook, sear/ saute, bake/ roast, grill, and keep warm, just like a portable kitchen with a rice cooker, pressure cooker, air fryer, oven and stovetop functions, reasonable price, and highly versatile. 


Ingredients:
中文食谱:请在网页的右边点击Translate,然后选择中文翻译

1 Boneless Chicken Leg/ Chicken Breast (butterflied & flattened)

5 Soda Cream Cracker, crushed

1 Egg White

2 tbsp Plain Flour

Optional Seasoning: Pepper Salt, Five Spice Powder & Chili Powder


Marinade:

1 tbsp Corn Flour

1/4 tsp Onion Powder

1/2 tsp Garlic Salt

1/8 tsp Five Spice Powder

1/8 tsp White Pepper

1/2 tsp Sesame Oil


If you are sharing this recipe/ blog content, kindly attach the link to this blog instead of screen capture/ copy & paste/ use in your blog. No parts of the content of this blog may be reproduced without prior written permission. All rights reserved. Thank you. 如果您要分享此食谱/内容,请联系这个部落格的相关链接。敬请不要复制或改篇为自己的食谱。谢谢!

Method:

1. Coat the chicken meat with the marinade ingredients, let marinate for at least 1 hour or overnight. 


2. Coat the meat with flour, egg white, and soda cream cracker crumbs. Preheat Ninja Foodi AirCrisp mode 180'C 3mins. 

You can deep-fry the chicken cutlets but I'd suggest using the easier and tastier air-fry method. I'd highly recommend cooking this in the Ninja Foodi, much lesser oil used, and the chicken cutlets turned out so crispy on the outside and juicy inside. If you're interested to purchase the Ninja Foodi, here's a special deal for our readers:

SINGAPORE:
Ninja Foodi can be purchased from Ninja Kitchen Official Website. Cart out with Promo Code: MIKISNSG to get a 10% discount for any Ninja-Shark products.

MALAYSIA:

Ninja Foodi can be purchased via Ninja Shark Official Website. Cart out with Promo Code: MFAOP300 to get the lowest price deal.


3. Spray/ brush some oil on the Cook & Crisp Basket, place chicken cutlet on the basket, spray/ brush some oil on the chicken cutlet, AirCrisp 180'C 12mins. 


4. Cut it into smaller pieces, add seasoning (if using), serve right away. 

若喜欢我的食谱,可以LIKE和追随我的面书专页,不要错过最新食谱发布。If you like my recipe, click hereLIKE & follow Miki's Food Archives Facebook page or follow us on Instagram: mfa_dingoozatfood  to receive more recipe updates. Don't forget to change the setting to 'SEE FIRST' if you wish to see my post on your Facebook news feed. 

<< Click HERE >> to view more Ninja Foodi recipes and cooking videos, including easy one-pot-meal, chicken curry, roast chicken, roast pork ribs, crispy chicken, porridge, fish recipes, bread, kid-friendly snacks, and many more...

Friday, 1 February 2019

Homemade Crispy Florentine (without florentine powder) 杏仁瓜子脆片【无需麦芽粉】


Super addictive and nutritious Crispy Almond & Seeds Florentine made without florentine powder. Made with mainly egg whites, it's an ideal way to use up leftover egg whites after baking cookies. 


好好利用之前做饼干剩下的蛋白,不需要买一大包麦芽粉,做了非常酥脆,满满的杏仁,瓜子和葵花籽的香味,口感超棒,令人无法停止一片一片的放进嘴里,太满足,太好吃了。。强力推荐!

Ingredients:
材料

*200g Sliced Almond (toasted) 杏仁片 200克 (烤香)

*175g Melon Seeds (toasted) 瓜子 175克 (烤香)

*150g Organic Sunflower Seeds (toasted) 葵花籽 150克 (烤香)

*Can be replaced with other seeds or nuts of your preference. 

20g Organic Black Sesame Seeds 黑芝麻 20克

85g Unsalted Butter (melted) 牛油 85克 (融化)

200g Castor Sugar 细砂糖 200克
(Can be reduced to 180g if prefer less sweet 喜欢少甜的可以把糖的份量减少至180克)

1/4 tsp Salt 盐 1/4小匙

230g Egg White 蛋白 230克

70g Cake Flour 低筋面粉 70克


If you are sharing this recipe/ blog content, kindly attach the link to this blog instead of screen capture/ copy & paste/ use in your blog. No parts of the content of this blog may be reproduced without prior written permission. All rights reserved. Thank you. 如果您要分享此食谱/内容,请联系这个部落格的相关链接。敬请不要复制或改篇为自己的食谱。谢谢!


Method: 步骤

1. In a bowl, add in egg white, sugar, salt and butter, mix well. Stir in flour, pour through a sieve to remove lumps. Add in black sesame seeds.
将蛋白,糖,盐和牛油拌均,筛入面粉,拌均,过筛。加入黑芝麻。


2. Add in the remaining ingredients, mix well.
加入其余的材料,拌均。


3. Layer thinly on a lined baking tray. 
倒入铺了油纸的烤盘,铺平,越薄越好。


4. Bake in a preheated oven 150'C fan force for 25 minutes, rotate the tray in between.
放入已预热的烤箱,以150度,烘烤25分钟。


5. Remove the tray from the oven, cut it into small squares. Flip over, return to oven and bake for another 18-20 minutes until golden brown. Remove from oven and let it cool completely on the tray. 
取出,切片后翻面,继续烘烤大概18-20分钟至金黄色,即可。若喜欢我的食谱,可以LIKE和追随我的面书专页,不要错过最新食谱发布。
If you like my recipe, click hereLIKE & follow Miki's Food Archives Facebook page or follow us on Instagram: mfa_dingoozatfood  to receive more recipe updates. Don't forget to favourite my pages if you wish to see my posts on your news feed. 
Enjoy!

By readers, some feedback from those who have tried this recipe:

By hard.workingcow


By rensskitchen

By elise_homebaking


Related Posts Plugin for WordPress, Blogger...