Click LIKE & follow us on Facebook for recipe updates

COOK WITH LOVE FOR A HAPPY HIM

Singapore home cooking/ baking/ food & recipe blog features more than 500 tried & tested, quick & easy kid friendly recipes with steps by steps tutorial.


Follow us on Instagram: mfa_dingoozatfood


If you're a company looking for possible collaboration, feel free to send me a message via Miki's Food Archives Facebook Fan Page or email to miki9mak@gmail.com


Search This Blog

Monday, 27 February 2023

Salted Egg Yolk Crab Recipe 金沙咸蛋黄奶油螃蟹


Last December 2022, when we were back visiting our parents, my son went prawning with his cousins and “accidentally” caught 2 crabs. Brought back to my parent’s place, my sister and I cooked this for our family’s lunch. The buttery and savoury salted egg yolk sauce paired with the natural sweetness of the crab was so tasty. If you're a crab lover, this is definitely a dish that you will regret not trying!


鲜味十足的金沙咸蛋黄奶油螃蟹,甜咸适中、美味而不腻!

中文食谱:请在网页的右边点击Translate,然后选择中文翻译

Ingredients:

2 Crab, small-med size


Some Potato Starch 


1 Bird’s Eye Chili/ Chili Padi


1-2 sprig Curry Leaves


2 Salted Egg, steamed and mashed


20g Butter


1/2 tsp Curry Powder


1 heap tbsp Milk Powder


3 tbsp Milk


Pinch of salt and sugar, add to taste


Some oil for cooking 


If you are sharing this recipe/ blog content, kindly attach the link to this blog instead of screen capture/ copy & paste/ use in your blog. No parts of the content of this blog may be reproduced without prior written permission. All rights reserved. Thank you. 

如果您要分享此食谱/内容,请联系这个部落格的相关链接。敬请不要复制或改篇为自己的食谱。谢谢!


Method:

1.
Coat the crab with potato starch and deep-fry until almost cooked. Set aside. 


2. Heat butter and some oil, stir-fry the salted egg, chilli, curry powder and curry leaves until aromatic. Add the remaining ingredients and mix well. Add crab, toss to coat the crab with sauce, and serve right away. 

若喜欢我的食谱,可以LIKE和追随我的面书专页,不要错过最新食谱发布。
If you like my recipe, click hereLIKE & follow Miki's Food Archives Facebook page or follow us on Instagram: mfa_dingoozatfood  to receive more recipe updates. Remember to favourite my pages if you wish to see my post on your news feed. 

Enjoy!

Friday, 10 February 2023

Easy Herbal Chicken Soup 滋补养生鸡汤


This simple yet nourishing herbal chicken soup tastes so good and is full of flavour that it can be served with rice/ noodles or as a delicious meal by itself. It's quick and easy to cook, added a bottle of chicken essence at the end of cooking to level up the nutrition values.


Ingredients: 
中文食谱:请在网页的右边点击Translate,然后选择中文翻译


6 Chicken Drumstick


2 slices Ginger


2 cloves Garlic


1 stalk Coriander 


1 tbsp Rice Wine 


1/2 can Sea Asparagus, optional


5pcs Straw Mushrooms 


1 pc Dang Shen 党参


4-5pcs Yu Zhu 玉竹


1-2pcs Dang Gui 当归


1 tbsp Wolfberries


1 bottle of Chicken Essence


Some Salt to taste, if needed


Marinade:


1 tsp Corn Flour


1 tsp Sesame Oil


1 tsp Salt


If you are sharing this recipe/ blog content, kindly attach the link to this blog instead of screen capture/ copy & paste/ use in your blog. No parts of the content of this blog may be reproduced without prior written permission. All rights reserved. Thank you. 

如果您要分享此食谱/内容,请联系这个部落格的相关链接。敬请不要复制或改篇为自己的食谱。谢谢!


Method: 

1. Combine chicken and the marinade, let marinate for 1 hour. Heat some oil in the cooking pot, sear the chicken drumstick together with garlic, ginger and coriander root.

2. Add in rice wine and the remaining ingredients, except wolfberries and chicken essence.  Add some hot water (enough to cover the ingredients), bring to a boil. 


3. When the chicken is cooked through, add in wolfberries and season with salt if needed. Stir in chicken essence, garnish with coriander and serve warm.
若喜欢我的食谱,可以LIKE和追随我的面书专页,不要错过最新食谱发布。If you like my recipe, click hereLIKE & follow Miki's Food Archives Facebook page or follow us on Instagram: mfa_dingoozatfood  to receive more recipe updates. Don't forget to favourite my pages if you wish to see my post on your news feed. 


Monday, 6 February 2023

Trio Steamed Egg With Minced Meat 蒸三黄蛋|三色蒸水蛋


This silky smooth Chinese-style steamed three colours egg with minced meat brings comfort in every spoonful of flavour from the salted egg yolk and century egg bits. A homey dish that my mom used to cook for us and now this has become one of my son's favourites too! Preparation is quite easy and versatile, you can adjust the amount of meat, salted egg and century egg to your preferences. 

滑嫩细腻的三色蒸水蛋含有鸡蛋、咸蛋黄、皮蛋和少许肉碎,每一口都超满足!
中文食谱:请在网页的右边点击Translate,然后选择中文翻译

Ingredients:

3 Eggs

1 Century Egg

1 Salted Egg Yolk

1 tsp Mirin/ Rice Wine

1/2 tsp Salt 

1 heap tbsp Minced Pork
(marinate the meat with some tapioca flour, sesame oil, white pepper and light soy sauce)

Water: Egg ratio 5:3


If you are sharing this recipe/ blog content, kindly attach the link to this blog instead of screen capture/ copy & paste/ use in your blog. No parts of the content of this blog may be reproduced without prior written permission. All rights reserved. Thank you. 

如果您要分享此食谱/内容,请联系这个部落格的相关链接。敬请不要复制或改篇为自己的食谱。谢谢!


Method:

1. Cut the salted egg yolk and century egg into smaller pieces. Lightly mix with the minced meat and spread evenly on a steaming bowl/ container. 

2. Mix the remaining ingredients, pour the mixture through a strainer into the steaming bowl/ container, cover it with aluminium foil.  


I cooked this dish using Song Cho stainless steel wok, a multiply stainless steel wok without chemical coating, it's safe to use in any cooking. 
For more information about the product, visit Song Cho e-shop for details.

3. Fill some water in a wok and bring it to a boil, steam the egg for 15-20 minutes or until cooked through. Optional: Drizzle some fried shallot oil and light soy sauce, garnish with spring onion and serve warm with steamed rice.

若喜欢我的食谱,可以LIKE和追随我的面书专页,不要错过最新食谱发布。
If you like my recipe, click hereLIKE & follow Miki's Food Archives Facebook page or follow us on Instagram: mfa_dingoozatfood  to receive more recipe updates. Remember to favourite my pages if you wish to see my post on your news feed. 

Enjoy!

Sunday, 22 January 2023

Cute Bunny Rabbit Steamed Bun With Peanuts & Black Sesame Fillings 萌兔花生黑芝麻包子 【Easy Blender Recipe】


Happy Lunar New Year! May your year of the rabbit be full of happiness, good health and luck! 祝你兔年幸福安康!

These soft and fluffy steamed buns are filled with peanuts and black sesame paste, shaped into cute little bunnies to usher in the year of the rabbit in the Chinese Zodiac.

Watch the making of Bunny Steamed Bun video/ tutorial 萌兔包子制作视频:


Ingredients: 

90g Cold Milk 冷牛奶 

20g Sugar 细砂糖 

1 tsp Oil 花生油

150g Plain Flour/ Pau Flour 中筋面粉/包粉 


1/2 tsp Instant Dry Yeast 即溶酵母 


Peanuts & Black Sesame Fillings 黑芝麻馅:


40g Toasted Black Sesame Seeds 炒香黑芝麻 


40g Toasted Peanut 花生


85g Castor Sugar 细砂糖 


50g Salted Butter (or use ground nut oil/ lard with some salt, adjust the amount accordingly)  含盐牛油/花生油/ 猪油 


Bunny steamed buns for breakfast🐰💕 
Compared with the one I made at the end of rabbit year, they are happier getting off work😍  
认真工作了一整年,兔兔开开心心地准备下班咯!希望大家也一样愉悦地迈进甲辰龙年🐲
Photo updated: Jan 2024


If you are sharing this recipe/ blog content, kindly attach the link to this blog instead of screen capture/ copy & paste/ use in your blog. No parts of the content of this blog may be reproduced without prior written permission from Miki's Food Archives. All rights reserved. Thank you. 如果您要分享此食谱/内容,请联系这个部落格的相关链接。敬请不要复制或改篇为自己的食谱。谢谢!

Method: 步骤

1. Process the black sesame seeds and peanuts separately in a grinder, follow the steps in the video tutorial. Mix all filling ingredients to form a paste, add more oil if needed. 
黑芝麻和花生搅碎,与馅料食材混合。冷藏后揉成小球备用。


2. Chill the paste then divide and roll into small balls. 

3. Meanwhile, prepare the dough. Place the dough blade into the processor pitcher. Add in all the dough ingredients. Select the DOUGH function to knead the dough.
将其它材料放进搅拌机搅拌成团


I used the spice & coffee grinder to grind the black sesame seeds and finely chopped the peanuts


4. When the dough is ready, transfer the dough onto the floured tabletop, knead for a few minutes till smooth. Divide dough, roll into small balls. Roll out the dough, wrap in fillings and shape into bunny rabbit.
取出面团加少许面粉揉至光滑。分割,包入馅料后造型。


5. Let it proof for about 50 minutes or double in size. Steam for 15 minutes. When it's done, turn off the heat. Let it sit for 5 minutes before removing the lid. 
做好后发酵50分钟或双倍大。蒸15分钟。 蒸好后熄火,待5分钟才把包子拿出。待凉后即可享用。若喜欢我的食谱,可以LIKE和追随我的面书专页,不要错过最新食谱发布。If you like my recipe, click hereLIKE & follow Miki's Food Archives Facebook page or follow us on Instagram: mfa_dingoozatfood  to receive more recipe updates. Don't forget to favourite my pages if you wish to see my post on your news feed. 


Friday, 20 January 2023

Bunny Rabbit Coconut Jelly 萌兔椰奶果冻


These cute bunny rabbit jellies are delicately sweet and delicious, made with coconut cream infused with the fragrance of the Pandan leaves. It's the perfect dessert to mark the festivities and "wow" your family and friends during this year of the rabbit! 

Let's all HUAT 兔-gether! Wishing you happiness, success and good health… 兔来运转旺全年,万事如意迎新年。欢庆除夕共聚一堂㊗️大家平安喜乐、阖家幸福


Ingredients: 
中文食谱:请在网页的右边点击Translate,然后选择中文翻译

250g Konnyaku Premix Jelly Powder


200ml Coconut Cream/ Coconut Milk


1150ml Water


2-3pcs Pandan Leaves 


If you are sharing this recipe/ blog content, kindly attach the link to this blog instead of screen capture/ copy & paste/ use in your blog. No parts of the content of this blog may be reproduced without prior written permission. All rights reserved. Thank you. 如果您要分享此食谱/内容,请联系这个部落格的相关链接。敬请不要复制或改篇为自己的食谱。谢谢!

Method: 

1.
 Heat water and pandan leaves. Gradually stir in jelly powder and bring to a boil. Reduce the heat and stir in coconut cream. 


2. Turn off the heat and continue stirring for a minute. Scoop out a small portion and mix with rose syrup or pink food colouring. Fill the rabbit ears then chill to set. 

3. Fill the body of the rabbit with the remaining pandan coconut jelly liquid. Refrigerate until set, unmould and serve chilled.

若喜欢我的食谱,可以LIKE和追随我的面书专页,不要错过最新食谱发布。If you like my recipe, click hereLIKE & follow Miki's Food Archives Facebook page or follow us on Instagram: mfa_dingoozatfood  to receive more recipe updates. Don't forget to "FAVOURITE" the pages if you wish to see my post on the news feed. 

Wednesday, 4 January 2023

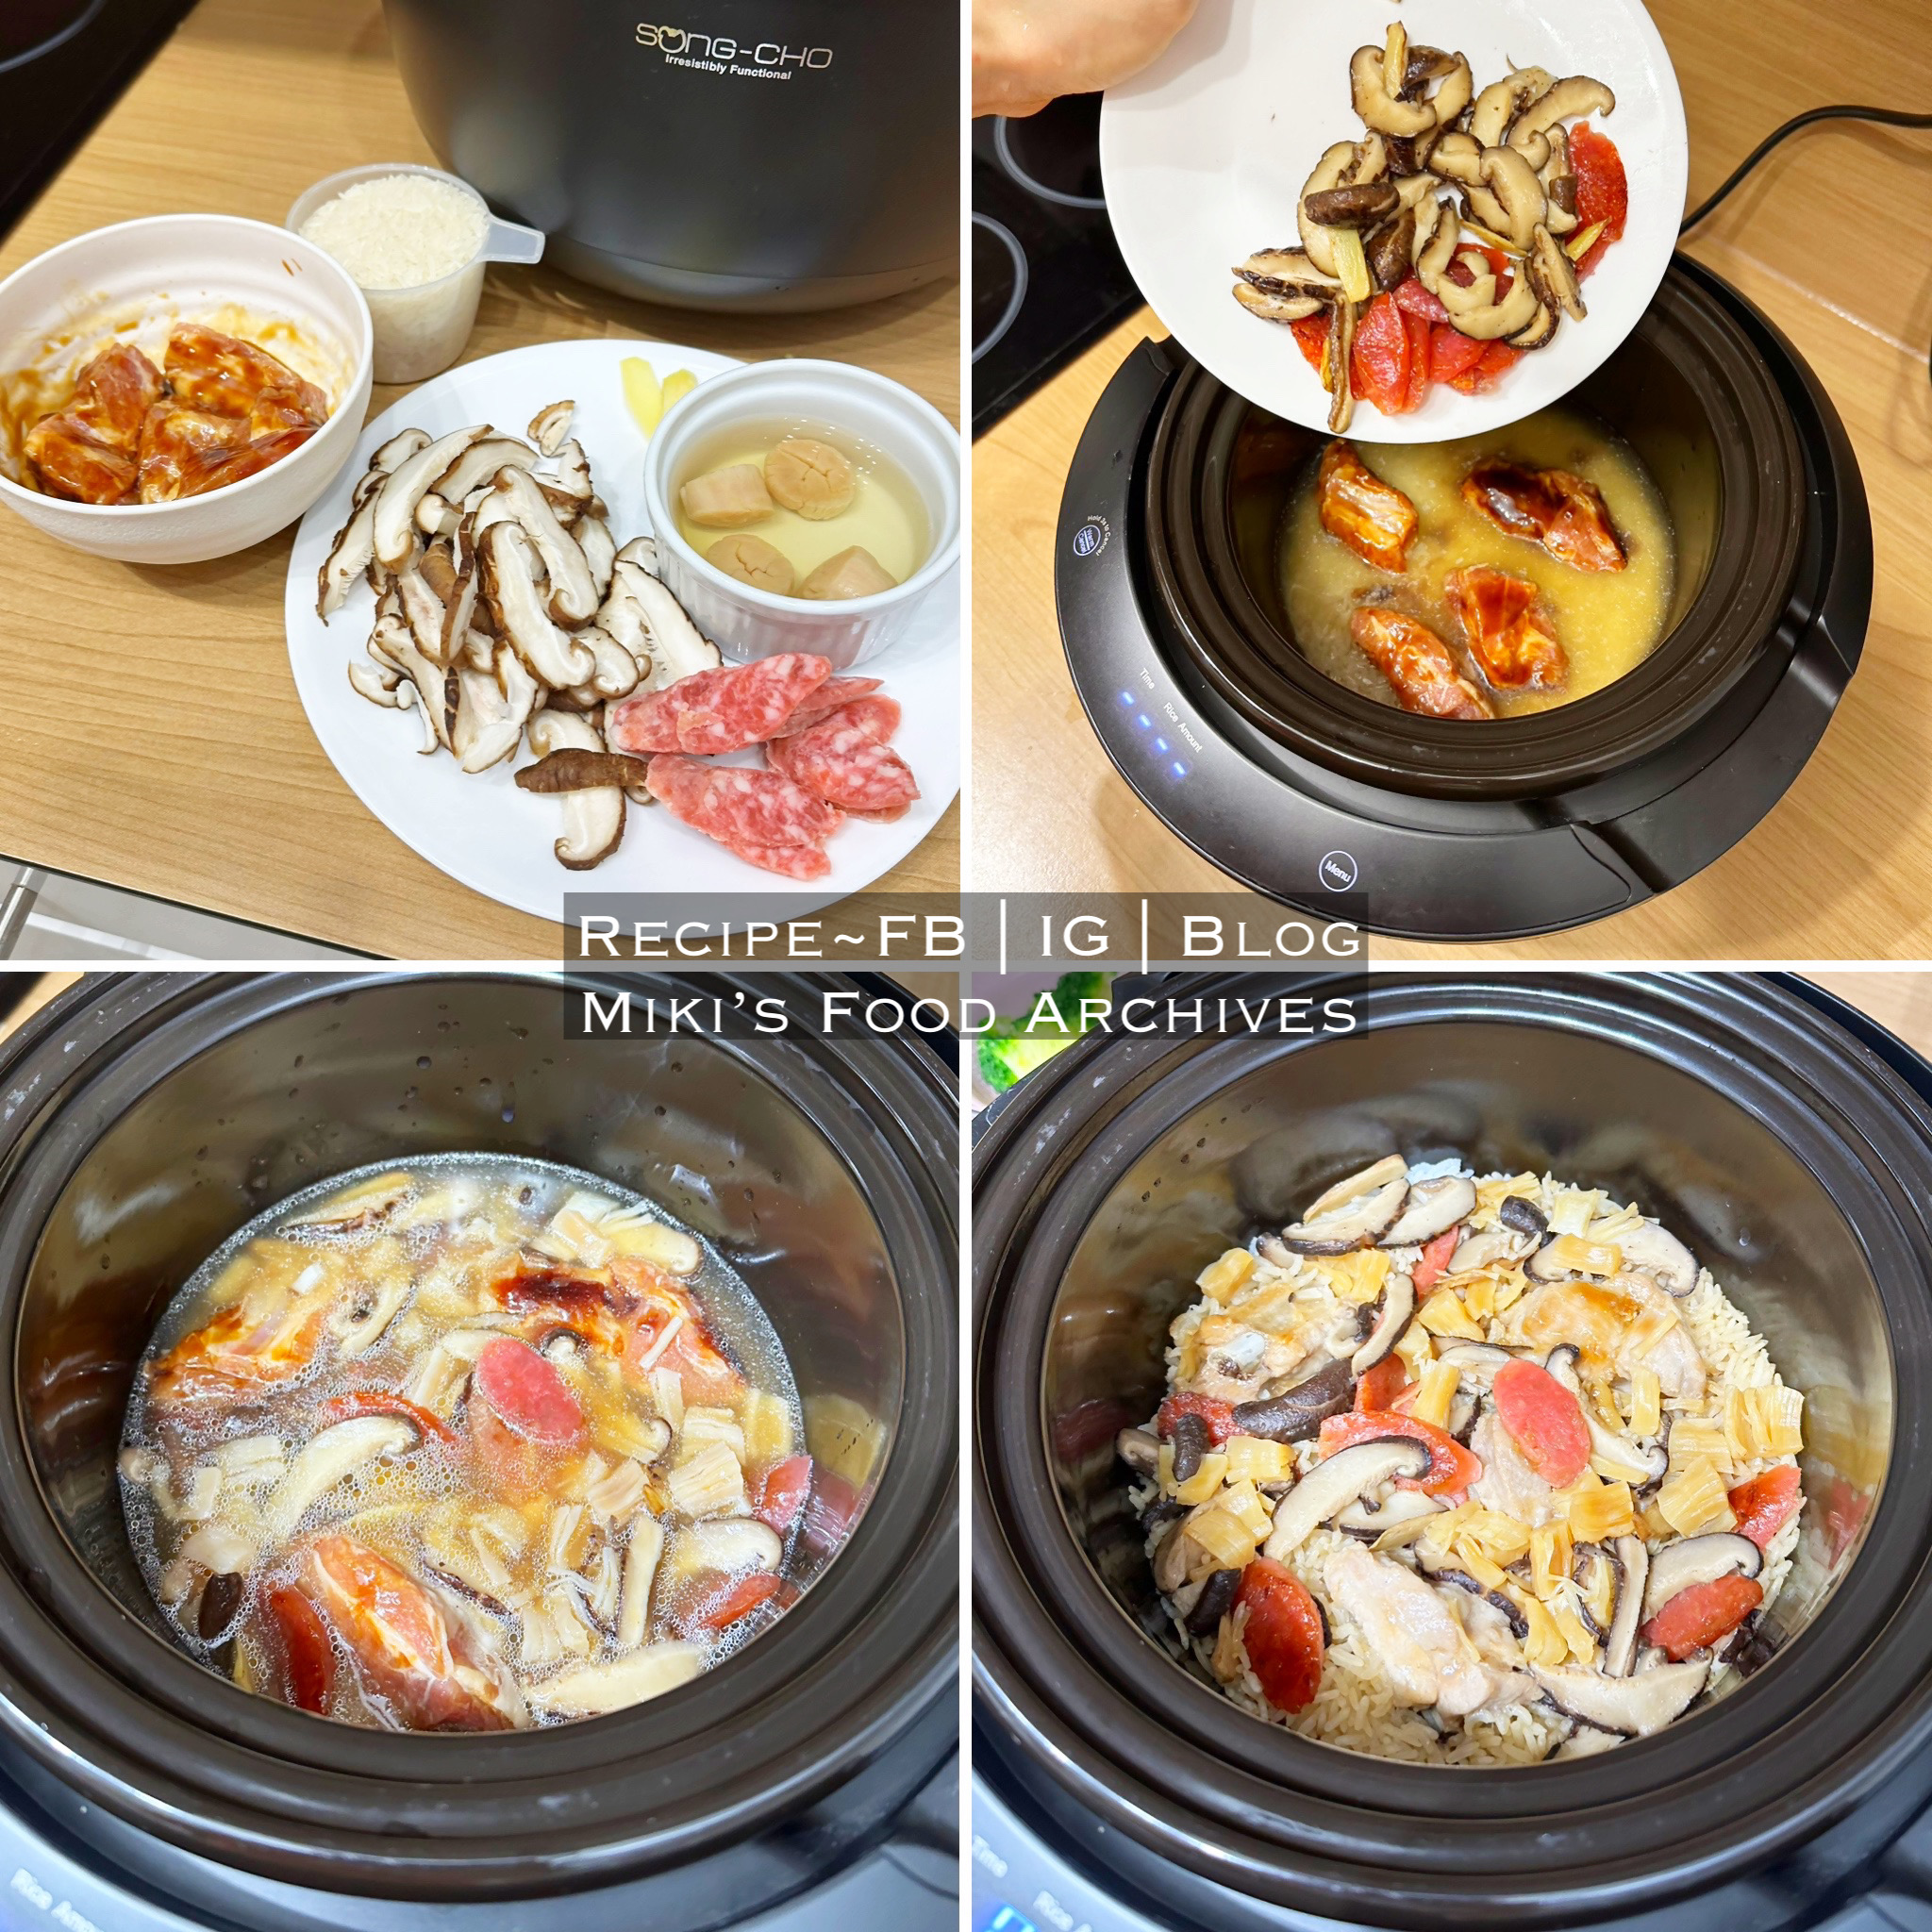
Conpoy/ Dried Scallops & Mushrooms Pork Ribs Rice 干贝香菇排骨饭


I love cooking pork ribs rice using a rice cooker because it's simple to make and delicious to eat. The meat is tender and the rice is full of Umami flavour with the combinations of Conpoy aka dried scallops, Shiitake mushrooms and Chinese sausage. 

Ingredients: 2 servings
中文食谱:请在网页的右边点击Translate, 然后选择中文翻译

150g Pork Ribs


1 cup Rice


1 & 1/2 cup Water, plus the water used to soak scallops


4 Fresh Shiitake Mushrooms, sliced


1 thumb-size Ginger, sliced


4 Conpoy/ Dried Scallops, soak and reserve the water


1/2 Chinese Sausage, sliced


Marinade: 


1 tbsp Oyster Sauce


1 tsp Light Soy Sauce 


1 tsp Tapioca Flour


1 tsp Sesame Oil


1/2 tbsp Shao Xing Hua Tiao Wine 


If you are sharing this recipe/ blog content, kindly attach the link to this blog instead of screen capture/ copy & paste/ use in your blog. No parts of the content of this blog may be reproduced without prior written permission. All rights reserved. Thank you. 如果您要分享此食谱/内容,请联系这个部落格的相关链接。敬请不要复制或改篇为自己的食谱。谢谢!

Method:

1. Combine the pork ribs and marinade ingredients, let marinate overnight. Heat some oil, sauté ginger, Chinese sausage and mushrooms, season with salt and pepper. 


2. Place all ingredients into the inner pot of the rice cooker. Cover with double lids set <RICE> mode. I'm using Song Cho Claypot Rice Cooker.


3. When the cooking has completed, garnish with spring onion, and serve warm.

若喜欢我的食谱,可以LIKE和追随我的面书专页,不要错过最新食谱发布。
If you like my recipe, click hereLIKE & follow Miki's Food Archives Facebook page or follow us on Instagram: mfa_dingoozatfood  to receive more recipe updates. Don't forget to favourite my pages if you wish to see my post on your news feed. 

Enjoy!

Friday, 9 December 2022

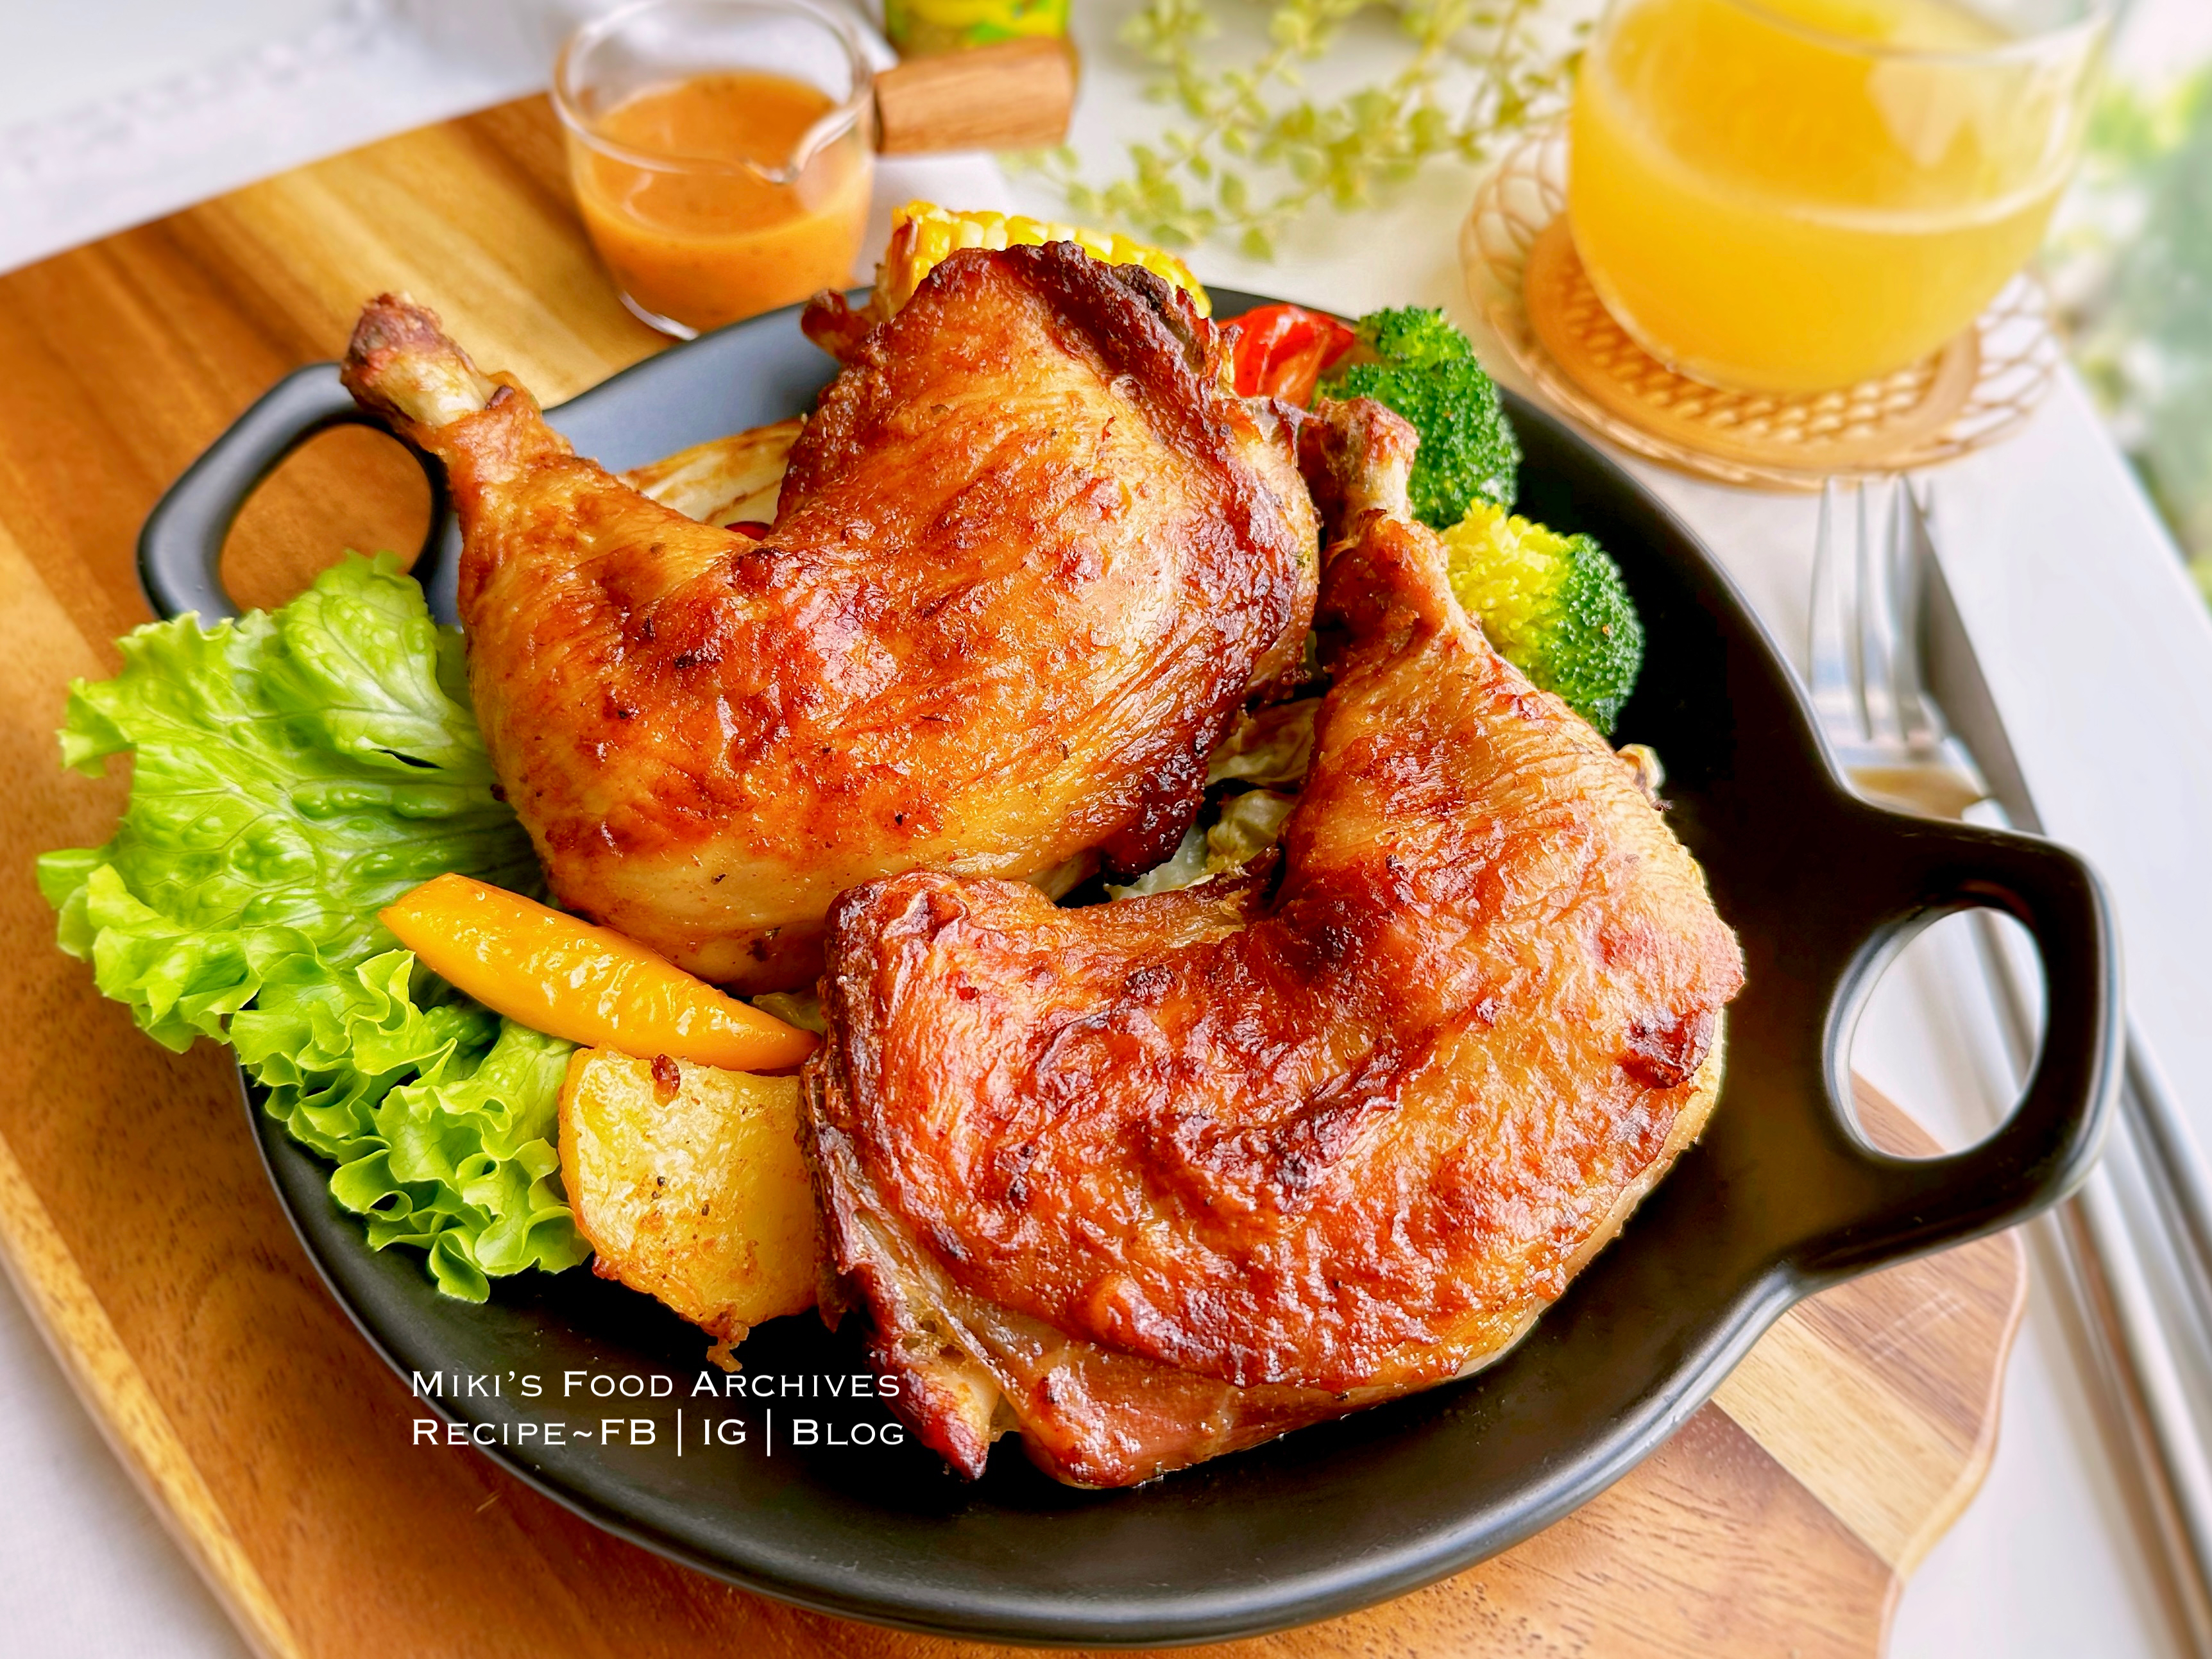
Homemade Nando’s Lemon & Herb PERi PERi Roast Chicken 【Nando's 招牌烤鸡 | 家常做法】


Craving Nando's PERi-PERi chicken? You can make it at home with this simple recipe. Preparation is easy, just marinate the chicken and throw them into the air-fryer or oven, let it cook the food to perfection. Add some roasted veggies for a delicious wholesome meal that looks fancy, but is actually really easy peasy!


Ingredients: 
中文食谱:请在网页的右边点击Translate,然后选择中文翻译

2 Chicken Leg


Marinade:


1 tsp Salt


1 tbsp Corn Flour


3 tbsp Lemon & Herb PERi PERi Sauce


If you are sharing this recipe/ blog content, kindly attach the link to this blog instead of screen capture/ copy & paste/ use in your blog. No parts of the content of this blog may be reproduced without prior written permission from Miki's Food Archives. All rights reserved. Thank you. 

如果您要分享此食谱/内容,请联系这个部落格的相关链接。敬请不要复制或改篇为自己的食谱。谢谢!


Method: 

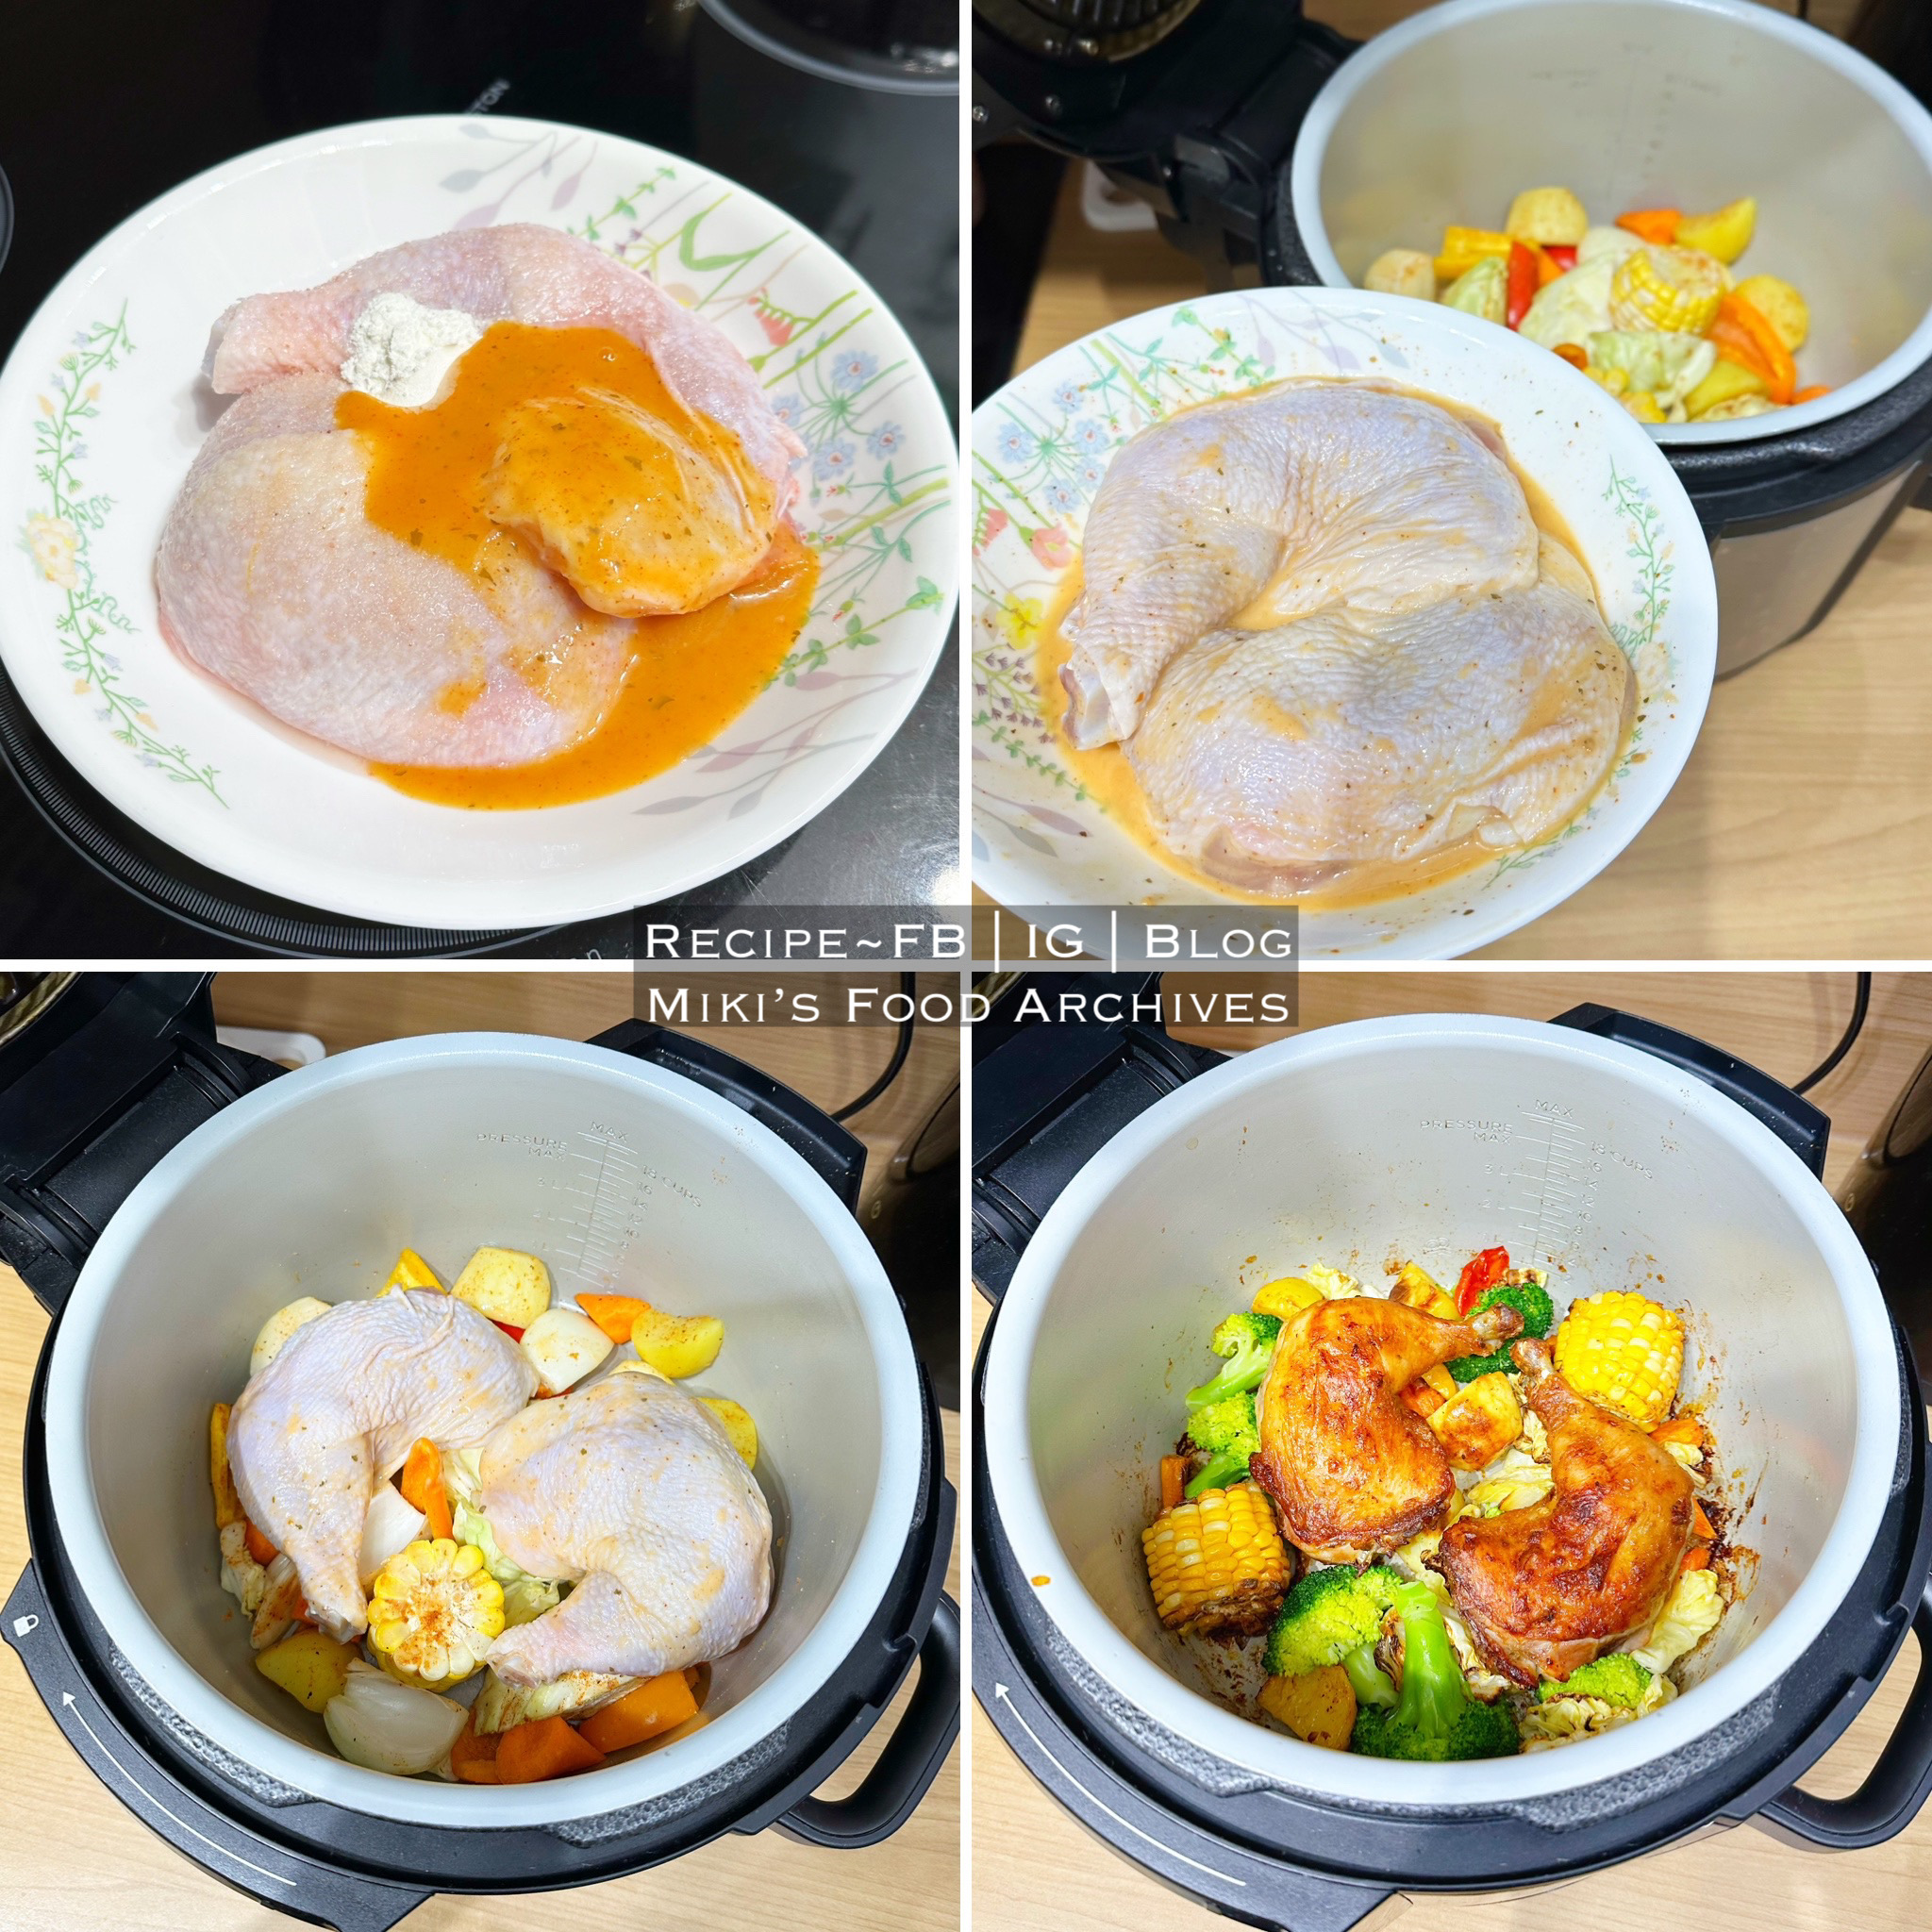
1. Combine marinade ingredients and chicken, and let marinate overnight. 


2. Layer the bottom of the pot with some veggies (as shown in the picture) and place the chicken on top, bake/ roast 180'C for 30 minutes, baste with sauce, then continue to cook another 8-10 minutes.
若喜欢我的食谱,可以LIKE和追随我的面书专页,不要错过最新食谱发布。If you like my recipe, click hereLIKE & follow Miki's Food Archives Facebook page or follow us on Instagram: mfa_dingoozatfood  to receive more recipe updates. Remember to favourite my pages if you wish to see my post on your news feed. 


By Kelly Kin


Thursday, 8 December 2022

Blanched Beansprout With Soy Sauce 香油酱拌豆芽菜


This is a simple side dish that I often cook at home, it's healthy and quick to cook. Briefly blanch the beansprout, drizzle some sauce and top with fried garlic or shallots, it goes well with any meal.

Ingredients:
中文食谱:请在网页的右边点击Translate,然后选择中文翻译

200g Beansprout 

1 tbsp Fried Garlic/ Shallot (with oil) 

Sauce: 

1 tsp Brown Sugar 

1 tsp Sugar 

1.5 tbsp Light Soy Sauce 

2 tbsp Water 


If you are sharing this recipe/ blog content, kindly attach the link to this blog instead of screen capture/ copy & paste/ use in your blog. No parts of the content of this blog may be reproduced without prior written permission. All rights reserved. Thank you. 

如果您要分享此食谱/内容,请联系这个部落格的相关链接。敬请不要复制或改篇为自己的食谱。谢谢!


Method:

1. Combine the sauce ingredients, and set aside. 

2. Fill some water in a wok and bring it to a boil. Add in beansprout, and blanch for about 60 seconds. Transfer the beansprout to a serving plate, discard the water.

I cooked this dish using Song Cho stainless steel wok, a multiply stainless steel wok without chemical coating, it's safe to use in any cooking. 
For more information about the product, visit Song Cho e-shop for details.


3. Add sauce ingredients to the wok, and simmer until the sugar dissolves. Pour the sauce over the beansprout, garnish with fried garlic/ shallots oil and serve right away.

若喜欢我的食谱,可以LIKE和追随我的面书专页,不要错过最新食谱发布。
If you like my recipe, click hereLIKE & follow Miki's Food Archives Facebook page or follow us on Instagram: mfa_dingoozatfood  to receive more recipe updates. Remember to favourite my pages if you wish to see my post on your news feed. 

Enjoy!

Wednesday, 30 November 2022

Air-fried Crispy Chicken Karaage aka Japanese Fried Chicken 日式炸鸡块【免油炸唐扬鸡】


Karaage is a Japanese dish typically made with marinated boneless chicken meat and deep-fried. It's extremely popular and well-loved by children and even adults. Here's sharing a simple Japanese Karaage recipe that you can easily make at home without going through the messy deep-frying process. Just marinate the chicken meat, mix it with flour and let them cook in the air-fryer. The chicken turned out absolutely tasty with a crispy exterior and juicy inside, just like the deep-fried version, minus the oil! Same comforting taste, no oily mess:)


Ingredients: 
中文食谱:请在网页的右边点击Translate,然后选择中文翻译

150g Boneless Chicken Thigh, cut into chunks


2 tbsp Crispy Flour


Marinade:


1 tsp Mirin


1 tbsp Corn Flour


1/4 tsp Grated Ginger


1/4 tsp Garlic Powder/ Mashed Garlic


Pinch of Salt & Pepper


If you are sharing this recipe/ blog content, kindly attach the link to this blog instead of screen capture/ copy & paste/ use in your blog. No parts of the content of this blog may be reproduced without prior written permission from Miki's Food Archives. All rights reserved. Thank you. 

如果您要分享此食谱/内容,请联系这个部落格的相关链接。敬请不要复制或改篇为自己的食谱。谢谢!


Method: 

1. Combine marinade ingredients and chicken, and let marinate 30 minutes.

I made a small portion for one serving, feel free to increase the amount.


2. Mix in the crispy flour, air-fry for 8-10 minutes or until golden and crisp.
Note: Spray some oil before cooking, flip the meat halfway through cooking.
若喜欢我的食谱,可以LIKE和追随我的面书专页,不要错过最新食谱发布。If you like my recipe, click hereLIKE & follow Miki's Food Archives Facebook page or follow us on Instagram: mfa_dingoozatfood  to receive more recipe updates. Don't forget to favourite my pages if you wish to see my post on your news feed. 


Related Posts Plugin for WordPress, Blogger...