Click LIKE & follow us on Facebook for recipe updates

COOK WITH LOVE FOR A HAPPY HIM

Singapore home cooking/ baking/ food & recipe blog features more than 500 tried & tested, quick & easy kid friendly recipes with steps by steps tutorial.


Follow us on Instagram: mfa_dingoozatfood


If you're a company looking for possible collaboration, feel free to send me a message via Miki's Food Archives Facebook Fan Page or email to miki9mak@gmail.com


Search This Blog

Thursday, 16 September 2021

Easy Air Fryer Fish & Chips 气炸鱼片薯条餐


An easy peasy fish and chips recipe cooked without deep-frying in oil. Frying can be messy and I'd always skip that part by air-frying with no unnecessary oil and it takes less time. 

These delicious fish fillets are covered in tasty crispy crust, it's soft and velvety from the inside.


Ingredients:
中文食谱:请在网页的右边点击Translate,然后选择中文翻译

330g Fish Fillets (I use fresh grouper fish fillets)

1 tsp Sesame Oil

1 tsp Garlic Salt

Crust:

2 part Crispy Flour + 3 part Plain Flour

1 Egg 

Bread Crumbs

Some Cooking Oil/ Spray


If you are sharing this recipe/ blog content, kindly attach the link to this blog instead of screen capture/ copy & paste/ use in your blog. No parts of the content of this blog may be reproduced without prior written permission. All rights reserved. Thank you. 如果您要分享此食谱/内容,请联系这个部落格的相关链接。敬请不要复制或改篇为自己的食谱。谢谢!

Method:

1. Combine the flour, mix well. Rub the fillet with sesame oil, season with garlic salt.


2. Coat the fish fillets with flour > egg > flour > egg > bread crumbs. 


Crispy fries air-fried from frozen 200'C 12mins. 


3. AIR FRY 200'C 6-8 minutes or until golden and crispy, serve right away with fries.
Note: Spray/ brush some oil on the fish fillets before cooking. 
若喜欢我的食谱,可以LIKE和追随我的面书专页,不要错过最新食谱发布。If you like my recipe, click hereLIKE & follow Miki's Food Archives Facebook page or follow us on Instagram: mfa_dingoozatfood  to receive more recipe updates. Don't forget to favourite my pages if you wish to see my post on your news feed. 

Saturday, 11 September 2021

Salted Egg Yolk Pastry Mooncake 螺旋蛋黄酥/咸蛋酥【豆沙馅】


Delicate and delicious Salted Egg Yolk Chinese Pastry Mooncake made with flaky layers of pastry crust stuffed with sweetened red bean paste and salted egg yolk. In this recipe, I'm using butter, if you like it flakier, use shortening or pork lard that'll give it a unique flavour!


Ingredients: 
中文食谱:请在网页的右边点击Translate,然后选择中文翻译

120g Red Bean Paste

6pcs Salted Egg Yolk

Water Dough:

65g Plain Flour

10g Icing Sugar

25g Salted Butter

25g Cold Water

Oil Dough:

20g Salted Butter/ Lard/ Shortening

40g Cake Flour

Pumpkin Powder/ Yellow Food Colouring (if making Pooh Bear mooncake design)


If you are sharing this recipe/ blog content, kindly attach the link to this blog instead of screen capture/ copy & paste/ use in your blog. No parts of the content of this blog may be reproduced without prior written permission. All rights reserved. Thank you. 如果您要分享此食谱/内容,请联系这个部落格的相关链接。敬请不要复制或改篇为自己的食谱。谢谢!

Method:

1. Brush salted egg yolk with cooking wine, steam for 5 minutes. Set aside to cool.


2. Mix all water dough ingredients, cover with cling wrap, let it rest for 30 minutes. Divide dough into 6 portions. Mix all oil dough ingredients, cover with cling wrap, let it rest for 30 minutes. Divide dough into 6 portions.


3. Roll out the water dough (flat and round). Place oil dough in the middle, wrap up and seal. Roll it out flat, roll up, let it rest for 10 minutes. Roll out again (long and flat), then roll up, let it rest for 10 minutes. 


4. Divide red bean paste into 6 portions, wrap in salted egg yolk. Cut the dough into 6 portions, roll the dough round and flat, wrap in fillings. Bake 160'C 30mins, decorate as desired and enjoy!

若喜欢我的食谱,可以LIKE和追随我的面书专页,不要错过最新食谱发布。
If you like my recipe, click hereLIKE & follow Miki's Food Archives Facebook page or follow us on Instagram: mfa_dingoozatfood  to receive more recipe updates. Remember to favourite my pages if you wish to see my recipe posts on your news feed. 

By readers: some feedback from those who have tried this recipe.

By Irawatie15


Saturday, 4 September 2021

Taiwanese 3Q Flaky Mooncake 台式3Q麻薯酥皮月饼


This unique Taiwanese 3Q mooncake is made of flaky pastry crust, filled with red bean paste, salted egg yolk, QQ mochi and meat floss. If you like less sweet mooncakes with sweet and savoury fillings, do give this a try! 


Ingredients:
中文食谱:请在网页的右边点击Translate,然后选择中文翻译

280g Red Bean Paste

80g Chicken Floss 

6-7pcs Salted Egg Yolk (cooked & break into smaller pieces)

1 Egg White

Some Black & White Sesame Seeds

Mochi:

25g Glutinous Rice Flour 

15g Rice Flour

10g Corn Flour

10g Coconut Oil/ Cooking Oil

90g Milk

15g Icing Sugar


Water Dough:

160g Plain Flour

55g Salted Butter

70g Water

1 tsp Icing Sugar


Oil Dough:

100g Plain Flour

60-65g Shortening/ Lard/ Butter


If you are sharing this recipe/ blog content, kindly attach the link to this blog instead of screen capture/ copy & paste/ use in your blog. No parts of the content of this blog may be reproduced without prior written permission. All rights reserved. Thank you. 如果您要分享此食谱/内容,请联系这个部落格的相关链接。敬请不要复制或改篇为自己的食谱。谢谢!

Method:

1. Mix all mochi ingredients in a bowl, pour through a sieve. Cover with aluminium foil, steam for 20 minutes, stir with a pair of wooden chopsticks until smooth, divide into 8 portions, set aside.


2. Mix all water dough ingredients, cover with cling wrap, let it rest for 30 minutes. Divide dough into 8 portions. Mix all oil dough ingredients, cover with cling wrap, let it rest for 30 minutes. Divide dough into 8 portions.


3. Roll out the water dough (flat and round). Place oil dough in the middle, wrap up and seal. Roll it out long and flat, roll up. Rotate the dough 90', roll out again (long and flat), then roll upHold up 2 sides and seal, let it rest for 15 minutes. Repeat for the rest. Divide red bean paste, salted egg yolk and chicken floss into 8 portions. Roll the dough round and flat, wrap in fillings. 


4. Brush a thin layer of egg white, coat with sesame seeds. 


5. Bake 170'C for 30 minutes or until golden and crisp. 
若喜欢我的食谱,可以LIKE和追随我的面书专页,不要错过最新食谱发布。If you like my recipe, click hereLIKE & follow Miki's Food Archives Facebook page or follow us on Instagram: mfa_dingoozatfood  to receive more recipe updates. Don't forget to favourite my pages if you wish to see my post on your news feed. 

Friday, 3 September 2021

Bongo Cat Bento [Cartoon animation cat | Internet meme]


Rice Based Food Art ~ Cute Bongo Cat Bento, specially requested by my kid who loves this cartoon animation cat that plays bongo drum and many other instruments/ "things".

Along with the Bongo Cat are Air-fried Lemongrass Chicken, butter garlic prawns, and some veggies served with pumpkin rice. The bongo ( small drums) are quail eggs. 


If you are sharing this recipe/ blog content, kindly attach the link to this blog instead of screen capture/ copy & paste/ use in your blog. No parts of the content of this blog may be reproduced without prior written permission. All rights reserved. Thank you. 如果您要分享此食谱/内容,请联系这个部落格的相关链接。敬请不要复制或改篇为自己的食谱。谢谢!


It's pretty easy to shape this Bongo Cat rice ball, just shape the cat with cooked rice then add the face details and paw using seaweed. If you have kids or friends who loves Bongo Cat, you can try making it! ;)

Thanks for reading, I hope you are inspired after reading my blog. If you love to see my food, click hereLIKE & follow Miki's Food Archives Facebook page or follow us on Instagram: mfa_dingoozatfood  to receive more recipe updates. Don't forget to change the setting to 'SEE FIRST' if you wish to see my post on your Facebook news feed. 

Enjoy!

Wednesday, 1 September 2021

Stir-fry Curry Prawn 香炒咖喱虾


This curried prawns stir-fry is very tasty, goes well with rice and it's easy to cook. 

Ingredients:

15 Prawns

1 tsp Sesame Oil

1 tbsp Curry Paste

1 Onion

1 Lemongrass

1/4 tsp Salt

1 tsp Curry Powder

2-3 tbsp Water

1/2 tsp Light Soy Sauce


If you are sharing this recipe/ blog content, kindly attach the link to this blog instead of screen capture/ copy & paste/ use in your blog. No parts of the content of this blog may be reproduced without prior written permission. All rights reserved. Thank you. 

如果您要分享此食谱/内容,请联系这个部落格的相关链接。敬请不要复制或改篇为自己的食谱。谢谢!


Method:

1. Combine prawns, sesame oil and curry paste, let it sit for 10 minutes. 
Heat some oil in the wok, stir fry lemongrass and onion until fragrant. Season with salt.

I cooked this dish using Song Cho stainless steel wok, 
a multiply stainless steel wok without chemical coating, it's safe to use in any cooking including deep-frying. 
For more information about the product, visit Song Cho e-shop for details.

2. Stir fry prawns, add in curry powder, light soy sauce and water. When the prawns are cooked, serve warm with steamed rice.
若喜欢我的食谱,可以LIKE和追随我的面书专页,不要错过最新食谱发布。
If you like my recipe, click hereLIKE & follow Miki's Food Archives Facebook page or follow us on Instagram: mfa_dingoozatfood  to receive more recipe updates. Don't forget to change the setting to 'SEE FIRST' if you wish to see my post on your Facebook news feed. 

Enjoy!


Thursday, 26 August 2021

Char-Grilled Honey Chicken Chop 香烤蜜汁鸡扒


This quick and easy chargrilled honey chicken chop is sweet, moist, tender and juicy, it's without a doubt at the top of my busy day cooking recipe list. 

Whenever I decide to make this dish, I'll marinate the chicken a day before and cook on the next day. The tender-crisp chicken chop with a delicious honey glaze will be ready in 8 minutes. 


Ingredients:
中文食谱:请在网页的右边点击Translate,然后选择中文翻译

1-2 Chicken Leg (boneless)

1 tsp Honey 

Marinade: 

1 tsp Sugar 

1 tbsp Oyster Sauce

1 tbsp Char Siu Sauce

1 tbsp Shao Xing Hua Tiao Wine 

1/2 tsp Salt 

1 tsp Corn Flour 


If you are sharing this recipe/ blog content, kindly attach the link to this blog instead of screen capture/ copy & paste/ use in your blog. No parts of the content of this blog may be reproduced without prior written permission. All rights reserved. Thank you. 如果您要分享此食谱/内容,请联系这个部落格的相关链接。敬请不要复制或改篇为自己的食谱。谢谢!

Method:

1. Wash and dry the chicken legs with kitchen towels. Mix all marinades in a bowl, pour the marinade over the chicken meat. Mix well and cover with cling wrap. Keep in the refrigerator and let marinate for 1 hour or overnight.


2. Remove the marinated chicken meat from the refrigerator. Let it sit on the counter to return to room temperature. 


3. Grill 8 minutes or until cooked through, brush a thin layer of honey, serve right away. 
Note: Adjust the grill time according to the thickness of the meat.
若喜欢我的食谱,可以LIKE和追随我的面书专页,不要错过最新食谱发布。If you like my recipe, click hereLIKE & follow Miki's Food Archives Facebook page or follow us on Instagram: mfa_dingoozatfood  to receive more recipe updates. Don't forget to favourite my pages if you wish to see my post on your news feed. 

Saturday, 21 August 2021

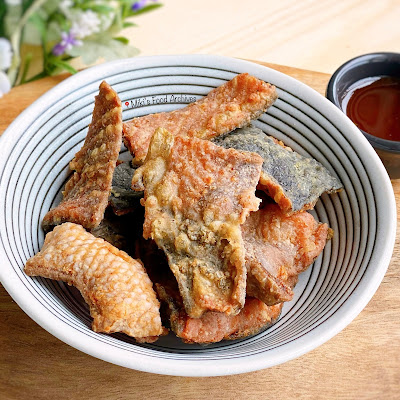
Air Fried Crispy Salmon Skin 酥脆三文鱼皮【免油炸】


Crispy Salmon skin is often deep-fried in hot oil. When making it at home, we can use the air fryer to make these nutritious and delicious snacks in a healthier way tastes as good as the deep-fried version minus the oil. 


Ingredients:
中文食谱:请在网页的右边点击Translate,然后选择中文翻译

1 Salmon Skin 
(Season with garlic salt, pepper and sesame oil)

2 part Crispy Flour 

1 part Corn Flour

Some Cooking Oil/ Spray


If you are sharing this recipe/ blog content, kindly attach the link to this blog instead of screen capture/ copy & paste/ use in your blog. No parts of the content of this blog may be reproduced without prior written permission. All rights reserved. Thank you. 如果您要分享此食谱/内容,请联系这个部落格的相关链接。敬请不要复制或改篇为自己的食谱。谢谢!

Method:

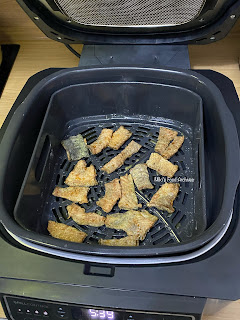
1. Combine the flour, mix well. Cut salmon skin into strips, coat with the flour mixture. 


2. AIR FRY  200'C 10 minutes or until golden and crispy, serve right away.
Note: Spray/ brush some oil on the basket and Salmon skin before cooking.
若喜欢我的食谱,可以LIKE和追随我的面书专页,不要错过最新食谱发布。If you like my recipe, click hereLIKE & follow Miki's Food Archives Facebook page or follow us on Instagram: mfa_dingoozatfood  to receive more recipe updates. Don't forget to favourite my pages if you wish to see my post on your news feed. 

Saturday, 14 August 2021

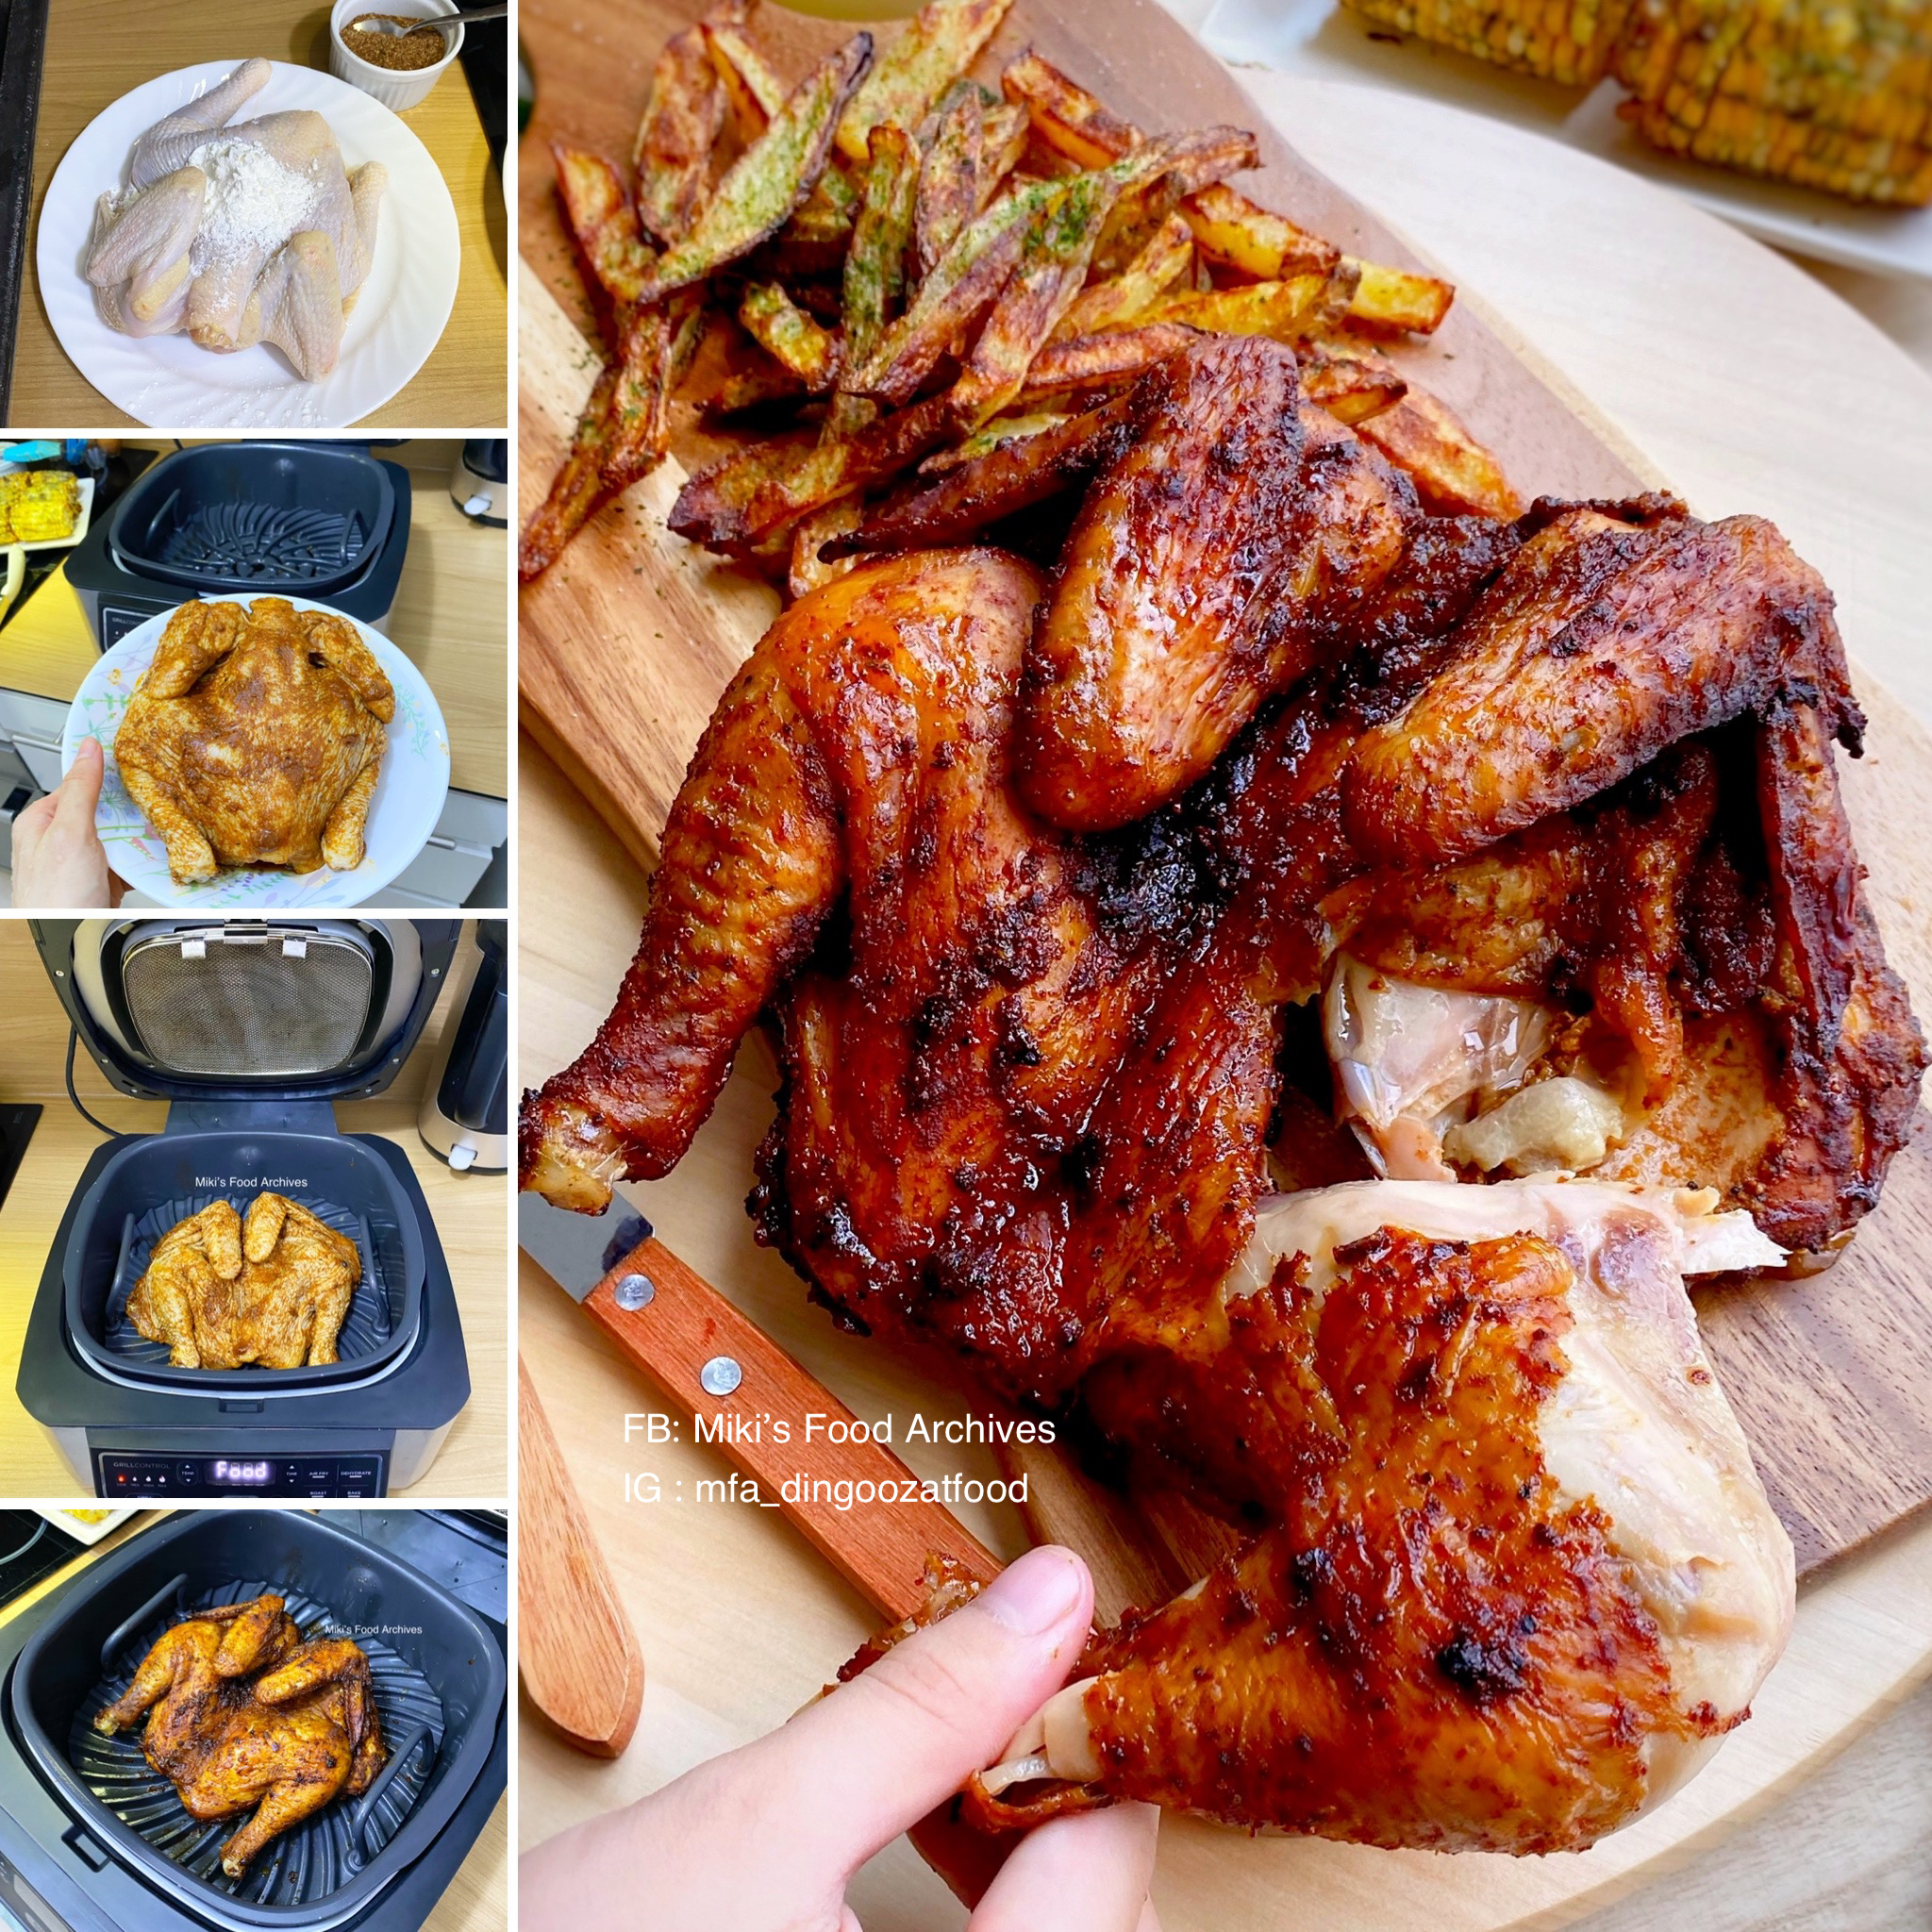
Easy Dry Rub Grilled Chicken 干抹香料烤鸡


This easy dry rub grilled chicken is infused with aromatic flavours. Juicy, tender and tasty chicken paired with homemade air-fried seaweed shaker fries and Seaweed Parmesan Mayo Grilled Corn, this will definitely bring everyone a taste thrill experience. 


Ingredients:
中文食谱:请在网页的右边点击Translate,然后选择中文翻译

1 Chicken

1 tbsp Corn Flour (optional)

1 tbsp Oil

Homemade Dry Rub:

30g Brown Sugar

10g Smoke Paprika 

1 tbsp Garlic Pepper 

1 tsp Garlic Powder

1 tsp Onion Powder

1 tbsp Salt 


If you are sharing this recipe/ blog content, kindly attach the link to this blog instead of screen capture/ copy & paste/ use in your blog. No parts of the content of this blog may be reproduced without prior written permission. All rights reserved. Thank you. 如果您要分享此食谱/内容,请联系这个部落格的相关链接。敬请不要复制或改篇为自己的食谱。谢谢!

Method:

1. Rub the chicken with corn flour and oil. 


Grilled dry-rub chicken

2. Sprinkle with the rub mixture and massage all over the chicken until it is fully coated. If you like it more flavorful, let it marinate overnight before grilling.


Oven roasted dry-rub chicken

Oven roasted for an hour
Added some parsley

3. Grill 15 minutes or roast in a preheated oven 180'C (fan) for 1 hour, serve with your favourite side dishes. 
Note: Do adjust the cooking time according to the size of the chicken.
若喜欢我的食谱,可以LIKE和追随我的面书专页,不要错过最新食谱发布。If you like my recipe, click hereLIKE & follow Miki's Food Archives Facebook page or follow us on Instagram: mfa_dingoozatfood  to receive more recipe updates. Don't forget to favourite my pages if you wish to see my post on your news feed. 

Wednesday, 4 August 2021

Rice Cooker Braised Chicken Without Water 电饭锅无水焖鸡


This is a fuss-free braised chicken recipe that requires no cooking skill at all. Just marinate the chicken and let it cook in a rice cooker like how you usually select the setting to cook rice. When the rice cooker "beep", the chicken is ready. It's tender, juicy, and delicious, goes well with rice and noodles. 

Ingredients:
中文食谱:请在网页的右边点击Translate, 然后选择中文翻译

1 Kampong Chicken 


5 stalk Spring Onion


1 Garlic, pounded


2 thumb-size Ginger, sliced


5 Shallot


Some Mushroom (optional)


Seasonings:


1 tbsp Dark Soy Sauce


2 tbsp Light Soy Sauce


1 tbsp Brown Sugar/ Honey


2 tbsp Oyster Sauce 


2 tbsp Shao Xing Hua Tiao Wine 


Some Salt & Pepper, add to taste


If you are sharing this recipe/ blog content, kindly attach the link to this blog instead of screen capture/ copy & paste/ use in your blog. No parts of the content of this blog may be reproduced without prior written permission. All rights reserved. Thank you. 如果您要分享此食谱/内容,请联系这个部落格的相关链接。敬请不要复制或改篇为自己的食谱。谢谢!

Method:

1. Rub seasonings all over the chicken with spring onion (green part), stuff spring onion and half of the ginger slices inside the chicken, let marinate for 1-2 hours.


2. Place spring onion (white part), ginger, garlic, mushroom (if using), shallot, chicken, and the marinade in the inner pot of the rice cooker. Cover with double lids set <RICE> mode. I'm using Song Cho Claypot Rice Cooker, the default cooking time is about 1 hour.


3. When the cooking has completed, serve warm with rice or noodles. 

若喜欢我的食谱,可以LIKE和追随我的面书专页,不要错过最新食谱发布。
If you like my recipe, click hereLIKE & follow Miki's Food Archives Facebook page or follow us on Instagram: mfa_dingoozatfood  to receive more recipe updates. Don't forget to change the setting to 'SEE FIRST' if you wish to see my post on your Facebook news feed. 
Enjoy!

Related Posts Plugin for WordPress, Blogger...