Click LIKE & follow us on Facebook for recipe updates

COOK WITH LOVE FOR A HAPPY HIM

Singapore home cooking/ baking/ food & recipe blog features more than 500 tried & tested, quick & easy kid friendly recipes with steps by steps tutorial.


Follow us on Instagram: mfa_dingoozatfood


If you're a company looking for possible collaboration, feel free to send me a message via Miki's Food Archives Facebook Fan Page or email to miki9mak@gmail.com


Search This Blog

Wednesday, 27 April 2022

Sea Coconut & White Fungus Chicken Soup 海底椰银耳润肺清补鸡汤


I've been wanting to cook sea coconut soup for the longest time. Finally, I managed to get some fresh sea coconut online. Bought a packet and use half to cook this nourishing Sea Coconut & White Fungus Chicken Soup, it's a lung nourishing soup that's good for our overall health. Glad that my boy loves it and keeps saying "I like this soup, mmm.... very nice!". 


This is a time-saving recipe using Ninja Foodi multi-cooker - Pressure Cook function, which uses super-heated steam to quickly and easily cook up to 70% faster than traditional cooking methods, the soup turned out so flavourful and delicious! << Read more about the Ninja Foodi and where to buy Ninja Foodi at the best price >>

海底椰银耳鸡汤是一道润肺养颜汤。有润肺止咳、滋阴除燥、安神养心、健脾胃等功效
中文食谱:请在网页的右边点击Translate,然后选择中文翻译

Ingredients: (Yield 3 servings)

1 Chicken Carcass, blanched

3pcs Fresh Sea Coconut, peeled and sliced

15g White Fungus, soak to rehydrate

2 Dried Scallops

4 Red Dates

Hot Water

Some Salt/ White Pepper (add to taste)


If you are sharing this recipe/ blog content, kindly attach the link to this blog instead of screen capture/ copy & paste/ use in your blog. No parts of the content of this blog may be reproduced without prior written permission. All rights reserved. Thank you. 如果您要分享此食谱/内容,请联系这个部落格的相关链接。敬请不要复制或改篇为自己的食谱。谢谢!

Method:

1. Place all ingredients (except white fungus, salt, and pepper) into Ninja Foodi inner pot. Add in hot water to 8 cups level. 

About Ninja Foodi Multi-Cooker: The Ninja Foodi that I'm using is a combination of a pressure cooker and air fryer in one appliance, it's super-efficient and time-saving. Besides pressure cooking and air frying, there are other functions such as steam, slow cook, sear/ saute, bake/ roast, grill, dehydrate, sous vide, yoghurt, and keep warm. This cooker helps prepare quick meals without hassle, which I highly recommend to everyone who loves easy and hassle-free cooking with fewer pots and pans to wash.

There are 2 models available in Singapore and Malaysia. If you're interested, you can use our exclusive discount code to buy at the best market rate. The discount is valid for orders from Singapore and Malaysia via Ninja Kitchen Website with 1-year warranty + home delivery (usually takes about 4 working days). I've attached the details and links below for easy reference.

SINGAPORE:
Ninja Foodi can be purchased from Ninja Kitchen Official Website. Cart out with Promo Code: MIKISNSG to get a 10% discount for any Ninja-Shark products via their website.

MALAYSIA:

Ninja Foodi can be purchased via Ninja Shark Official Website. Cart out with Promo Code: MFAOP300 to get the lowest price deal.


2. Close the pressure lid, SEAL. Pressure cook (HI) for 20 minutes (NPR). Switch to Sear/ Saute mode, add white fungus and salt to taste, and simmer for 15-30 minutes (cooking time depending on the type of white fungus). If you do not have a pressure cooker, you can boil the soup over the stovetop for 2hr 30mins.

若喜欢我的食谱,可以LIKE和追随我的面书专页,不要错过最新食谱发布。If you like my recipe, click hereLIKE & follow Miki's Food Archives Facebook page or follow us on Instagram: mfa_dingoozatfood  to receive more recipe updates. Don't forget to favourite my pages if you wish to see my post on your news feed. 

<< Click HERE >> to view more Ninja Foodi recipes and cooking videos, including easy one-pot-meal, chicken curry, roast chicken, roast pork ribs, crispy chicken, porridge, fish recipes, bread, kid-friendly snacks, and many more...

Saturday, 23 April 2022

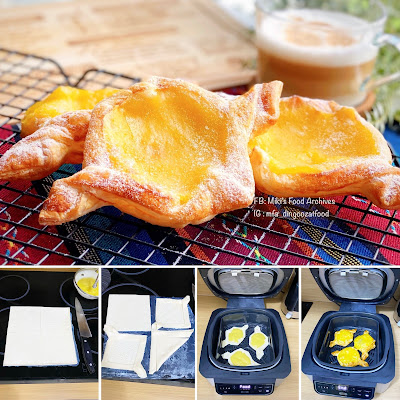
Easy Custard Puff Pastry 卡仕达酥【简易做法】


Custard Puff Pastry is a buttery, flaky pastry filled with custard and/ or fruits. It's a well-known favourite but it's tedious to make the pastry from scratch, especially when making this for breakfast. Sharing here is a super easy method using frozen puff pastry and homemade custard filling that can be prepared ahead of time. Great for busy parents or anyone who'd love simple meal prep! 

Ingredients:
中文食谱:请在网页的右边点击Translate,然后选择中文翻译

1 Frozen Puff Pastry 


If you are sharing this recipe/ blog content, kindly attach the link to this blog instead of screen capture/ copy & paste/ use in your blog. No parts of the content of this blog may be reproduced without prior written permission. All rights reserved. Thank you. 如果您要分享此食谱/内容,请联系这个部落格的相关链接。敬请不要复制或改篇为自己的食谱。谢谢!

Method:

1. Leave the frozen puff pastry at room temperature for about 5 minutes or until pliable. Shape and add custard fillings as shown in the picture below. 

Custard Puff Pastry, baked using Ninja Grill


Custard Puff Pastry, baked using Ninja Foodi Multi-Cooker

Ninja Foodi multi-cooker and grill can be purchased from Ninja Kitchen Official Website. Cart out with Promo Code: MIKISNSG to get a 10% discount for all Ninja/ Shark products.

If you're from Malaysia, Ninja Foodi can be purchased via Ninja Shark MY Official Website. Cart out with Promo Code: MFAOP300 to get the lowest price deal.

2. Bake using Ninja Foodi BAKE/ROAST mode 180'C for 10 minutes or until golden. Egg wash is optional, you can add some fruits and deco it nicely if you want to.

若喜欢我的食谱,可以LIKE和追随我的面书专页,不要错过最新食谱发布。If you like my recipe, click hereLIKE & follow Miki's Food Archives Facebook page or follow us on Instagram: mfa_dingoozatfood  to receive more recipe updates. Don't forget to change the setting to 'SEE FIRST' and "FAVOURITE" the page if you wish to see my post on your Facebook news feed. 

Friday, 22 April 2022

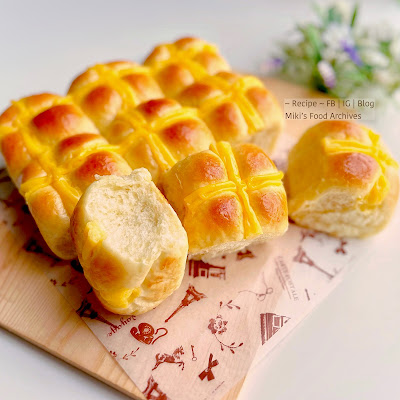
Soft Potato Bread With Custard Topping 卡仕达酱马铃薯软面包


Revisited an old recipe of mine, a light, soft and fluffy bread made with mashed potatoes, topped with sweet custard crosses.


I shared the bread recipe back in the year 2014. When my boy was younger, I used to make everything from scratch, including the custard toppings using egg yolk. 


This time, I used another eggless custard recipe made with custard powder. I've included both recipes here, if you'd like to try making it at home, tap the link below to view the recipes.


If you are sharing this recipe/ blog content, kindly attach the link to this blog instead of screen capture/ copy & paste/ use in your blog. No parts of the content of this blog may be reproduced without prior written permission. All rights reserved. Thank you. 如果您要分享此食谱/内容,请联系这个部落格的相关链接。敬请不要复制或改篇为自己的食谱。谢谢!

Thanks for reading, I hope you are inspired after reading my blog. If you love to see my food, click hereLIKE & follow Miki's Food Archives Facebook page or follow us on Instagram: mfa_dingoozatfood  to receive more recipe updates. Don't forget to change the setting to 'SEE FIRST' if you wish to see my post on your Facebook news feed. 

Enjoy!

Tuesday, 19 April 2022

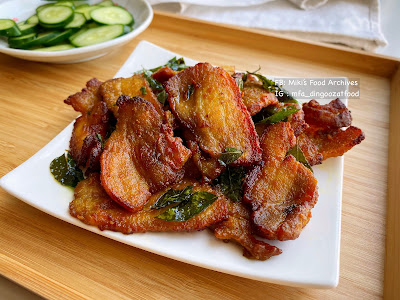
Air-fried Curry Pork Belly 气炸咖喱五花肉片


Flavourful and delicious Fried Curry Pork Belly cooked without deep-frying using Ninja Foodi Air-Crisp function. 
This time, I tried frying the pork belly without using the Cook & Crisp basket. Glad that it turned out well and the cleaning afterward is really easy, just soak and rinse the pot and it's all clean!


The Ninja Foodi multi-cooker that I'm using is a combination of the pressure cooker and air fryer in one pot, it's super-efficient and time-saving. Besides pressure cooking and air frying, there are other functions such as steam, slow cook, sear/ saute, bake/ roast, grill, and keep warm. I also use it for stir-frying dishes with the 5 heat levels. Overall, Ninja Foodi is a good all-in-one product, just like a portable kitchen with a rice cooker, pressure cooker, air fryer, oven and stovetop functions, reasonable price, and highly versatile. 

Ingredients: 

250g Pork Belly 五花肉片

Handful of Curry Leaves 咖喱叶


Marinade:

2 tsp Curry Powder 咖喱粉

1/2 tsp Ground Turmeric 黄姜粉

1 tsp Tapioca Flour 木薯粉

1 tsp Light Soy Sauce 酱油

1/4 tsp Salt 盐

1 tsp Sesame Oil 麻油

1/2 tbsp Oyster Sauce 蚝油


If you are sharing this recipe/ blog content, kindly attach the link to this blog instead of screen capture/ copy & paste/ use in your blog. No parts of the content of this blog may be reproduced without prior written permission. All rights reserved. Thank you. 

如果您要分享此食谱/内容,请联系这个部落格的相关链接。敬请不要复制或改篇为自己的食谱。谢谢!


Method: 

1. Place pork belly in a bowl, add all marinade ingredients and mix well. Cover and marinate overnight in the fridge. 
把调味料和猪肉拌均,腌制隔夜。


2. Remove pork belly from the fridge, and return to room temperature. 
Preheat Ninja Foodi - Set Air Crisp mode 180'C 3mins. 
气炸锅预热180度三分钟。

Appliance: [Ninja Foodi Multi-Cooker] The Ninja Foodi that I'm using is a combination of a pressure cooker and air fryer in one appliance, it's super-efficient and time-saving. Besides pressure cooking and air frying, there are other functions such as steam, slow cook, sear/ saute, bake/ roast, grill, dehydrate, sous vide, yoghurt, and keep warm. This cooker helps prepare quick meals without hassle, which I highly recommend to everyone who loves easy and hassle-free cooking with fewer pots and pans to wash. If you're interested, you can use our exclusive discount code to buy at the best market rate. I've attached the details and links below for easy reference.

SINGAPORE:
Ninja Foodi can be purchased from Ninja Kitchen Official Website. Cart out with Promo Code: MIKISNSG to get a 10% discount for any Ninja-Shark products.

MALAYSIA:

Ninja Foodi can be purchased via Ninja Shark Official Website. Cart out with Promo Code: MFAOP300 to get the lowest price deal.


3. Spray/ brush some oil in the pot, and add in pork belly. AirCrisp 180'C for 15 minutes (or 20 minutes - slightly crispy), flip and add curry leaves halfway. If you're cooking a bigger portion, adjust the cooking time accordingly. 
锅里刷上少许油,加入猪肉,气炸180度15至20分钟。备注:中途加入咖喱叶,翻面。
若喜欢我的食谱,可以LIKE和追随我的面书专页,不要错过最新食谱发布。If you like my recipe, click hereLIKE & follow Miki's Food Archives Facebook page or follow us on Instagram: mfa_dingoozatfood  to receive more recipe updates. Don't forget to favourite my pages if you wish to see my post on your Facebook news feed. 

Saturday, 16 April 2022

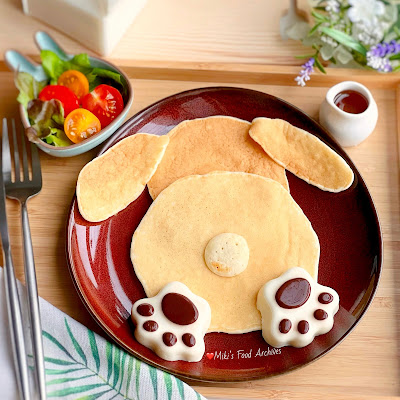
Cute Easter Bunny Pancakes With Panna Cotta/ Milk Pudding 可爱小兔奶冻煎饼 【复活节小兔】


Happy Easter! I've made this lop-eared Easter bunny pancake for the kid's breakfast, the bunny paws are Panna Cotta which is a creamy and sweet Italian milk pudding, pairing with pancakes is truly an indulgence! 


Ingredients: 
材料:

30g Water 水 30克

2 tsp Gelatin Powder 吉利丁粉 2小匙

160g Whipping Cream 动物性鲜奶油 160克

140g Fresh Milk 鲜奶 140克

45g Sugar 细砂糖 45克

<<Tap here for Easy 3-ingredients Pancake Recipe 点击进入~ 松软煎饼食谱>>


If you are sharing this recipe/ blog content, kindly attach the link to this blog instead of screen capture/ copy & paste/ use in your blog. No parts of the content of this blog may be reproduced without prior written permission. All rights reserved. Thank you. 如果您要分享此食谱/内容,请联系这个部落格的相关链接。敬请不要复制或改篇为自己的食谱。谢谢!

Method: 步骤:

1. Add water to a bowl, and add the gelatin powder, set aside for 10 minutes.
把水倒进碗里,撒上吉利丁粉,待10分钟。


2. Heat up the remaining ingredients in a saucepan until sugar dissolved (do not boil). 
把剩下的材料倒进锅里,开小火煮至糖溶化。不要煮沸。

3. Turn off heat, stir in (1) until gelatin fully dissolved.
熄火,倒入(1)搅拌至吉利丁溶化。


4. Pour into pudding mold and keep in the refrigerator once cooled. Let it chill until set, 4 hours or longer. Cook the pancake following the recipe, and serve the pancakes with panna cotta. Enjoy! Note: add some cocoa powder if making the paw design.
倒入布丁杯里,待凉后放进冰箱至少4小时以上(或至凝固)。做好煎饼后和奶冻一起享用。备注:加少许可可粉做脚印造型。
若喜欢我的食谱,可以LIKE和追随我的面书专页,不要错过最新食谱发布。
If you like my recipe, click hereLIKE & follow Miki's Food Archives Facebook page or follow us on Instagram: mfa_dingoozatfood  to receive more recipe updates. Don't forget to favourite my pages if you wish to see my post on your news feed. 


Thursday, 14 April 2022

Easter Chicks Steamed Cake 超萌小鸡蒸蛋糕【复活节小鸡造型蛋糕】


Peep Peep.... come say "hello!" to these soft, fluffy, and adorable Easter Chicks! 

Eggs and chicks are often associated with Easter because they're signs of fertility and new life. Easter weekend is here, I've took some courage to make my first batch of Easter chicks steamed cakes for the kid. I'm so happy that they turned out well! 


I've made this using my favourite steamed cake recipe, fill the batter into the egg shells then steam and decorated to resemble little chicks. 

If you are sharing this recipe/ blog content, kindly attach the link to this blog instead of screen capture/ copy & paste/ use in your blog. No parts of the content of this blog may be reproduced without prior written permission. All rights reserved. Thank you. 如果您要分享此食谱/内容,请联系这个部落格的相关链接。敬请不要复制或改篇为自己的食谱。谢谢!


If you'd like to try making it at home, tap the link below to view the recipe

Wishing you a happy, heartwarming Easter time!

Thanks for reading, I hope you are inspired after reading my blog. If you love to see my food, click hereLIKE & follow Miki's Food Archives Facebook page or follow us on Instagram: mfa_dingoozatfood  to receive more recipe updates. Don't forget to change the setting to 'SEE FIRST' if you wish to see my post on your Facebook news feed. 

Enjoy!

By readers: some feedback from those who have tried this recipe

By Janet Quik


Saturday, 9 April 2022

Easy 3-ingredients Milo Pudding 美禄布丁/巧克力奶布丁【简单做法, 只需三种材料】


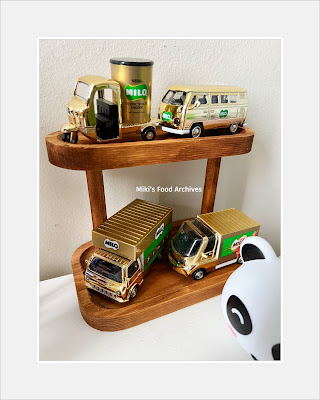
That's one mistake that I often make is showing my kid the freebies with product purchases. A few months back, we bought 4 big packs of 3-in-1 Milo just to get the collectible trucks for the boy. Well, we seldom drink Milo at home, what to do with so much Milo? 

The "golden" Milo trucks 😝


Dessert is the answer! I made Milo ice cream and puddings. Many of my readers asked me how to make the Milo pudding, it's actually quite easy, here's the recipe and method. 

Ingredients:
中文食谱:请在网页的右边点击Translate,然后选择中文翻译

4 tsp Gelatin Powder

60g Water

6 pkts Milo

600g Hot Water 


If you are sharing this recipe/ blog content, kindly attach the link to this blog instead of screen capture/ copy & paste/ use in your blog. No parts of the content of this blog may be reproduced without prior written permission. All rights reserved. Thank you. 如果您要分享此食谱/内容,请联系这个部落格的相关链接。敬请不要复制或改篇为自己的食谱。谢谢!


Method:

1. Combine gelatin and water, set aside for 10 minutes. Dissolve the gelatin powder using double boil method. 


2. Mix Milo powder and hot water, stir in gelatin liquid. Pour the mixture into pudding cups, refrigerate overnight, serve chilled. 

若喜欢我的食谱,可以LIKE和追随我的面书专页,不要错过最新食谱发布。If you like my recipe, click hereLIKE & follow Miki's Food Archives Facebook page or follow us on Instagram: mfa_dingoozatfood  to receive more recipe updates. Don't forget to change the setting to 'SEE FIRST' if you wish to see my post on your Facebook news feed. 

Friday, 1 April 2022

Homemade Pandan Kaya/ Nyonya Kaya 自制娘惹班兰咖椰酱 [Easy Sous Vide Recipe]


Sous Vide is pronounced "sue-veed", is a cooking technique that utilizes precise temperature control in a water bath to cook food to the exact level of doneness, preserve the flavour and saves more nutritional elements. Other than cooking savoury dishes, sous vide is an excellent method for making desserts. One of the sweet treats that I've tried is my all-time favourite Pandan Kaya aka coconut egg jam spread.

The traditional way of making Kaya is quite tedious as it requires continuous stirring over low heat. Making Kaya using Sous Vide method is much less labour-intensive, the result is fantastic! Just 4 ingredients, mix and place in the Ninja Foodi, it could not be simpler!


I don't have Sous Vide equipment as I wasn't a real fan of Sous Vide cooking before I got my Ninja Foodi 11-in-1 OP350 multi-cooker that can do almost anything including Sous Vide, Air-Crisp/ Air-fry, Pressure Cook, Bake/ Roast, Grill, Steam, Sear/ Saute, Slow Cook, Yoghurt, Dehydrate and Keep Warm. Sous Vide is now one of my go-to cooking methods.

Coconut Kaya bread using my homemade Pandan Kaya, 

this bread smells so good! <<Tap here for bread recipe>>


Ingredients:
中文食谱:请在网页的右边点击Translate,然后选择中文翻译

200g Coconut Milk


10pcs Pandan Leaves 


180g Castor Sugar


5 Eggs


If you are sharing this recipe/ blog content, kindly attach the link to this blog instead of screen capture/ copy & paste/ use in your blog. No parts of the content of this blog may be reproduced without prior written permission. All rights reserved. Thank you. 如果您要分享此食谱/内容,请联系这个部落格的相关链接。敬请不要复制或改篇为自己的食谱。谢谢!

Method:

1. Blend Pandan leaves and coconut milk, extract the Pandan coconut milk. 


2. Stir in eggs and sugar, pour the mixture through a strainer into the sous vide bag, seal. Add 12 cups of water into the pot. Turn on Ninja Foodi, select SOUS VIDE mode, 80'C 1 hr 30mins. 

Appliance: [Ninja Foodi OP350] The Ninja Foodi that I'm using is a combination of a pressure cooker and air fryer in one appliance, it's super-efficient and time-saving. Besides pressure cooking and air frying, there are other functions such as steam, slow cook, sear/ saute, bake/ roast, grill, dehydrate, sous vide, yoghurt, and keep warm. This cooker helps prepare quick meals without hassle, which I highly recommend to everyone who loves easy and hassle-free cooking with fewer pots and pans to wash.  I've attached the details and links below for easy reference.

SINGAPORE:
Ninja Foodi can be purchased from Ninja Kitchen Official Website. Cart out with Promo Code: MIKISNSG to get a 10% discount for any Ninja-Shark products via their website.

MALAYSIA:

Ninja Foodi can be purchased via Ninja Shark Official Website. Cart out with Promo Code: MFAOP300 to get the lowest price deal.


3. When the Ninja Foodi says "ADD FOOD", place the bag in the pot. The Kaya will be ready when the Ninja Foodi beeps. 若喜欢我的食谱,可以LIKE和追随我的面书专页,不要错过最新食谱发布。If you like my recipe, click hereLIKE & follow Miki's Food Archives Facebook page or follow us on Instagram: mfa_dingoozatfood  to receive more recipe updates. Don't forget to favourite my pages if you wish to see my post on your news feed. 

<< Click HERE >> to view more Ninja Foodi recipes and cooking videos, including easy one-pot-meal, chicken curry, roast chicken, roast pork ribs, crispy chicken, porridge, fish recipes, bread, kid-friendly snacks, and many more...


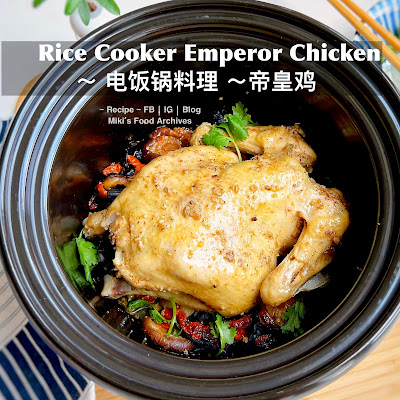
Rice Cooker Emperor Chicken 帝皇鸡【简单电饭锅食谱】


Emperor Chicken is a luxurious and healthy dish that is usually prepared by wrapping the chicken in foil/ plastic wrappers, steam to infuse the flavour. Many of us are concerned about using aluminum foil on food, sharing here is a simple Emperor Chicken recipe cooked using a rice cooker without the need to wrap the chicken. 


Ingredients:
中文食谱:请在网页的右边点击Translate, 然后选择中文翻译

1 Kampong Chicken 


10g Dried Black Fungus, soak to rehydrate


6 Shiitake Mushrooms, soak to rehydrate


1 Garlic 


1 tbsp Wolfberries/ Goji Berries


1 stalk Chinese Coriander, separate root and greens, reserve the green leaves for garnish


Seasoning:


1 pkt Emperor Chicken Premixed Seasoning


1 tbsp Black Sesame Oil 


1 tbsp Shao Xing Hua Tiao Wine


1 tbsp Concentrated Chicken Stock


If you are sharing this recipe/ blog content, kindly attach the link to this blog instead of screen capture/ copy & paste/ use in your blog. No parts of the content of this blog may be reproduced without prior written permission. All rights reserved. Thank you. 如果您要分享此食谱/内容,请联系这个部落格的相关链接。敬请不要复制或改篇为自己的食谱。谢谢!

Method:

1. Rub seasonings all over the chicken, let marinate for 2 hours or overnight.


2. Place all ingredients into the inner pot of the rice cooker. Cover with double lids set <RICE> mode. I'm using Song Cho Claypot Rice Cooker.


3. When the cooking has completed (about 1hr 30mins), garnish with coriander, and serve warm with rice. 

Note: Emperor chicken premixes (different brands) may taste different, do adjust the seasonings accordingly.

若喜欢我的食谱,可以LIKE和追随我的面书专页,不要错过最新食谱发布。
If you like my recipe, click hereLIKE & follow Miki's Food Archives Facebook page or follow us on Instagram: mfa_dingoozatfood  to receive more recipe updates. Don't forget to favourite my pages if you wish to see my post on your news feed. 

Enjoy!

Related Posts Plugin for WordPress, Blogger...