Click LIKE & follow us on Facebook for recipe updates

COOK WITH LOVE FOR A HAPPY HIM

Singapore home cooking/ baking/ food & recipe blog features more than 500 tried & tested, quick & easy kid friendly recipes with steps by steps tutorial.


Follow us on Instagram: mfa_dingoozatfood


If you're a company looking for possible collaboration, feel free to send me a message via Miki's Food Archives Facebook Fan Page or email to miki9mak@gmail.com


Search This Blog

Tuesday, 29 June 2021

One-Pot Chicken & Mushroom Rice 香菇鸡肉焖饭


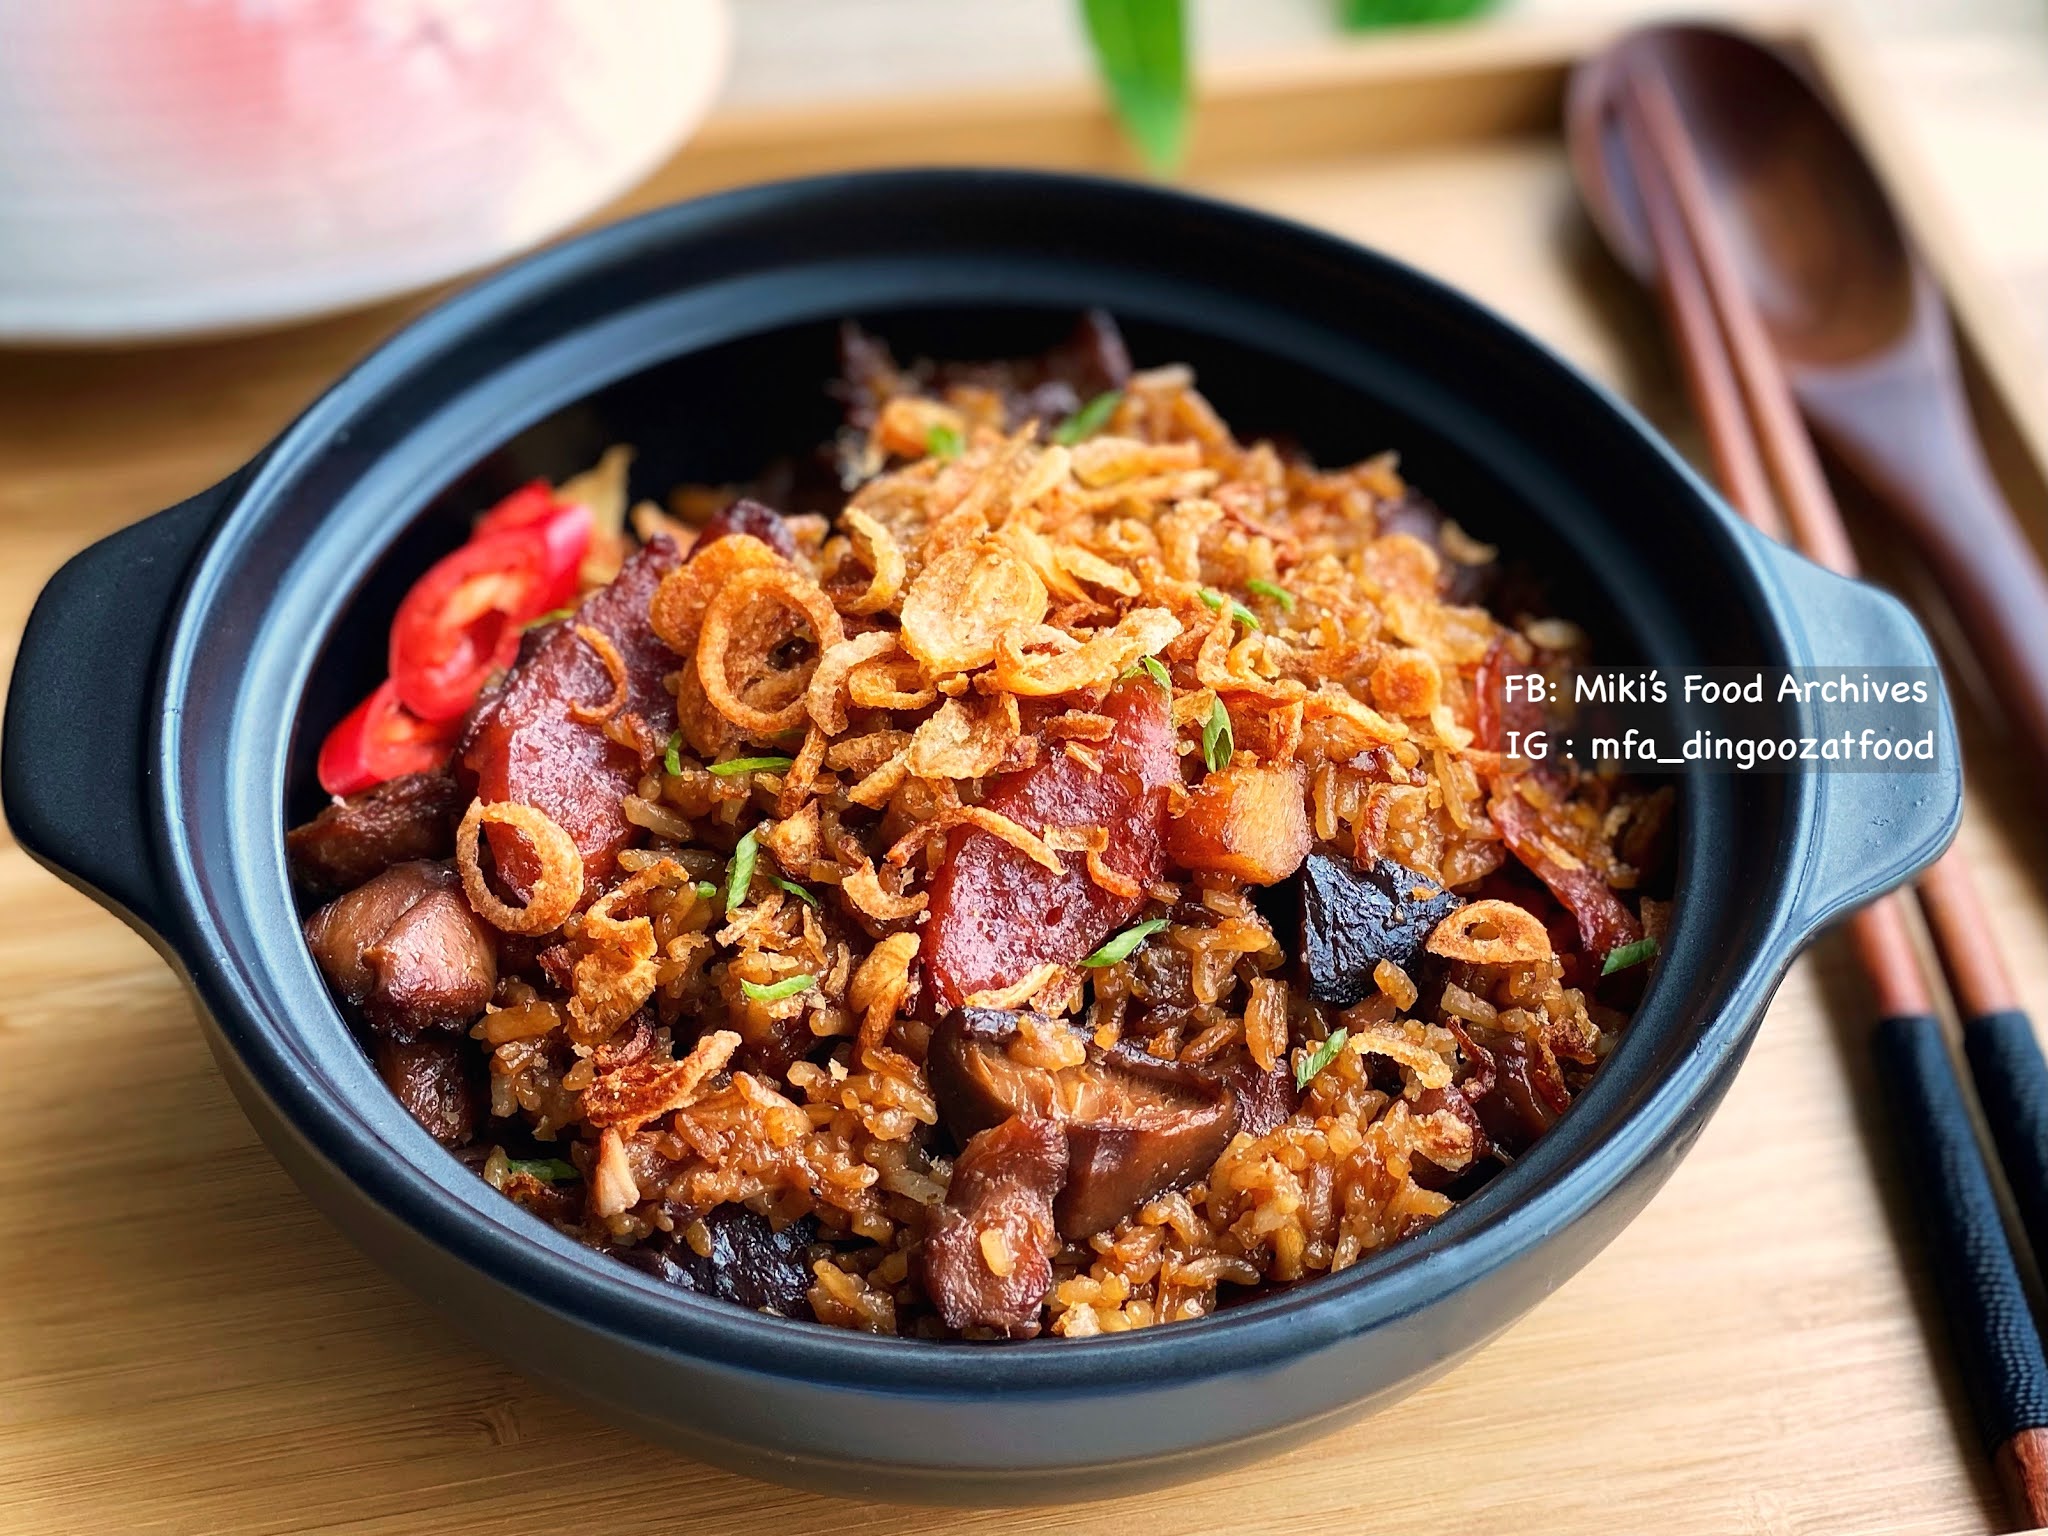
Soy Sauce Chicken & Mushroom Rice is one of our favourite one-pot meals. Sharing on this blog post is a super quick and easy recipe.


Ideal for after-school lunch…
Cooked one-pot chicken & mushroom rice and soup before I fetch the boy from school, and let them keep warm in the cooker.
Back home, just do a quick stir-fry veggie, and lunch is ready!
Photo updated: April 2022

One of my go-to rice meals on busy weekdays 
Quick & easy Soy Sauce Chicken & Mushroom Rice With Salted Fish topped with a fried egg.

Ingredients: 
中文食谱:请在网页的右边点击Translate,然后选择中文翻译。

1 + 1/2 cup Rice 

300g Chicken Thigh, sliced 

6-8pcs Shiitake Mushrooms, sliced 
(*soaked and reserve the water)

Thumb-size Ginger (sliced/ julienned) 

6 cloves Garlic, chopped 

1 cup Water + 1 cup *Mushroom Water 

1 Chinese Sausage, sliced

1 slice Salted Fish

1 tbsp Sweet Dark Soy Sauce

Marinade: 

1 tbsp Dark Soy Sauce 

1 tsp Corn Flour 

1 tbsp Light Soy Sauce 

1/4 tsp Salt 

A dash of White Pepper 

1/4 tsp Garlic Pepper  

1 tsp Sesame Oil 

1 tbsp Shao Xing Hua Tiao Wine 

3/4 tsp Sugar  

2 + 1/2 tbsp Oyster Sauce

Garnish: 

Chopped spring onion and fried shallot 


If you are sharing this recipe/ blog content, kindly attach the link to this blog instead of screen capture/ copy & paste/ use in your blog. No parts of the content of this blog may be reproduced without prior written permission. All rights reserved. Thank you. 如果您要分享此食谱/内容,请联系这个部落格的相关链接。敬请不要复制或改篇为自己的食谱。谢谢!

Method:  

1. Add all marinade ingredients to the chicken, mix well.  Add in mushrooms, mix well. Cover and let marinate in the refrigerator overnight.

2. Add 1 tbsp oil to the cooking pot. Add in salted fish and Chinese Sausage. Air-fry 180'C 5mins. This step is to air-fry and crisp up the salted fish and Chinese sausage with minimal oil and avoid oil splattering around the kitchen/ stovetop. 


3. When it's done, set aside. Use the remaining oil in the pot, stir fry garlic and ginger till fragrant. Stir in rice, mix well. 


4. Add in water, mushroom water, marinated chicken, mushrooms, and all the marinade. Top with Chinese sausage and salted fish. 


5. Pressure cook on high for 3 minutes, natural pressure release. Stir in sweet dark soy sauce, garnish with spring onion and crispy shallots, serve warm.若喜欢我的食谱,可以LIKE和追随我的面书专页,不要错过最新食谱发布。
If you like my recipe, click hereLIKE & follow Miki's Food Archives Facebook page or follow us on Instagram: mfa_dingoozatfood  to receive more recipe updates. Don't forget to favourite my pages if you wish to see my post on your news feed. 


By readers, some feedback from those who have tried this recipe:

By mamabunnykitchen


Wednesday, 23 June 2021

Chicken & Potato Curry Baked Rice 咖喱鸡肉马铃薯芝士焗饭


This is really delicious! Quick and easy Chicken & Potato Curry Baked Rice ready under 15 minutes, made using simple ingredients, it's an ideal prep-ahead and quick-fix meal on a busy day. 


Ingredients:
中文食谱:请在网页的右边点击Translate,然后选择中文翻译


Some Cooked Rice & Cheese 


If you are sharing this recipe/ blog content, kindly attach the link to this blog instead of screen capture/ copy & paste/ use in your blog. No parts of the content of this blog may be reproduced without prior written permission. All rights reserved. Thank you. 如果您要分享此食谱/内容,请联系这个部落格的相关链接。敬请不要复制或改篇为自己的食谱。谢谢!

Method:

1. Place rice and chicken & potato dry curry in a baking dish, top with some generous amount of cheese. 


3. Bake the rice 160'C 5 minutes, serve warm.若喜欢我的食谱,可以LIKE和追随我的面书专页,不要错过最新食谱发布。If you like my recipe, click hereLIKE & follow Miki's Food Archives Facebook page or follow us on Instagram: mfa_dingoozatfood  to receive more recipe updates. Don't forget to favourite my pages if you wish to see my post on your news feed. 

Tuesday, 8 June 2021

Pineapple & Coconut Milk Ice Cream aka Pina Colada Ice Cream - Easy No-churn, No Ice Cream Maker, Kid-Friendly Recipe


A healthy, kid-friendly, and easy-to-make Pineapple & Coconut Milk Ice Cream aka Pina Colada Ice Cream, super simple no-churn, no ice cream maker recipe. 


A great way to indulge your sweet tooth with this all-natural, creamy and scoop-able fruity ice cream made in a blender, ready in a minute. 


Ingredients:
中文食谱:请在网页的右边点击Translate,然后选择中文翻译

130g Coconut Milk

2 tbsp Honey

280g Frozen Pineapple 

110g Frozen Banana 


If you are sharing this recipe/ blog content, kindly attach the link to this blog instead of screen capture/ copy & paste/ use in your blog. No parts of the content of this blog may be reproduced without prior written permission. All rights reserved. Thank you. 如果您要分享此食谱/内容,请联系这个部落格的相关链接。敬请不要复制或改篇为自己的食谱。谢谢!


Method:

1. To start, you'll need a high-speed blender with really sharp blades. 

The 3-tiers blades are especially good for crushing frozen fruits and ice,
no need to manually stir in between blending.

Just add all ingredients into the pitcher, select <Ice Cream> mode.
The blender will do all the work for you. 


2. Add all ingredients into the pitcher, select <ICE CREAM>, the program will run for 1 min. When it's ready, serve right away if you like a soft-serve/ smoothie bowl. Freeze for later if you like a creamy ice cream texture. Watch the recipe video tutorial below for easy reference.若喜欢我的食谱,可以LIKE和追随我的面书专页,不要错过最新食谱发布。If you like my recipe, click hereLIKE & follow Miki's Food Archives Facebook page or follow us on Instagram: mfa_dingoozatfood  to receive more recipe updates. Don't forget to favourite my pages if you wish to see my post on your news feed. 


Sunday, 6 June 2021

Lemongrass Baked Prawns 香茅焗虾【免烤箱】


Easy Lemongrass Baked Prawns only takes 15 minutes to make using simple ingredients with bursting flavors! 


Ingredients:
中文食谱:请在网页的右边点击Translate,然后选择中文翻译

12 Large Prawns

1 thumb size Ginger, sliced

1 Red Chili, sliced

3 Lemongrass (white part - chopped, green part-pounded)

3 cloves Garlic, chopped

Garnish: Crispy Fried Shallots

2 tbsp Cooking Oil


Sauce:

1/8 tsp White Pepper

1 tsp Dark Soy Sauce

2 tsp Fish Sauce

2 tbsp Oyster Sauce

2 tsp Sugar

1 tsp Sesame Oil

1 tbsp Shao Xing Hua Tiao Cooking Wine


If you are sharing this recipe/ blog content, kindly attach the link to this blog instead of screen capture/ copy & paste/ use in your blog. No parts of the content of this blog may be reproduced without prior written permission. All rights reserved. Thank you. 如果您要分享此食谱/内容,请联系这个部落格的相关链接。敬请不要复制或改篇为自己的食谱。谢谢!

Method:

1. Add sauce ingredients to the prawns, set them aside. 

2. Heat the oil, add in ginger, chilli, lemongrass, and garlic, stir fry until fragrant. 


3. Add in prawns and the sauce. 


4. Bake 210'C 5mins. Flip the prawns, continue to bake for 2 minutes. Garnish with fried shallots, serve right away. 若喜欢我的食谱,可以LIKE和追随我的面书专页,不要错过最新食谱发布。
If you like my recipe, click hereLIKE & follow Miki's Food Archives Facebook page or follow us on Instagram: mfa_dingoozatfood  to receive more recipe updates. Don't forget to favourite my pages if you wish to see my post on your news feed. 


By readers, some feedback from those who have tried this recipe:

By Samantha Loh 


Saturday, 5 June 2021

9 Best Chicken Wings | Asian-Inspired Recipes 鸡翼/鸡翅膀食谱收藏


This list of chicken wing recipes is specially archived for you who look for simple, healthy and delicious new flavor to try, all to please your tastebuds! 


SG Hawker-Style BBQ Chicken Wings 新加坡烤鸡翅

Red Fermented Bean Curd aka Nam Yu Fried Chicken (air fry/ deep fry recipe) 南乳炸鸡(气炸/油炸)

Air Fried Crispy Prawn Paste Chicken 虾酱炸鸡 (气炸)


Easy Air Fried Chicken Wings - IKEA-style 免油炸鸡翼 


Honey Glazed Chicken Wings 蜜汁鸡翼/鸡翅膀

Air Fried Curry Chicken Wings 咖喱粉炸鸡翼【免油炸 Ninja Foodi Recipe】

Thai Style Single Bone Chicken Wings 泰式单骨鸡翼/免油炸鸡翅膀

Five Spice Salt & Pepper Chicken Wings 五香椒盐鸡翼/鸡翅 [免油炸 Ninja Foodi Air Fryer Recipe]


Curry Lemongrass Fried Chicken (Air Fried Recipe) 咖喱香茅炸鸡 (气炸)


若喜欢我的食谱,可以LIKE和追随我的面书专页,不要错过最新食谱发布。If you like my recipe, click hereLIKE & follow Miki's Food Archives Facebook page or follow us on Instagram: mfa_dingoozatfood  to receive more recipe updates. Don't forget to favourite my pages if you wish to see my post on your news feed. 

Wednesday, 2 June 2021

Stir-Fry White Bee Hoon/ Rice Vermicelli 炒白米粉


A simple yet delicious stir-fry white rice vermicelli aka Bee Hoon with vegetables, egg, meat, and seafood. This is a very well-flavoured and healthy one-dish meal that you can easily cook at home. 


Ingredients: 
中文食谱:请在网页的右边点击Translate,然后选择中文翻译。

130g Dried Bee Hoon/ Vermicelli, soaked to soften

1 tbsp Garlic, chopped

2 tbsp Shallot, chopped

4 slices Ginger 

2 Egg, lightly beaten 

4 Large/ 6 Small *Prawns 

50g *Squid  

100g **Iberico Pork Collar/ Pork Slices

*Season prawns and squid with some salt, white pepper, sesame oil, and Shao Xing Hua Tiao cooking wine. 
** Marinate the pork with Tapioca flour, light soy sauce, and sesame oil

500g Chicken Stock 

Fish Sauce & White Pepper, add to taste 

A handful of Choy Sum 

1 stalk Coriander 


If you are sharing this recipe/ blog content, kindly attach the link to this blog instead of screen capture/ copy & paste/ use in your blog. No parts of the content of this blog may be reproduced without prior written permission. All rights reserved. Thank you. 如果您要分享此食谱/内容,请联系这个部落格的相关链接。敬请不要复制或改篇为自己的食谱。谢谢!

Method: 


1. Heat some oil stir fry garlic, shallot, coriander root and ginger until fragrant, stir fry the pork, push aside, pour in the egg. 


2. When the egg is half-cooked, stir in chicken stock, bring to a boil.


3. Add in the rest of the ingredients (except coriander). Let simmer until cooked through. Garnish with coriander, serve right away.若喜欢我的食谱,可以LIKE和追随我的面书专页,不要错过最新食谱发布。
If you like my recipe, click hereLIKE & follow Miki's Food Archives Facebook page or follow us on Instagram: mfa_dingoozatfood  to receive more recipe updates. Don't forget to favourite my pages if you wish to see my post on your news feed. 

Tuesday, 1 June 2021

Stir-fry Sweet Tamarind Squid/ Assam Sotong 亚参乌贼/苏东


A quick and easy stir-fry squid in sweet tamarind sauce, tangy and delicious, goes well with rice. 

Ingredients:

2 Squid

1/2 Red Chili (non-spicy) or 1 Bird's Eye Chili/ Cili Padi, sliced

1 Onion, sliced

Some Coriander


Marinade:

2 tsp Garlic, mashed

1/2 tsp Ginger, grated

1.5 tbsp Tamarind/ Assam Paste

1.5 tbsp Sweet Dark Soy Sauce

1 tsp Salt

2 tsp Sugar

1 tsp Sesame Oil


If you are sharing this recipe/ blog content, kindly attach the link to this blog instead of screen capture/ copy & paste/ use in your blog. No parts of the content of this blog may be reproduced without prior written permission. All rights reserved. Thank you. 

如果您要分享此食谱/内容,请联系这个部落格的相关链接。敬请不要复制或改篇为自己的食谱。谢谢!


Method:

1. Combine squid and the marinade, let it sit for 15 minutes. 
Heat some oil in the wok, stir fry chili and onion until fragrant.

I cooked this dish using Song Cho stainless steel wok, 
a multiply stainless steel wok without chemical coating, it's safe to use in any cooking including deep-frying. 
For more information about the product, visit Song Cho e-shop for details.


2. Add in squid and all the marinade, bring to a boil. Adjust the taste if needed. When the sauce has thickened, garnish with coriander and serve right away.
若喜欢我的食谱,可以LIKE和追随我的面书专页,不要错过最新食谱发布。
If you like my recipe, click hereLIKE & follow Miki's Food Archives Facebook page or follow us on Instagram: mfa_dingoozatfood  to receive more recipe updates. Don't forget to change the setting to 'SEE FIRST' if you wish to see my post on your Facebook news feed. 

Enjoy!


Related Posts Plugin for WordPress, Blogger...