Click LIKE & follow us on Facebook for recipe updates

COOK WITH LOVE FOR A HAPPY HIM

Singapore home cooking/ baking/ food & recipe blog features more than 500 tried & tested, quick & easy kid friendly recipes with steps by steps tutorial.


Follow us on Instagram: mfa_dingoozatfood


If you're a company looking for possible collaboration, feel free to send me a message via Miki's Food Archives Facebook Fan Page or email to miki9mak@gmail.com


Search This Blog

Friday, 30 October 2020

Cute Pig Pizza - Easy 2 Ingredients Pizza Dough 简易披萨


Baking pizza using a simple 2 ingredients dough recipe. I normally make pizza with my kid, our pizza is not the best-looking but the boy loves it! ;)

Ingredient: 
中文食谱:请在网页的右边点击Translate,然后选择中文翻译

Quick & easy 2 ingredients pizza dough: 

200g Self-raising Flour

180g+- Greek-style Yoghurt, adjust the amount accordingly.


If you are sharing this recipe/ blog content, kindly attach the link to this blog instead of screen capture/ copy & paste/ use in your blog. No parts of the content of this blog may be reproduced without prior written permission. All rights reserved. Thank you. 如果您要分享此食谱/内容,请联系这个部落格的相关链接。敬请不要复制或改篇为自己的食谱。谢谢!


Method:

1. Mix Greek yogurt & self-raising flour, knead to form a smooth pliable dough. 

Can be made into regular pizza as shown in the video below
or thin crust as shown in this picture.


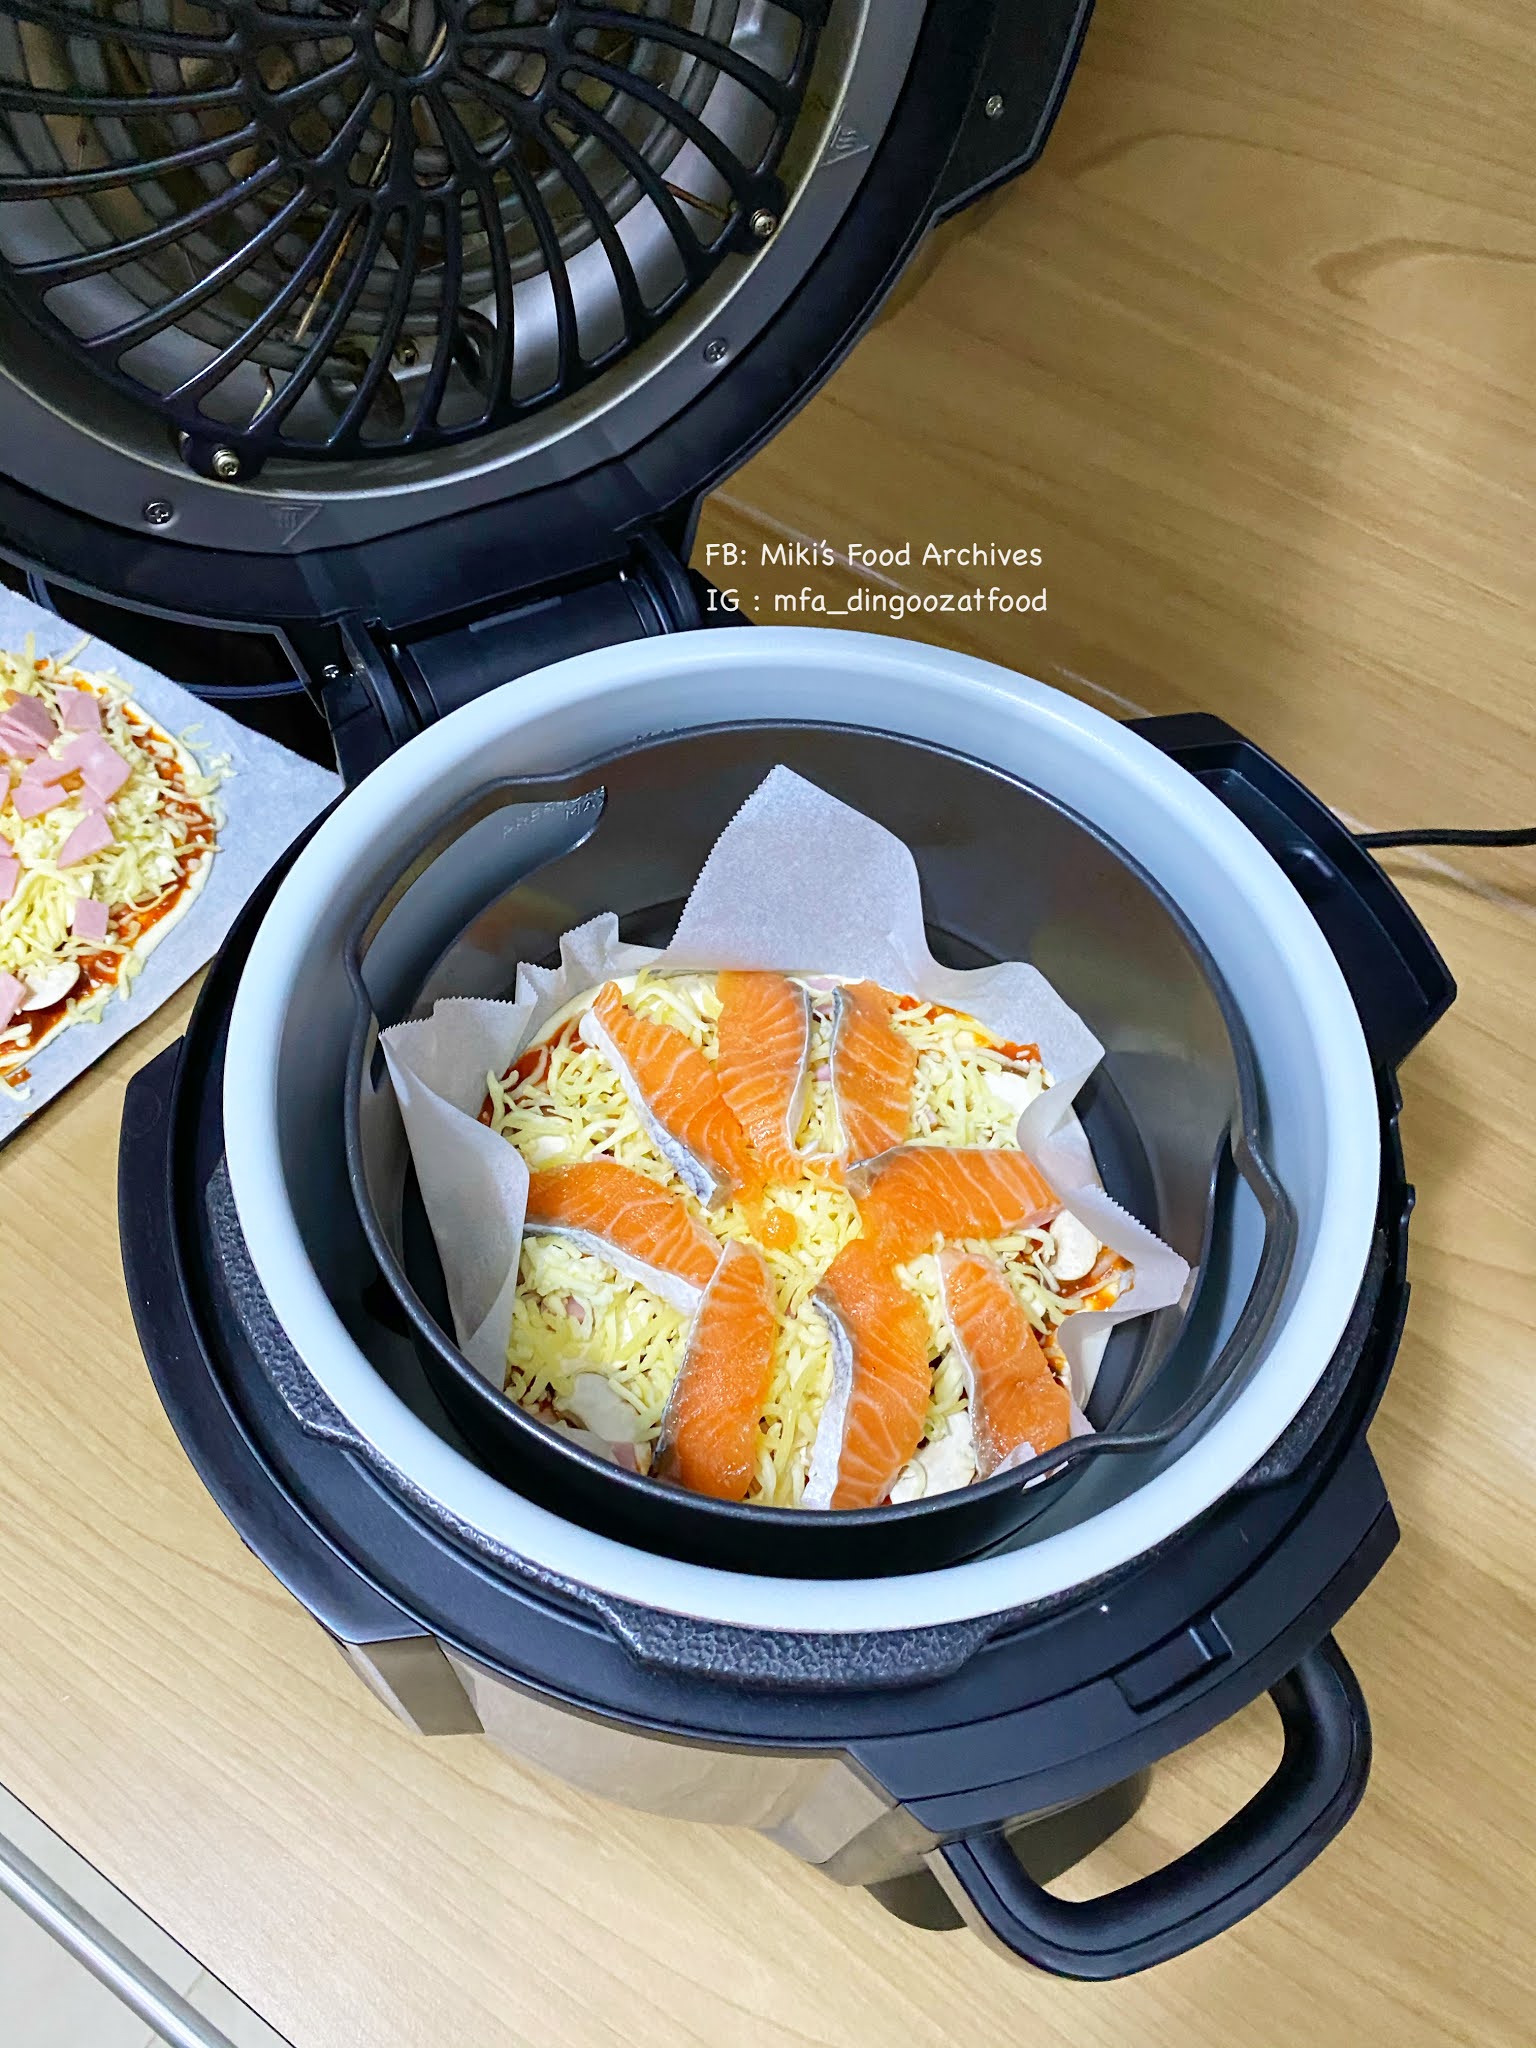
2. Prepare the toppings following the steps in the video below. Bake 180'C, 8 minutes. 

Watch the video tutorial for the cooking method/ steps. 步骤详细在下面的视频里👇 若喜欢我的食谱,可以LIKE和追随我的面书专页,不要错过最新食谱发布。If you like my recipe, click hereLIKE & follow Miki's Food Archives Facebook page or follow us on Instagram: mfa_dingoozatfood  to receive more recipe updates. Don't forget to favourite my pages if you wish to see my post on your news feed. 


Thin-crust pizza made using the same recipe, this time I added some cheese to the outer edge of the crust, glad that everyone loves it! 
Photo updated: Nov 2022


Salt Baked Chicken With Dang Gui aka Angelica Sinensis 当归盐焗鸡


Cooked this nutritious Salt Baked Chicken for the family using simple ingredients, seasoned with GoodSalt, a low sodium iodized salt that tastes like regular salt. Glad that everyone loves it without noticing the change in the salt content! 


The sodium content in GoodSalt is replaced by essential minerals such as Potassium, Magnesium, Lysine and Iodine. 

  • Potassium: Important to heart, digestive, and muscle functions
  • Magnesium: Helps regulate blood pressure
  • Iodine & Lysine: Supports brain cell development

This powerful combination of minerals helps to protect users from LVH salt damage, maintain cardiac rhythm and lowers blood pressure. 

When switching to GoodSalt, there's no need to re-measure, you can use GoodSalt in replacement of regular salt in your daily cooking, gram to gram! 


📣 Stand a chance to win $20 NTUC vouchers and a #goodsalt gift pack! Simply head over to @imilifestylesg and do the following:


👉🏻Follow IMI Lifestyle Facebook page

👉🏻Tag 3 friends in the post

👉🏻Like and Share the post

👉🏻Comment with 2 dishes that GoodSalt can be used in


Winners will be announced on IMI Lifestyle Facebook page on 4 Nov 2020. Winners will be selected only based on Facebook entries. Good luck! 🌟


Ingredients:
中文食谱:请在网页的右边点击Translate,然后选择中文翻译

2 Chicken Leg 

2 tsp GoodSalt 

1 tbsp Shao Xing Hua Tiao Cooking Wine 

1 tsp Sesame Oil 

1/8 tsp White Pepper

1 tsp Grated Ginger 

5 Red Dates, halved 

3-4 slices Angelica Sinensis aka Dang Gui 

1 tbsp Wolfberries


If you are sharing this recipe/ blog content, kindly attach the link to this blog instead of screen capture/ copy & paste/ use in your blog. No parts of the content of this blog may be reproduced without prior written permission. All rights reserved. Thank you. 

如果您要分享此食谱/内容,请联系这个部落格的相关链接。敬请不要复制或改篇为自己的食谱。谢谢!


Method:

1. In a bowl, mix together all ingredients, c
over with cling wrap, let marinate in the refrigerator for 6 hours or overnight.


2. Remove the marinated chicken legs from the refrigerator, return to room temperature.


3. Place chicken on baking paper and wrap up. Use 2 sheets of baking paper to avoid leakage.


4. Bake in a preheated oven 180'C for 60-90 minutes. Serve warm with rice or porridge.

If you like my recipe, click hereLIKE & follow Miki's Food Archives Facebook page or follow us on Instagram: mfa_dingoozatfood  to receive more recipe updates. Don't forget to change the setting to 'SEE FIRST' if you wish to see my post on your Facebook news feed. 

Enjoy!


Tuesday, 27 October 2020

Crispy Prawn & Fruits Salad 沙拉虾球 【免油炸/Air-fryer recipe】


Delicious prawn salad made using fresh prawns, marinate with simple ingredients.


Ingredients:
中文食谱:请在网页的右边点击Translate,然后选择中文翻译

15 Prawns

1 Egg White

Some Potato Starch

Some fruits - fresh/ canned, diced

3-4 tbsp Japanese Mayonaise 

Marinade:

1/4 tsp Sesame Oil

1/2 tsp Shao Xing Hua Tiao Wine

Dash of White Pepper

1/2 tsp Salt


If you are sharing this recipe/ blog content, kindly attach the link to this blog instead of screen capture/ copy & paste/ use in your blog. No parts of the content of this blog may be reproduced without prior written permission. All rights reserved. Thank you. 如果您要分享此食谱/内容,请联系这个部落格的相关链接。敬请不要复制或改篇为自己的食谱。谢谢!

Method:

1. Pat dry the prawns with kitchen towels. Add in marinade ingredients, mix well and let marinate for 15 minutes.


2. Preheat air-fryer 210'C 5 minutes.


3. Coat the prawns with egg white and potato starch. Air fry 210'C for 8 minutes or till golden and crisp. Mix with mayonnaise and fruits, serve right away. 
Note: Spray some oil on the basket and prawns before air-frying. Flip once halfway cooking. If you do not have an air-fryer, you can deep fry the prawns. 若喜欢我的食谱,可以LIKE和追随我的面书专页,不要错过最新食谱发布。
If you like my recipe, click hereLIKE & follow Miki's Food Archives Facebook page or follow us on Instagram: mfa_dingoozatfood  to receive more recipe updates. Don't forget to favourite my pages if you wish to see my post on your news feed. 


Friday, 23 October 2020

Easy Beef Rendang【Pressure Cooker Recipe】 牛肉仁当


Rendang Sapi Padang or beef rendang is originally from Indonesia, a well-known Padang dish that's made by stewing meat in coconut milk and spices for hours until the meat becomes tender and dark, liquids evaporated and caramelized. The authentic rendang recipe required a long list of spices and at least 3-4 hours of cooking time. For a busy SAHM and working parents in Singapore, I think most of us would be interested in the short-cut method than spending half a day in the kitchen to cook a pot of rendang. 


This is a super simple beef rendang recipe using instant Padang rendang paste, merely 45 minutes cooking time that tastes like it's been slow-cooked for 3-4 hours, with perfectly tender and succulent beef infused in rich aromatic thick rendang gravy.


Cook rice and rendang at the same time.
Rice and water ratio is 2:3 

The rice is perfectly cooked and ready to serve!

Home-cooked Beef Rendang Rice along with a cute bear air-fried egg and prawn rolls


Ingredients:
中文食谱:请在网页的右边点击Translate,然后选择中文翻译
(serves 2 or 2 adults1 child, if you're a small eater like us!)

300g Beef, I use NZ Grass Fed Beef Shin/ Shank Cubes 

1 tbsp Potato Starch

75g Rendang Paste (homemade/ store-bought)

100g Coconut Milk

1 Lemongrass, pounded

1 tbsp Toasted Desiccated Coconut

About 100g Water, or add to 2 cup level

Some oil for cooking


If you are sharing this recipe/ blog content, kindly attach the link to this blog instead of screen capture/ copy & paste/ use in your blog. No parts of the content of this blog may be reproduced without prior written permission. All rights reserved. Thank you. 如果您要分享此食谱/内容,请联系这个部落格的相关链接。敬请不要复制或改篇为自己的食谱。谢谢!


Method:

1. Marinate beef with potato starch and 25g of Rendang Paste for 1 hour or overnight. 


2. Heat some oil and saute lemongrass and gently stir-fry the marinated beef to lock the moisture. 


3. Add in the rest of the ingredients, mix well.


4. Pressure Cook (HI) 30 minutes. When the cooking is done, quick-release pressure. If you're cooking rice, place a rack and rice in the pot as shown in the pictures above. Continue with 15 minutes of pressure cook on high.  


Cooked our favourite Beef Rendang again,
this time I added some potatoes, the kid loves it so much!
Note: add the potato chunks to the rendang after 30mins PC.
Photo updated: Oct 2022


5. When the cooking is done, natural pressure release 15 minutes. Remove the rice and rack from the pot. Set Saute/Sear mode to thicken the rendang gravy. 
Note: If you're not cooking with rice, you can serve the rendang after the first 30mins, natural pressure release 15mins, the meat is quite tender. If you like it almost-melt-in-mouth, set 45 minutes Pressure Cook (HI), 15 minutes natural pressure release. 若喜欢我的食谱,可以LIKE和追随我的面书专页,不要错过最新食谱发布。
If you like my recipe, click hereLIKE & follow Miki's Food Archives Facebook page or follow us on Instagram: mfa_dingoozatfood  to receive more recipe updates. Don't forget to favourite my pages if you wish to see my post on your news feed. 


Thursday, 22 October 2020

Air-Fried Calamari/ Squid Rings 香脆鱿鱼圈【免油炸】


Calamari is the culinary name for squid. It is widely available fresh or frozen, and relatively inexpensive. Every time when we dine out, if we see fried calamari on the menu, we must order, it's one of our favourite finger food! 


Making fried calamari rings at home is easy if you minus the deep-frying process. Get the calamari rings seasoned and coated with crumbs, place them in the cooker, and select the cooking temperature and time. You'll get your crispy and yummy calamari rings ready in just 5 minutes. 


Ingredients:
中文食谱:请在网页的右边点击Translate,然后选择中文翻译

2 Squid, cut into rings

1 tsp Garlic Salt or add to taste

1/4 tsp Onion Powder

Dash of White Pepper 

Some All-Purpose Flour

1 small Egg, lightly beaten

Some Bread Crumbs + a dash of Curry Powder

Oil Spray


If you are sharing this recipe/ blog content, kindly attach the link to this blog instead of screen capture/ copy & paste/ use in your blog. No parts of the content of this blog may be reproduced without prior written permission. All rights reserved. Thank you. 如果您要分享此食谱/内容,请联系这个部落格的相关链接。敬请不要复制或改篇为自己的食谱。谢谢!

Method:

1. Pat dry the squid with kitchen towels. Season with garlic salt, onion powder and white pepper. 


2. Preheat air-fryer 200'C for 3 minutes. Coat the rings with some flour, then egg and finally in bread crumbs. 


3. Cook in 2 batches, air-fry 200'C for 5-6 minutes or till golden and crisp. Serve with your favourite dipping sauce. Note: Spray some oil on the basket and calamari before air-frying.若喜欢我的食谱,可以LIKE和追随我的面书专页,不要错过最新食谱发布。
If you like my recipe, click hereLIKE & follow Miki's Food Archives Facebook page or follow us on Instagram: mfa_dingoozatfood  to receive more recipe updates. Don't forget to favourite my pages if you wish to see my post on your news feed. 


Friday, 16 October 2020

Easy Bread Pudding 面包布丁 [Air-Fryer Recipe]


Bread Pudding is a bread-based dessert, made with stale bread, milk, egg and cream. The bread soaked in custard mixture, mixed with other ingredients such as dried fruits, ham or a variety of other ingredients depending on whether the pudding is sweet or savory. Usually baked in an oven for 40-45 minutes. 


Don't worry, this recipe that I'm sharing here is a quick and easy method. The total time needed from preparation to serve is under 20 minutes. If you are a "fast hand fast leg 快手快脚" person, you can get it done in 15 minutes. 

Ingredient: 
中文食谱:请在网页的右边点击Translate,然后选择中文翻译

2 thick slices Bread, cut/ tear into smaller pieces

90g Milk

90g Whipping Cream

35g Castor Sugar
(can be adjusted to taste)

1/4 tsp Vanilla Extract

1 Egg 

Some Dried Cranberries (optional)

Some Icing/ Vanilla Sugar for toppings

Some Butter to grease the ramekin


If you are sharing this recipe/ blog content, kindly attach the link to this blog instead of screen capture/ copy & paste/ use in your blog. No parts of the content of this blog may be reproduced without prior written permission. All rights reserved. Thank you. 如果您要分享此食谱/内容,请联系这个部落格的相关链接。敬请不要复制或改篇为自己的食谱。谢谢!


Method:

1. Grease ramekin/ baking dish with some softened butter. 

2. Prepare the ingredients following the steps in the video tutorial below. Bake/ air-fry 180'C cook for 10 minutes and it's ready! If you don't have an air fryer at home, you can bake this in an oven. Watch the video tutorial for the cooking method/ steps. 步骤详细在下面的视频里👇若喜欢我的食谱,可以LIKE和追随我的面书专页,不要错过最新食谱发布。If you like my recipe, click hereLIKE & follow Miki's Food Archives Facebook page or follow us on Instagram: mfa_dingoozatfood  to receive more recipe updates. Don't forget to favourite my pages if you wish to see my post on your news feed. 


Some feedback from those who have tried this recipe:

By Samantha Yeap


Thursday, 15 October 2020

Easy BBQ Pork Puff aka Siu Bao 简易酥皮烧包


I have many easy ways to prepare snacks, this is one of them, a quick and mess-free method to make BBQ Pork Puff/ Siu Bao. If you've ever been to a town called Seremban in Malaysia, you've probably heard of Seremban Siu Bao, a very famous pastry filled with BBQ pork. This is the cheat version using puff pastry, just wrap and air-fry for 6 minutes. 


Ingredients:
中文食谱:请在网页的右边点击Translate,然后选择中文翻译

1 Puff Pastry

Some Sesame Seeds, optional

1 Egg, lightly beaten for egg wash


If you are sharing this recipe/ blog content, kindly attach the link to this blog instead of screen capture/ copy & paste/ use in your blog. No parts of the content of this blog may be reproduced without prior written permission. All rights reserved. Thank you. 如果您要分享此食谱/内容,请联系这个部落格的相关链接。敬请不要复制或改篇为自己的食谱。谢谢!


Method:

Preheat air-fryer 200'C for 3 minutes. While preheating, prepare the pastry as follow:

Use a round cutter or a mug, cut out the semi-thaw puff pastry.


Wrap in fillings.

Egg wash, top with a pinch of sesame seeds.


Place the raw Siu Bao into cooking basket, air-fry or bake 200'C for 6 minutes and it's done! 
Note: If making a bigger portion, adjust the cooking time accordingly. 若喜欢我的食谱,可以LIKE和追随我的面书专页,不要错过最新食谱发布。
If you like my recipe, click hereLIKE & follow Miki's Food Archives Facebook page or follow us on Instagram: mfa_dingoozatfood  to receive more recipe updates. Don't forget to favourite my pages if you wish to see my post on your news feed. 


Related Posts Plugin for WordPress, Blogger...