Click LIKE & follow us on Facebook for recipe updates

COOK WITH LOVE FOR A HAPPY HIM

Singapore home cooking/ baking/ food & recipe blog features more than 500 tried & tested, quick & easy kid friendly recipes with steps by steps tutorial.


Follow us on Instagram: mfa_dingoozatfood


If you're a company looking for possible collaboration, feel free to send me a message via Miki's Food Archives Facebook Fan Page or email to miki9mak@gmail.com


Search This Blog

Monday, 27 July 2020

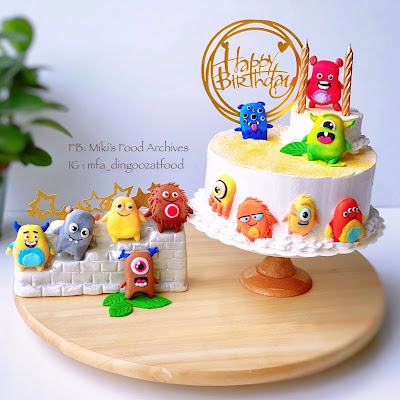
Monster Theme Birthday Cake [Customised Kid's Birthday Cake]


It's that time of the year again.... Every year, I'd make birthday cake for my boy. This year, for his 11th birthday, he'd requested a ClassDojo monster theme birthday cake. He printed and cut out 12 monster pictures that he and his classmates created via Classdojo and asked me if I could make a cake with all these monsters on it. Ohh he did mentioned about 3D, not just pictures LOL.... This is definitely not easy but challenge accepted! :D 


Handcrafted customised ClassDojo monsters fondant cake topper.

I started with the cake toppers, I'd made all 12 fondant cake toppers based on the pictures given, all handcrafted in 3D figurines. Every piece is unique because it's all hand-shaped, tedious work that I took about 8 hours to complete.


Handcrafted customised ClassDojo monsters fondant cake topper and a stand alone staircase/ wall.

Recently my boy started to love coffee, so I baked a coffee cake as base and decorated the cake with fresh cream frosting. I kept it as simple as possible as the 12 monsters were already very colourful. 


Handcrafted customised ClassDojo monsters fondant cake topper.

Besides the 6" coffee cake, I also made a mini vanilla cake. This idea came after the boy found a box of candy and asked if I could make pinata cake. I didn't want him to eat too much candies, so I made a mini pinata cake to place on top (where the pink monster standing) instead of using the main cake to fill with candies. 

Just 6 candies.... all for him.. :D 


Birthday boy with his unique ClassDojo monster theme birthday cake
specially made for him.


When everything's ready, I let him decide where to place the monsters. Although there were some flaws here and there after he accidentally "touch" the cakes, overall we were happy that everything turned out well. 


Creative monster theme kid's birthday cake, handmade by mom ❤️

Look at the pink monster holding 2 candles....isn't it cute! :D 


Coffee Cake With Fresh Cream.


If you wish to try the cake recipe, click the link here 蛋糕食谱: The Perfect Sponge Cake Recipe 点击进入《海绵蛋糕食谱》

If you are sharing this recipe/ blog content, kindly attach the link to this blog instead of screen capture/ copy & paste/ use in your blog. No parts of the content of this blog may be reproduced without prior written permission. All rights reserved. Thank you. 如果您要分享此食谱/内容,请联系这个部落格的相关链接。敬请不要复制或改篇为自己的食谱。谢谢!

Thanks for reading, I hope you are inspired after reading my blog. If you love to see my food, click hereLIKE & follow Miki's Food Archives Facebook page or follow us on Instagram: mfa_dingoozatfood  to receive more recipe updates. Don't forget to change the setting to 'SEE FIRST' if you wish to see my post on your Facebook news feed. 

Enjoy!

Wednesday, 15 July 2020

Dry Curry Pork Stir-fry 香炒干咖喱猪肉片


This is my family's recipe, one of my childhood favourite dishes that my mom used to cook for us. Flavourful and full of curry aroma but non-spicy, that's why it's well-loved by children. :) 


Ingredients: 材料

250g Pork, thinly sliced 猪肉片

1tbsp Garlic 蒜头

A handful of Curry Leaves 咖喱叶

Some oil for cooking 油


(A)

1 tsp Curry Powder 咖喱粉

1/2 tsp Ground Turmeric 黄姜粉

1 tsp Tapioca Flour 木薯粉

1/2 tsp Soy Sauce 酱油

1/4 tsp Salt 盐

1 tsp Sesame Oil 麻油

(B)

1/2 tbsp Oyster Sauce 蚝油

1 tsp Curry Powder 咖喱粉

1/2 tsp Soy Sauce 酱油

1/8 tsp Dark Soy Sauce 黑酱油

Some Water 水


If you are sharing this recipe/ blog content, kindly attach the link to this blog instead of screen capture/ copy & paste/ use in your blog. No parts of the content of this blog may be reproduced without prior written permission. All rights reserved. Thank you. 

如果您要分享此食谱/内容,请联系这个部落格的相关链接。敬请不要复制或改篇为自己的食谱。谢谢!

Method:步骤

1. Marinate pork with (A)for 2 hours or overnight.
(A)和肉片拌均,腌两小时或隔夜。

2. Heat oil in a pan/ wok, fry garlic and curry leaves till fragrant. Add in the pork and stir fry till half-cooked.
烧热油把蒜头和咖喱叶爆香,加入肉片炒香。


3. Add in (B), stir/ toss to mix well. 
加入(B),拌均。


4. When the pork is cooked through, remove it from the heat and serve it with warm rice.
猪肉煮熟后收汁即可。若喜欢我的食谱,可以LIKE和追随我的面书专页,不要错过最新食谱发布。
If you like my recipe, click hereLIKE & follow Miki's Food Archives Facebook page or follow us on Instagram: mfa_dingoozatfood  to receive more recipe updates. Don't forget to change the setting to 'SEE FIRST' if you wish to see my post on your Facebook news feed. 

Enjoy!
By readers: some feedback from those who have tried this recipe:

By Safrinachong


Friday, 10 July 2020

Curry Potato & Chicken Cute Steamed Bun/ Pau 咖喱马铃薯鸡肉包【可爱造型包子】


Peep peep little chicks! Made these adorable, soft and fluffy steamed buns for breakfast. Don't worry about the vibrant yellow colour, it's all-natural colour from ground turmeric.

After I tried making the first batch of Red Bean Paste Steamed Bun using a blender, I have confident making the second batch with design.


Red Bean Paste Steamed Bun for me and Curry Potato Chicken Steamed Bun for the kid.


Ingredients: 

Dough recipe 面团材料: 

85g Milk 牛奶 85克

20g Sugar 细砂糖 20克

1 tsp Oil 油 1小匙

Few dashes of  Ground Turmeric 黄姜粉 少许

150g Plain Flour/ Pao Flour 中筋面粉/包粉 150克

1/2 tsp Instant Dry Yeast 即溶酵母 1/2小匙

~~~~~~~~~~~~~~~~~~~~~~~~~~~~~~~~~~~~~

Red Rice Powder/ Carrot Juice and Charcoal Powder 红菊粉/胡萝卜汁和黑炭粉,适量

1-2 tbsp Milk, if needed 牛奶,适量

Some Chicken & Potato Dry Curry Fillings 鸡肉马铃薯干咖喱馅
Tap the link for recipe 点击链接进入 


If you are sharing this recipe/ blog content, kindly attach the link to this blog instead of screen capture/ copy & paste/ use in your blog. No parts of the content of this blog may be reproduced without prior written permission. All rights reserved. Thank you. 如果您要分享此食谱/内容,请联系这个部落格的相关链接。敬请不要复制或改篇为自己的食谱。谢谢!


Method: 步骤

1. Place the dough blade into the pitcher. Add in all dough ingredients. Select the DOUGH function to knead the dough.
将所有面团材料放进搅拌机搅拌成团

About the appliance:
This is Ninja’s most powerful blender kitchen system that crushes, processes, grinds and powers through thick ingredients without stalling or needing to stir or shake.


🌟Comes with variable speed control and 6 pre-set Auto-iQ programs: smoothies, extractions, bowls, spreads, chopping and dough mix. 

🧼 Easy-to-clean, all removable parts are dishwasher safe 

⚡️ Ninja blender can be purchased from Ninja Kitchen Official Website. Cart out with Promo Code: MIKISNSG to get a 10% discount for any Ninja-Shark products via their website.


2. When the dough is ready, transfer the dough onto the floured tabletop, knead for few minutes till smooth.
取出面团加少许面粉揉至光滑。

- Prepare red/orange colour dough: knead in some red rice powder+ milk/ carrot juice. 
红色面团:加少许红菊粉和牛奶/胡萝卜汁,揉均。

Prepare the black colour dough: knead in some charcoal powder and milk. 
黑色面团:加少许黑炭粉和牛奶,揉均。


3. Shape as desired, use the pictures below as reference.
分割后包入馅料,造型可参考下图。


4. Let it proof for about 50 minutes or double in size. Steam for 15 minutes. When it's done, turn off the heat. Let it sit for 5 minutes before removing open the lid. 
做好后发酵50分钟或双倍大。蒸15分钟。 蒸好后熄火,待5分钟才把包子拿出。待凉后即可享用。若喜欢我的食谱,可以LIKE和追随我的面书专页,不要错过最新食谱发布。

If you like my recipe, click hereLIKE & follow Miki's Food Archives Facebook page or follow us on Instagram: mfa_dingoozatfood  to receive more recipe updates. Remember to favourite my pages if you wish to see my post on your news feed. Enjoy!


Thursday, 9 July 2020

Red Bean Paste Steamed Bun aka Dòu Shā Bāo 简易豆沙包 [Blender Recipe]


Continuing my food experiment using Ninja blender with unique Auto-iQ technology designed to make life easier, simply press one button and let Auto-iQ do the work for you... It's easy to prepare dough for steamed buns that do not require much kneading, just add in all ingredients and select the DOUGH function to form the dough.

Ingredients: 

85g Milk 牛奶 85克

20g Sugar 细砂糖 20克

1 tsp Oil 油 1小匙

150g Plain Flour/ Pau Flour 中筋面粉/包粉 150克

1/2 tsp Instant Dry Yeast 即溶酵母 1/2小匙


Red Bean Paste Fillings 豆沙馅


If you are sharing this recipe/ blog content, kindly attach the link to this blog instead of screen capture/ copy & paste/ use in your blog. No parts of the content of this blog may be reproduced without prior written permission. All rights reserved. Thank you. 如果您要分享此食谱/内容,请联系这个部落格的相关链接。敬请不要复制或改篇为自己的食谱。谢谢!

Method: 步骤

1. Place the dough blade into the pitcher. Add in all ingredients (except red bean paste). Select the DOUGH function to knead the dough.
将所有材料(除豆沙馅)放进搅拌机搅拌成团

About the appliance:
This is Ninja’s most powerful blender kitchen system that crushes, processes, grinds and powers through thick ingredients without stalling or needing to stir or shake.


🌟Comes with variable speed control and 6 pre-set Auto-iQ programs: smoothies, extractions, bowls, spreads, chopping and dough mix. 

🧼 Easy-to-clean, all removable parts are dishwasher safe 

⚡️Ninja blender can be purchased from Ninja Kitchen Official Website. Cart out with Promo Code: MIKISNSG to get a 10% discount for any Ninja-Shark products via their website.


I added a little more liquid than usual so the dough would be softer and easier for the blender to work. 

2. When the dough is ready, transfer the dough onto the floured tabletop, knead for a few minutes till smooth. Divide dough into 5 portions, and roll into small balls. Roll out and wrap in fillings. 
取出面团加少许面粉揉至光滑。分割5份,包入馅料。

Transfer on a floured worktop, and knead for a few minutes till smooth and elastic.

Wrap in filling and steam. I steamed the bun in Ninja Foodi using the STEAM function. 

3. Let it proof for about 50 minutes or double in size. Steam for 15 minutes. When it's done, turn off the heat. Let it sit for 5 minutes before removing open the lid. 
做好后发酵50分钟或双倍大。蒸15分钟。 蒸好后熄火,待5分钟才把包子拿出。待凉后即可享用。若喜欢我的食谱,可以LIKE和追随我的面书专页,不要错过最新食谱发布。

<<CLICK HERE>> to view more Ninja Blender recipes.

If you like my recipe, click hereLIKE & follow Miki's Food Archives Facebook page or follow us on Instagram: mfa_dingoozatfood  to receive more recipe updates. Remember to favourite my pages if you wish to see my post on your news feed. Enjoy!


Monday, 6 July 2020

Sweet Potato Bread With Red Bean Paste 豆沙软面包


Red bean bread have always been my favourite. This homemade version is slightly different from the one from bakery, these were made using sweet potato bread dough that yield super soft and fluffy bread that stay soft for days.

Sweet Potato Bread With Red Bean Paste, I tried using different topping this time.
Topped with desiccated coconut smells so good!
Photo updated: July 2024


Ingredients: 
材料

Bread Recipe adapted from here

260g Bread Flour 高筋面粉 260克

3/4 tsp Instant Yeast 即溶酵母 3/4 小匙

40g Castor Sugar 细砂糖 40克

1/4 tsp Salt 盐 1/4 小匙

120g Sweet Potato (steamed & mashed) 番薯(蒸熟) 120克 

30g Whipping Cream 动物性奶油 30克

110g Full Cream Fresh Milk  全脂牛奶 110克

20g Egg (lightly beaten) 蛋液 20克 

20g Unsalted Butter 无盐牛油 20克


Others:

Red Bean Paste 豆沙馅 适量

1 Egg yolk + 1tbsp milk for egg wash 1粒蛋黄+1汤匙牛奶

Some Sesame Seeds 芝麻 适量


If you are sharing this recipe/ blog content, kindly attach the link to this blog instead of screen capture/ copy & paste/ use in your blog. No parts of the content of this blog may be reproduced without prior written permission. All rights reserved. Thank you. 

如果您要分享此食谱/内容,请联系这个部落格的相关链接。敬请不要复制或改篇为自己的食谱。谢谢!


Method: 步骤

1. Add Milk > Whipping Cream> Sweet Potato > Egg > Castor Sugar > Salt> Butter > Flour > Yeast into bread maker. Alternatively, you can knead the dough using a stand mixer then continue with step 4.
将牛奶》动物性奶油》番薯》蛋液》细砂糖》盐》牛油》面粉》酵母跟次序放入面包机。

2. Select <#11 DOUGH > , press < START >.
安装好后按键选择 《#11 DOUGH》,按 《START》。


3. When the dough is ready, grab a small portion of dough, do the windowpane test. If the dough is ready, continue with step 4, otherwise, repeat step 2.  
取出一小份打好的面团,试试面团弹性。如果能拉出薄膜即可继续步骤4,否则重复步骤2。


4. Let the dough proof for 1 hour or double in size.
发酵1小时或双倍大。


5. When the bread dough is ready, roll out the dough. Cover with cling wrap and let it rest for 10 minutes.
把发酵好的面团擀平,盖上保鲜纸松弛10分钟。


6. Portion out the dough, wrap in filling and shape. Refer to the pictures below. 
把面团分割,包入馅料,照着下图造型。


7. Let it proof for an hour or doubled in size. Egg wash, sprinkle some sesame seeds on top, bake in a preheat oven 180'C for about 15 minutes or till golden brown. Remove from oven, let the bread cool on rack and enjoy!
发酵1小时或双倍大。刷上蛋液,撒上芝麻,放进已预热的烤箱,以180度烘烤15分钟或至熟透上色。取出面包,放在架上待凉后即可享用。若喜欢我的食谱,可以LIKE和追随我的面书专页,不要错过最新食谱发布。
If you like my recipe, click hereLIKE & follow Miki's Food Archives Facebook page or follow us on Instagram: mfa_dingoozatfood  to receive more recipe updates. Don't forget to change the setting to 'SEE FIRST' if you wish to see my post on your Facebook news feed. 

Enjoy!

Related Posts Plugin for WordPress, Blogger...