Click LIKE & follow us on Facebook for recipe updates

COOK WITH LOVE FOR A HAPPY HIM

Singapore home cooking/ baking/ food & recipe blog features more than 500 tried & tested, quick & easy kid friendly recipes with steps by steps tutorial.


Follow us on Instagram: mfa_dingoozatfood


If you're a company looking for possible collaboration, feel free to send me a message via Miki's Food Archives Facebook Fan Page or email to miki9mak@gmail.com


Search This Blog

Tuesday, 12 March 2019

Fish & Pork Dumplings (Jiaozi) 煎鱼肉饺子


Juicy and yummy Fish & Pork Dumplings added some finely shredded carrots in it, nutritious and especially good for my son who doesn't eat carrots but loves dumplings. These dumplings taste so good that he would never want to pick out the carrots. ;)


Pan Fried Seafood Dumpling/ JiaoZi using the same recipe, just wrapped in one marinated prawn. ;)

Photo updated: June 2020.


Ingredients: (yield 22 dumplings)
材料


160g Ground Pork 猪肉碎 160克

180g Fish Paste 鱼肉馅 180克

30g Carrot, shredded 胡萝卜碎 30克

22 pcs Gyoza/ Shanghai Dumpling Wrapper 饺子皮 22 张


(A)

1 tsp Tapioca Flour 木薯粉 1小匙

1/2 tsp Castor Sugar 细砂糖 1/2小匙

1 tsp Chicken Powder 鸡粉 1小匙

1/2 tsp Sesame Oil 麻油 1/2小匙

1 tsp Light Soy Sauce 酱油 1小匙

1/2 tsp Shao Xing Hua Tiao Wine 绍兴花雕酒 1/2小匙

Dash of White Pepper 胡椒粉 适量


If you are sharing this recipe/ blog content, kindly attach the link to this blog instead of screen capture/ copy & paste/ use in your blog. No parts of the content of this blog may be reproduced without prior written permission. All rights reserved. Thank you. 

如果您要分享此食谱/内容,请联系这个部落格的相关链接。敬请不要复制或改篇为自己的食谱。谢谢!


Method: 步骤

1. In a bowl, mix (A) and ground pork using a pair of chopsticks. Add in fish paste and stir in one direction until the mixture is sticky and gooey. 
材料(A)和猪肉碎用筷子拌均。加入鱼肉馅,以一个方向搅拌至起胶。


2. Place a piece of wrapper on your palm and spoon the filling onto the wrapper. Do not overfill. 
包入馅料。


3. Brush some water around the outer edges of the wrapper. Fold the dumpling over and finish by pressing the edges to ensure it seal tightly and no leakage. Repeat for the remaining fillings.


4. Heat oil in a skillet. Pan fry the dumpling until the bottom is lightly brown. 
平底锅烧热少许油把饺子煎至底部上色。


5. Add some boiling water, cover and let it simmer until dry and crisp. Remove from heat and serve warm. 
加入少许热水,盖上焖煮至收汁。打开盖,煎香即可。若喜欢我的食谱,可以LIKE和追随我的面书专页,不要错过最新食谱发布。

If you like my recipe, click hereLIKE & follow Miki's Food Archives Facebook page or follow us on Instagram: mfa_dingoozatfood  to receive more recipe updates. Don't forget to change the setting to 'SEE FIRST' if you wish to see my post on your Facebook news feed. 


Enjoy!

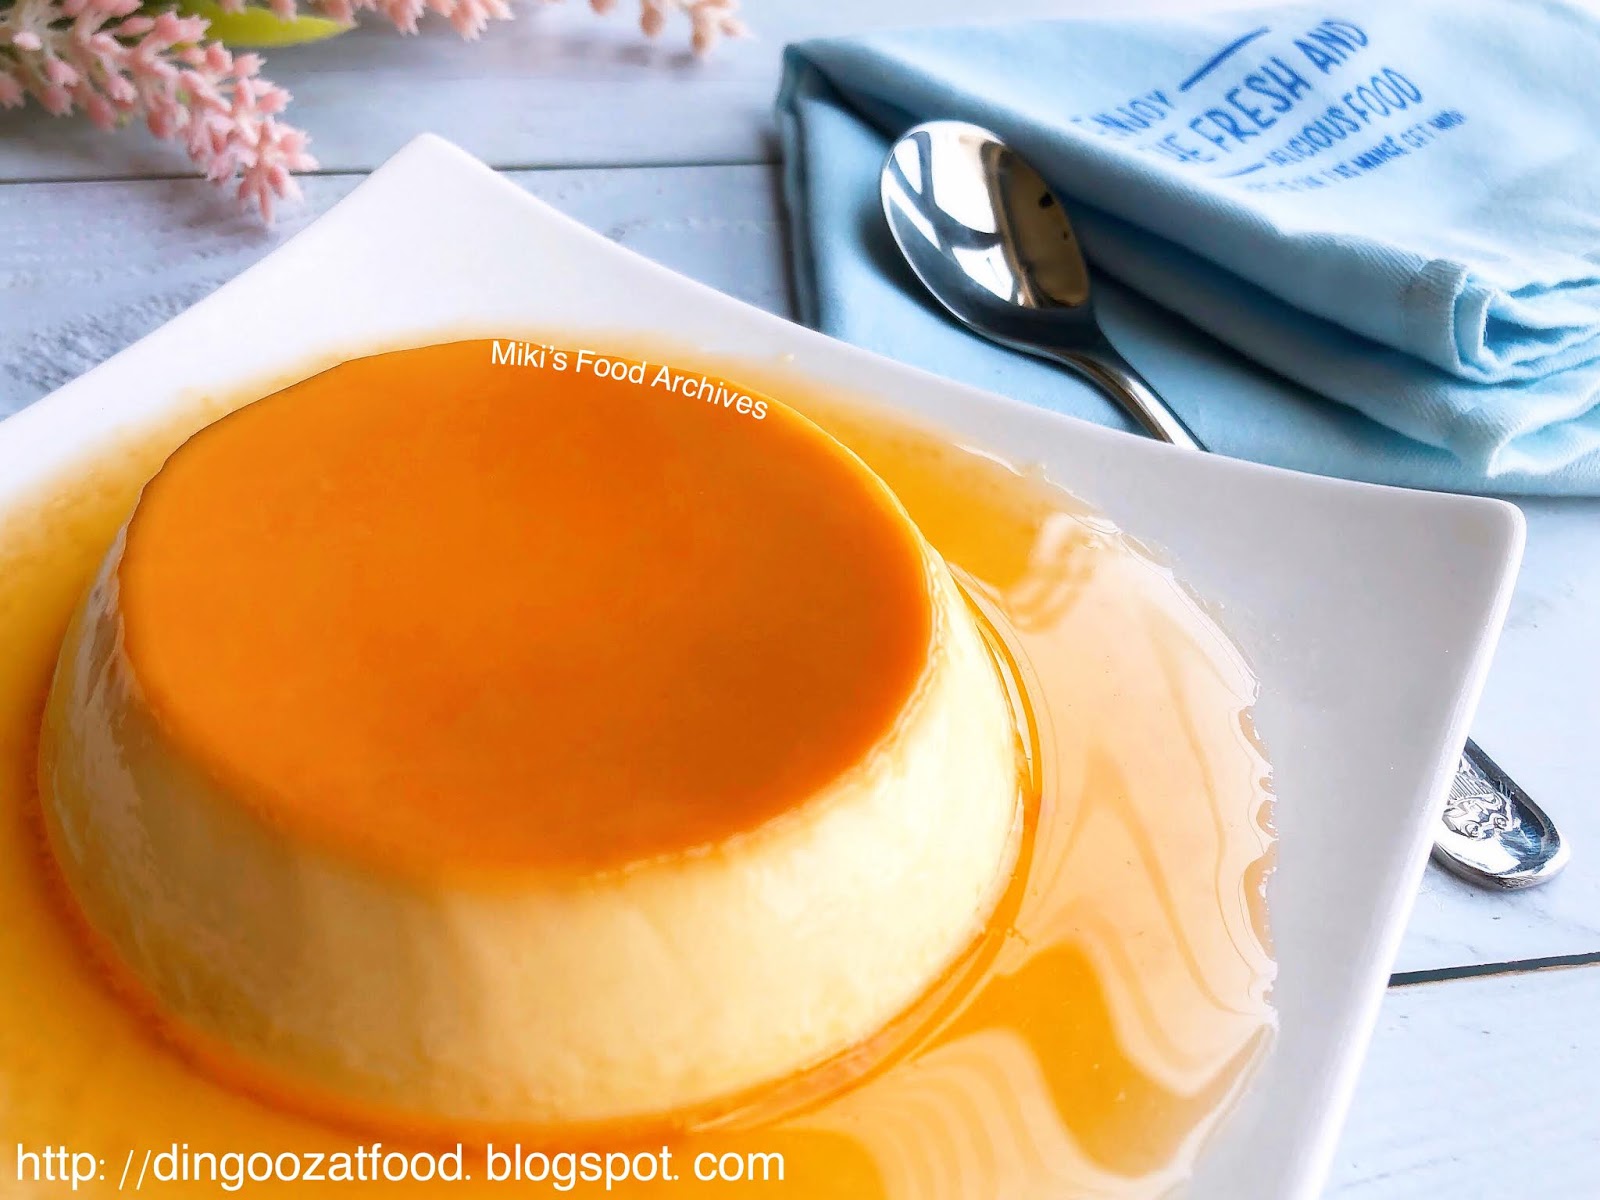
Custard Caramel Pudding 嫩滑焦糖布丁


This rich, creamy and scrumptious Custard Caramel Pudding is made from simple ingredients, the mixture of sugar, eggs, milk and cream. It's commonly known as custard pudding, creme caramel, caramel custard, flan etc. 


This delicate dessert is pretty easy to make but they need a little tender loving care when they're baked. Slow cooking using gentle heat in a water bath (bain-marie method) helps to prevent curdling. This step is crucial, do not skip this. ;)


Ingredients: (yield 4 servings)
材料

(A)

2 Whole Egg 全蛋 2粒

2 Egg Yolk 蛋黄 2粒

300g Milk 牛奶 300克

100g Whipping Cream 动物性鲜奶油 100克

1/2 tsp Vanilla Extract 香草精 1/2 小匙

50g Castor Sugar 细砂糖 50克


(B)

100g Castor Sugar 细砂糖 100克

30g Water 水 30克


If you are sharing this recipe/ blog content, kindly attach the link to this blog instead of screen capture/ copy & paste/ use in your blog. No parts of the content of this blog may be reproduced without prior written permission. All rights reserved. Thank you. 

如果您要分享此食谱/内容,请联系这个部落格的相关链接。敬请不要复制或改篇为自己的食谱。谢谢!

Method: 步骤

1. Mix all (A) ingredients in a bowl, pour through a sieve, set aside.
材料(A)拌均,过筛,备用。

2. Add (B) in a saucepan, turn on heat and cook until golden brown.
材料(B)煮至琥珀色。


3. Pour a thin layer on each ramekins.
把焦糖倒入模具里,待凉。


4. When it's cooled and set, fill each ramekins with egg mixtures. 
焦糖凝固后,倒入蛋液。


5. Cover with ramekins with aluminium foil.
盖上锡纸。


6. Bake in a preheated oven, water bath method, 150'C for 30 minutes, increase to 180'C for 15 minutes or until set. To serve: Run a blade of a knife around the ramekins, invert and serve chilled. 
放进已预热的烤箱,水浴法,以150度烘烤30分钟,转180度烘烤15分钟或至熟。若喜欢我的食谱,可以LIKE和追随我的面书专页,不要错过最新食谱发布。
If you like my recipe, click hereLIKE & follow Miki's Food Archives Facebook page or follow us on Instagram: mfa_dingoozatfood  to receive more recipe updates. Don't forget to change the setting to 'SEE FIRST' if you wish to see my post on your Facebook news feed. 


Enjoy!
Wednesday, 6 March 2019

Soft Milk Bread 牛奶吐司(Bread Maker Recipe 面包机食谱)


This simple bread maker Soft Milk Bread recipe is very easy to follow to the point of being foolproof, results in a bread with soft and fluffy texture. 


Made using Song Cho Bread Maker:


Song Cho Bread Maker SC-BK06A

Features:


  • * Sleek body design, large LED display
  • * 14 functions (basic, french, whole wheat, sweet, gluten free, sandwich, cake, bake, rise, rise dough, dough, jam, yoghurt and home made)
  • * 13-hour programmable timer
  • * Ceramic-coated bread barrel for easy cleaning
  • * 10 minutes' power cut-off memory function
  • * Bread weight: 680g to 900g
  • * Bread barrel: 19L x 14W x 17H cm
  • * Techincal Specs: Rated voltage 220/240V~50Hz, Rated power 550W


Recipe adapted from here.

If you do not have a bread maker, you can tap this link for oven baked version: Hokkaido Milk Bun 

Ingredients:
材料

(A)

270g Bread Flour 高筋面粉 270克

30g Cake Flour 低筋面粉 30克

1 tsp Instant Yeast 即溶酵母 1小匙

15g Milk Powder 奶粉 15克

50g Sugar 细砂糖 50克

1/2 tsp Salt 盐 1/2 小匙

(B)

30g Cold Egg (lightly beaten) 冷鸡蛋液 30克

125g Cold Milk 冷牛奶 125克

80g Cold Whipping Cream 动物性鲜奶油 80克


If you are sharing this recipe/ blog content, kindly attach the link to this blog instead of screen capture/ copy & paste/ use in your blog. No parts of the content of this blog may be reproduced without prior written permission. All rights reserved. Thank you. 

如果您要分享此食谱/内容,请联系这个部落格的相关链接。敬请不要复制或改篇为自己的食谱。谢谢!


Method: 步骤

1. Take out bread barrel from Song Cho Bread Maker. Install the stirring rod. Add Milk > Whipping Cream> Sugar > Egg > Salt > Milk Powder >  Flour > Yeast into bread barrel. 
将牛奶》动物性鲜奶油》糖》鸡蛋》盐》奶粉》面粉》酵母》跟次序放入松厨面包机。


2. Return bread barrel into Song Cho bread maker, press bread barrel down, turn it by clockwise and make sure it is installed firmly. Select <#4 SWEET > , press < START >.
安装好后按键选择 《#4 SWEET》,按 《START》。


3. When the bread is ready, remove the bread barrel and turn it up side down. The bread will drop out nicely. Let it cool on the cooling rack, slice and serve. 
面包烘烤完成后,即可拿出面包。若喜欢我的食谱,可以LIKE和追随我的面书专页,不要错过最新食谱发布。
If you like my recipe, click hereLIKE & follow Miki's Food Archives Facebook page or follow us on Instagram: mfa_dingoozatfood  to receive more recipe updates. Don't forget to change the setting to 'SEE FIRST' if you wish to see my post on your Facebook news feed. 


Enjoy!


Sunday, 3 March 2019

Pandan Coconut Milk & Butterfly Pea Layered Jelly 椰奶蓝蝶花燕菜


Fragrant and refreshing Pandan Coconut Milk & Butterfly Pea Layered Jelly aka agar agar made with all-natural ingredients - natural blue colour from the butterfly pea flowers, natural aroma from the pandan leaves and fresh coconut milk. 


Made into blue and white layers, the colour of this jelly is so beautiful! Taste is absolutely good and perfect to serve on a hot day.

采用蓝蝶花的纯天然色素,加入班兰叶和椰奶的香味,这椰奶蓝蝶花燕菜的味道非常香,又清爽,颜色也很漂亮。


Ingredients: 
材料

Blue Layer:
蓝色燕菜

(A)

250g Water 水 250克

8-10pcs Dried Butterfly Pea Flower/ Blue Pea Flower 干蓝蝶花 8-10朵

2 Pandan Leaves 班兰叶 2片


(B)

220g Water 水 220克

4g Agar agar Powder 燕菜粉 4克

~~~~~~~~~~~~~~~~~~~

60g Castor Sugar 细砂糖 60克


White Layer: 
白色燕菜

(C)

220g Water 水 220克

4g Agar agar Powder 燕菜粉 4克


(D)

255g Coconut Milk 椰奶 255克

2 Pandan Leaves 班兰叶 2片

50g Castor Sugar 细砂糖 50克


If you are sharing this recipe/ blog content, kindly attach the link to this blog instead of screen capture/ copy & paste/ use in your blog. No parts of the content of this blog may be reproduced without prior written permission. All rights reserved. Thank you. 

如果您要分享此食谱/内容,请联系这个部落格的相关链接。敬请不要复制或改篇为自己的食谱。谢谢!

Method:
步骤

1. Boil (A), lower heat and simmer for 1 minute, turn off heat, let it sit for 5 minutes. Strain.
(A)煮滚,转小火焖煮1分钟,熄火,待5分钟,过筛备用。


2. In a bowl, mix (B), stir to dissolve the powder. Add in blue water (1), add sugar and bring to boil. Lower heat just enough to keep warm, not boiling.
(B)拌均至溶解,加入蓝蝶花水(1)和细砂糖,煮滚。转小火保温。


3. Mix (C), stir to dissolve the powder. Add in (D), bring to boil. Lower heat just enough to keep warm, not boiling.
(C)拌均至溶解,加入(D),煮滚。转小火保温。


4. Pour a blue layer on the prepared container/ mould. Refrigerate for 3-5 minutes till the jelly layer is just set, the jelly should be still wobbly in the middle. 
模具里倒入蓝蝶花层,放进冰箱3-5分钟或至刚凝固。


5. Pour the white layer on the blue layer. Refrigerate for 3-5 minutes till the jelly layer is just set, the jelly should be still wobbly in the middle. 
倒入椰奶层,放进冰箱3-5分钟或至刚凝固。


6. Repeat steps 4 and 5 to use up all the jelly liquid. Cover and keep in the refrigerator for 1 hour. 
重复步骤 4 和 5 至用完为止。盖上,放进冰箱冷藏1小时。


7. To serve: Gently loosen the sides of the jelly. Place a larger plate on the container, turn it upside down. The jelly will drop on the plate nicely. Slice and serve chilled. 
倒扣脱模,即可享用。
若喜欢我的食谱,可以LIKE和追随我的面书专页,不要错过最新食谱发布。If you like my recipe, click hereLIKE & follow Miki's Food Archives Facebook page or follow us on Instagram: mfa_dingoozatfood  to receive more recipe updates. Remember to favourite my pages if you wish to see my posts on your news feed. 
Enjoy!


By readers, some feedback from those who have tried this recipe:

By Mardia Wahab


Tuesday, 19 February 2019

Cute Piglets Lei Sha Tang Yuan 可爱小猪黑芝麻馅擂沙汤圆


Unlike the common soupy Tang Yuan, Lei Sha Tang Yuan is served dry coated with ground roasted peanuts. The texture of these Tang Yuan is springy and soft, filled with homemade black sesame fillings, simply delectable!


Pig year is ending soon, made another round of piggies tang yuan on Winter Solstice.
Cute Pig Tang Yuan In Osmanthus Syrup
Photo updated: 22 Dec 2019


Ingredients: 
材料

Some Ground Roasted Peanuts 烤香花生碎 适量

Dough 面团:

100g Glutinous Rice Flour 糯米粉 100克

30g Hot Boiling Water 热水 30克

40g Cold Water 冷水 40克

Some Pink Food Colouring 粉红色素


Black Sesame Fillings 黑芝麻馅:

80g Toasted Black Sesame Seeds 炒香黑芝麻 80克

85g Castor Sugar 细砂糖 85克

30g Salted Butter or Lard, add more if prefer runny paste 含盐牛油/猪油 30克 


If you are sharing this recipe/ blog content, kindly attach the link to this blog instead of screen capture/ copy & paste/ use in your blog. No parts of the content of this blog may be reproduced without prior written permission. All rights reserved. Thank you. 

如果您要分享此食谱/内容,请联系这个部落格的相关链接。敬请不要复制或改篇为自己的食谱。谢谢!


Method:
步骤

1. Process toasted black sesame seeds and sugar in a blender, stir in butter/ lard to form a thick paste.
用搅拌器把黑芝麻和糖打均,加入油,拌均。


2. Divide the paste, roll into small balls. Cover and chill in the fridge for 30 minutes. 
将黑芝麻馅分成小球状。盖好,放进冰箱冷藏30分钟。


3. Prepare dough: Mix glutinous rice flour and hot boiling water with a spatula. Gradually add in cold water and knead with hand to form a dough. Knead in food colouring if using. 
面团:糯米粉加入热水,用刮刀稍微搅拌。慢慢加入冷水,用手揉成面团。加入色素,揉均。

4. Divide dough, wrap in fillings and shape. (for reference: black sesame paste 10g, dough 15g).
分割面团,包入馅料,然后造型。参考份量:面团:15克,黑芝麻馅:10克


5. Boil a pot of water, add in glutinous rice balls, cook until they float up. Cook for another minute. Transfer the dough to a bowl of water (room temperature), drain and coat with/ serve on ground roasted peanuts.
煮滚一锅水,加入汤圆,煮至汤圆浮起,继续煮1分钟左右,然后捞起放入室温的水里。捞起汤圆滴干水份,加入花生碎,即可享用。若喜欢我的食谱,可以LIKE和追随我的面书专页,不要错过最新食谱发布。
If you like my recipe, click hereLIKE & follow Miki's Food Archives Facebook page or follow us on Instagram: mfa_dingoozatfood  to receive more recipe updates. Don't forget to change the setting to 'SEE FIRST' if you wish to see my post on your Facebook news feed. 


Enjoy!

Related Posts Plugin for WordPress, Blogger...