Click LIKE & follow us on Facebook for recipe updates

COOK WITH LOVE FOR A HAPPY HIM

Singapore home cooking/ baking/ food & recipe blog features more than 500 tried & tested, quick & easy kid friendly recipes with steps by steps tutorial.


Follow us on Instagram: mfa_dingoozatfood


If you're a company looking for possible collaboration, feel free to send me a message via Miki's Food Archives Facebook Fan Page or email to miki9mak@gmail.com


Search This Blog

Monday, 27 June 2016

Classic Vanilla Swiss Roll 经典香草蛋糕卷


This Swiss roll may look ordinary to you but it means a lot to me. 

It was the recipe that I used in my......

~ first time baking Swiss roll with my dad 

~ first time baking for 100pax for food tasting  

~ first baking demo


This Swiss roll was made using 5 egg recipe, with extra cream as requested by my boy.


First time baking with my dad 祝父亲大人~父亲节快乐

Last week when I was back in my hometown, I visited my dad and as usual, we chatted a lot sharing our cooking and baking stories. Yes, my dad is a great home baker! He is 75yo this year. The way he bakes is the no-recipe method and that's where I learnt to create new recipes. Perhaps I should say I'm lucky to have his gene...and I knew that gene was from my grandma. My grandma was in the generation that she could bake madeleine and cakes using a tin and charcoal. No oven, no electricity required. Alright, I think I should stop here else I'll be blogging my grandma's stories...

Back to my Swiss roll stories, yes, I was so happy that I got to bake with my dad for the first time. He whipped up the meringue with a hand whisk, and I did the rest of the work. No worries, my dad has strong muscle power! lol... The one that we made together, we did it without fresh cream because my parents don't eat cakes with cream. It was filled with his homemade Kaya and I can tell you, it tastes even better than the one with fresh cream! No Kaya Swiss roll photo was taken on that day because I always leave my phone in my bag when I spend time with my family. 


The naked swiss roll :) 


This is the first time baking for 100 pax for food-tasting


I was one of the volunteer bakers in the SHC anniversary event. Helped to bake some Swiss rolls for the food tasting session, with a live demo on the spot. 

These were the rolls that I started to bake on Saturday night at 10pm and ended my baking on Sunday at 2:30am. My very first ROLL AROUND THE CLOCK baking, although it's tiring but I enjoyed the process to the max until I forgot how many rolls I had baked! lol...Just baked more to be given out to my son's music school teachers and his friends :) 


First baking demo

I hardly put my 'face' in my blog post...This is probably the first one...


Yes, this is ME - Miki Mak, the author of this blog. 
ME (the first from left) with all the lovely people passionate about baking and cooking. 

This was the Swiss roll that I made during the demo, using the 4 eggs recipe which is the one that I'm sharing in this blog post. 


Ingredients:


(A)


4 Egg Yolk 蛋黄 4粒

33g Oil 油 33克


40ml Fresh Milk 牛奶 40克

1/2 tsp Vanilla Extract 香草精 半小匙

67g Cake Flour 低粉 67克


(B)

4 Egg White 蛋白 4粒

80g Castor Sugar 细砂糖 80克
(can be reduced for less sweet Swiss roll) 


(C)

Whipped Cream, click here for the whipped cream recipe or use topping cream. 鲜奶油,打发

Homemade Vanilla Swiss Roll. I'm still using the same recipe after so many years! Moist, soft and roll up easily without cracking! This recipe is simple enough for beginners.
Photo updated: April 2024. 

If you are sharing this recipe, kindly attach the link to this blog instead of screen capture/ copy & paste/ use in your blog. No parts of the content of this blog may be reproduced without prior written permission. All rights reserved. Thank you. 

如果您要分享此食谱,请联系这个部落格的相关链接。敬请不要复制或改篇为自己的食谱。谢谢!


Method:

Preheat oven 180'C. 
预热烤箱180度。

1. In a bowl, mix together egg yolk, oil, milk and vanilla extract. Sift in flour. Mix with a hand whisk to form a smooth paste, do not beat or over-mix the batter. 
把蛋黄,油,牛奶和香草精搅拌均匀。低粉过筛,慢慢加入,搅拌均匀。

2. In another mixing bowl, beat egg white until foamy, add sugar gradually. Beat until stiff and glossy. 
把蛋白打至松发,慢慢加入糖。打至硬性发泡。


3. Fold the meringue into the yolk mixture in 3 batches. 
分次把蛋白加入蛋黄糊,用刮刀搅拌均匀。不能过度搅拌。


4. Pour the batter onto a lined baking tray (28cm/ 11" x 35cm/ 14"). Spread the batter evenly. Gently tap 2-3 times on the worktop.  
倒入铺了油纸的烤盘(尺寸:28cm/ 11" x 35cm/ 14")。把烤盘轻轻在桌面敲2-3次。


5. Bake in a preheated oven for 13-15 minutes. Every oven is different, do adjust the baking temperature and time accordingly.
放进已预热的烤箱,烘烤13-15分钟。每个烤箱的温度不同,烘烤温度和时间须自行调整。

6. When it's ready, remove it from the oven, gently tap 2-3 times on the worktop. Place a baking sheet and cooling rack on the cake, flip it over.
烘烤后把蛋糕从烤箱里拿出,轻轻在桌上敲2-3次。蛋糕上面铺一张新的油纸,再放一个架子,然后小心的把烤盘倒反。


7. Remove the baking tray. Carefully remove the baking sheet. Roll up the cake while it's still warm. Here's a short video to show how I roll the cake:
把烤盘和油纸拿掉。把蛋糕卷起。(可以参考以下视频)


8. Let it cool completely on the rack. 
卷好后把蛋糕放在架子上待凉。


9. When it's completely cooled, unfold the cake. Add whipped cream and roll up again. Keep in the fridge for at least 1-2 hours before serving. 
慢慢打开蛋糕,涂一层鲜奶油,然后卷起,收冰箱 1-2 小时。冷却后即可享用。若喜欢我的食谱,可以LIKE和追随我的面书专页,不要错过最新食谱发布。
If you like my recipe, click here, LIKE & FOLLOW Miki's Food Archives Facebook page to receive more recipe updates. Don't forget to change the setting to 'SEE FIRST' if you wish to see my post on your Facebook news feed. Enjoy!


Some feedback from those who have tried this recipe:


By Judy Bakes 


By Jeannie Tay 
By Sue Anne
By Angela Koh

By Eileen Tan


By Katherine Tan
By Katherine Tan
By Shen Cui Ling

By Shen Cui Ling

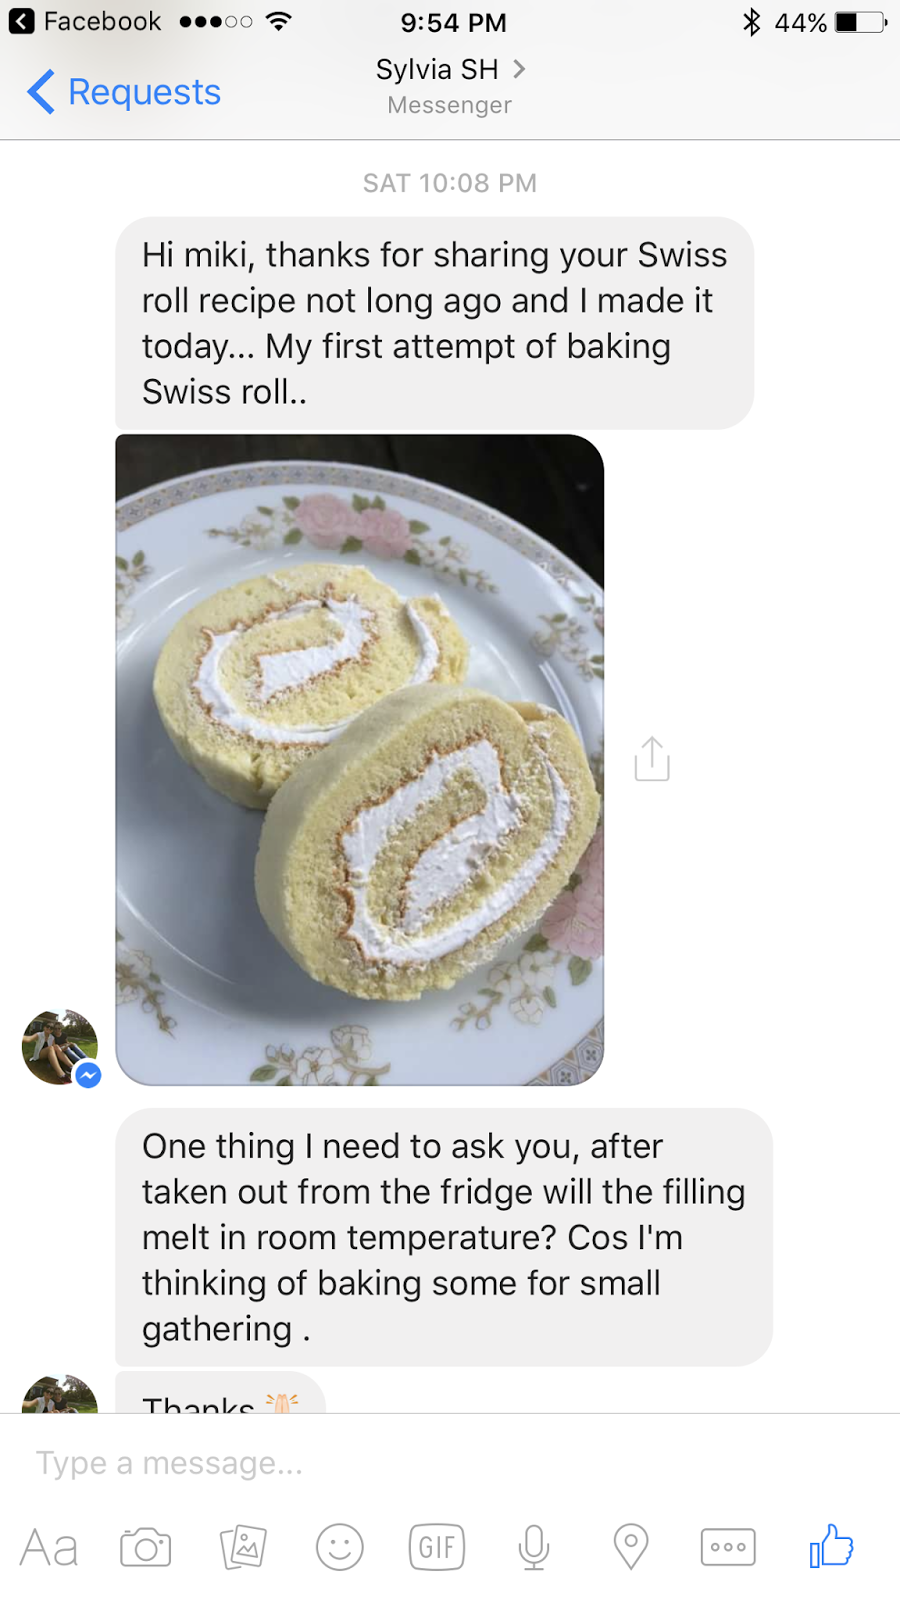
By Sylvia SH, her first attempt baking swiss roll. 


By Reigne Aniger


By Chris Then 
By See Ling


By Loraine Loren


By Vanessa Tay 


By Sharon Low


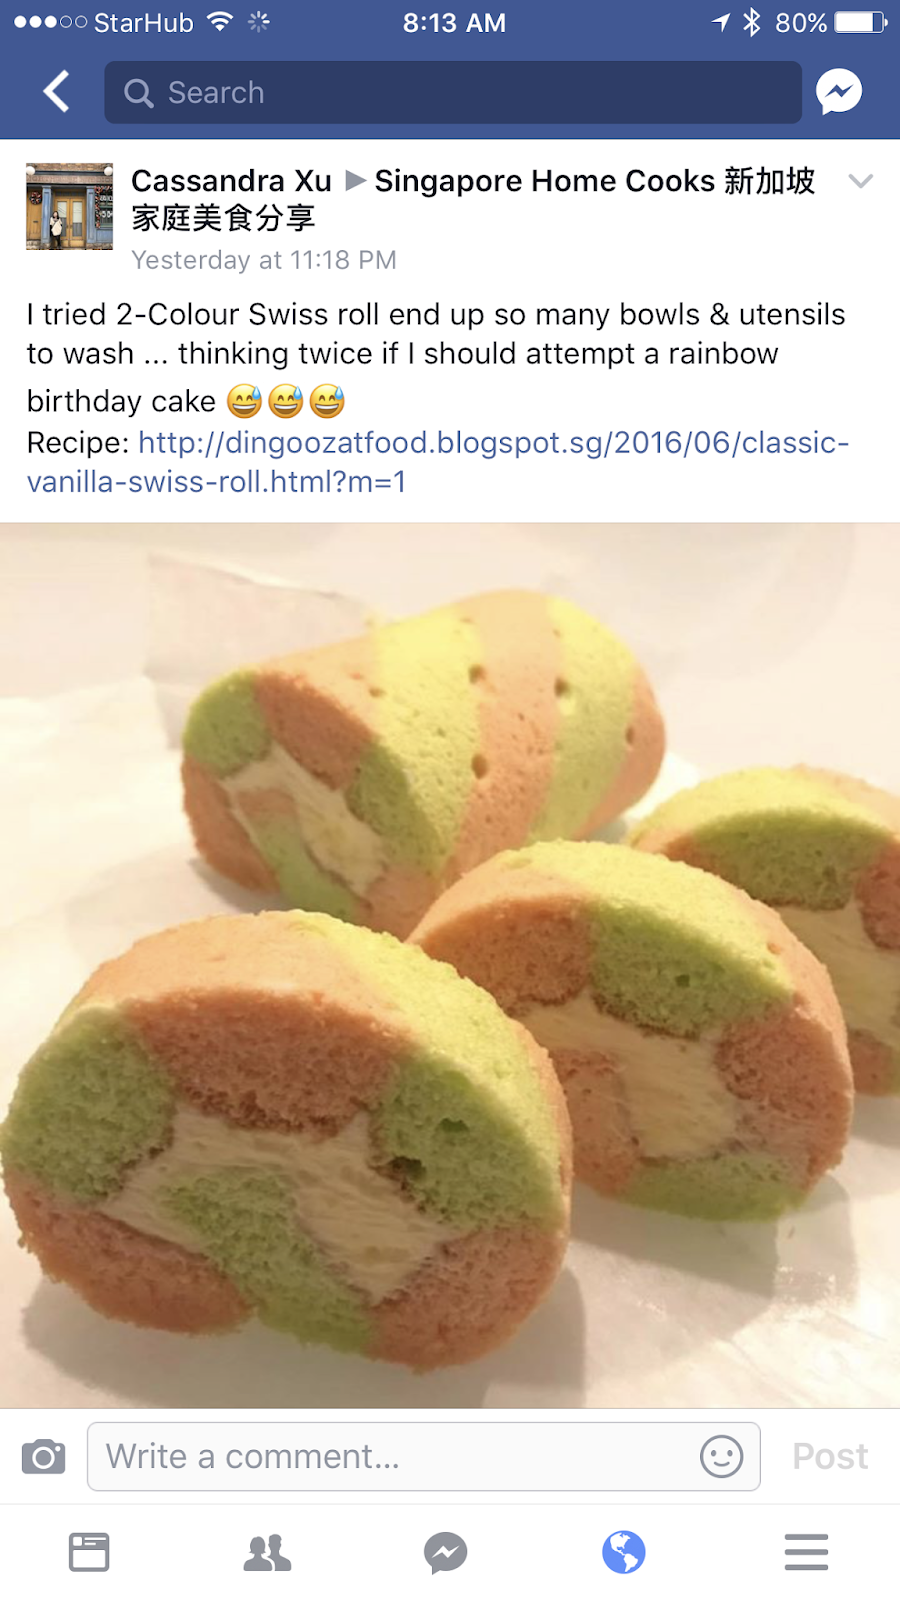
By Cassandra Xu


By Cassandra Xu


By Fong Meei Khee

By June-Lin Neoh


By Lisa Yip


By Kel Sya


By Lisa Yip

By Jeannie Lee  

By Lynn Teng

By Eileen Tan

By Liz Lim

By luvcheescake

By Suat Pheng Tan

By Lina Ong

By Eliza Lim


by mybakinghub

By Eileen Tan

By Kelly Yip

By Jeannie Lee

By Janet Gerrard

By Christine Tan

by Kel Sya

by Rosalind Ang


Sunday, 5 June 2016

Blueberry Overnight Oats 蓝莓果酱隔夜燕麦粥


Overnight oats have been part of my routine for years, and honestly, it’s one of those breakfasts I keep coming back to again and again. It’s simple, nourishing, and perfect for busy mornings when you just want something ready to eat without any fuss.


What I love most about overnight oats is how effortless it is. There’s no cooking involved, just mix everything in a jar, pop it into the fridge, and let time do the work. By morning, you’ll have a creamy, satisfying breakfast waiting for you. A great way to start the day with something wholesome.


Blueberry Overnight Oats using rolled oats, my preferred type for overnight oats.
Photo updated: Year 2016

Ingredients: 1 small serving

1/4 cup Oats 燕麦片 1/4 杯

1/3 cup Milk 牛奶 1/3 杯

1/4 cup Greek Yoghurt or Regular Yoghurt 酸奶1/4杯

1.5 tsp Chia Seeds 奇亚籽 1.5小匙

1/3 cup Blueberries 蓝莓 1/3 杯

2 tsp Blueberry Jam 蓝莓果酱 2小匙

Blueberry Overnight Oats using quick-cook oats.
Photo updated: May 2026

If you are sharing this recipe/ blog content, kindly attach the link to this blog instead of screen capture/ copy & paste/ use in your blog. No parts of the content of this blog may be reproduced without prior written permission. All rights reserved. Thank you. 如果您要分享此食谱/内容,请联系这个部落格的相关链接。敬请不要复制或改篇为自己的食谱。谢谢!


Method:

1. Put all ingredients in a jar, mix well. 
把所有材料放进罐子里,用汤匙搅拌均匀。
Previously, I made overnight oats using thick creamy yoghurt.
(2016)
In recent years, I made overnight oats using Greek yoghurt for extra protein. As for the oats, I sometimes use quick-cook oats when I'm out of rolled oats. 
Photo updated: May 2026

2. Cover and keep in the fridge overnight. Serve chilled. 
盖好,放进冰箱。隔天早上就可以吃了。可以加自己喜欢的果仁或其它水果。
若喜欢我的食谱,可以LIKE和追随我的面书专页,不要错过最新食谱发布。If you like my recipe, click here, LIKE & follow Miki's Food Archives Facebook page or follow us on Instagram: mfa_dingoozatfood  to receive more recipe updates. Remember to favourite my pages if you wish to see my recipe posts on your news feed. 


Sunday, 29 May 2016

Cookies N Cream Waffles 曲奇格子松饼


Making waffles is simple but you must have a good recipe to follow. I bought a new waffles maker few weeks back and I have tried and modified about 8 recipes. Not all are successful although all are edible :D .  However, among the successful one, there is one that I especially like.... the Cookies N Cream waffles, made using Cookies N Cream soy milk added some crushed Oreo. This is the combination that I customised for my family. We all love this!


Ingredients:

(A)

125g All Purpose Flour/ Plain Flour 中筋面粉 125克

1.5 tsp Corn Flour 玉米粉 1.5 小匙

55g Sugar 糖 55克

1/4 tsp Salt 盐 1/4 小匙

1/2 tsp Baking Soda 小苏打 半小匙

1 tsp Baking Powder 发粉 1小匙


(B)

1 Egg Yolk 蛋黄 1 粒

180ml Cookies N Cream Soy Milk 曲奇口味豆奶 180克

1/4 tsp Vanilla Extract 香草精 1/4小匙

30ml Oil 油 30克

(C)

1 Egg White 蛋白 1粒

(D)

Some crushed Oreo (optional) 奥利噢饼干碎 适量


When I was out of Cookie N Cream soy milk, I'd make plain waffles using the same recipe. Click HERE for Plain Waffles recipe. :)


If you are sharing this recipe, kindly attach the link to this blog instead of screen capture/ copy & paste/ use in your blog and claimed as your recipe! Thank you. 如果您要分享此食谱,请联系这个部落格的相关链接。敬请不要复制或改篇为自己的食谱。谢谢!  


Method:

1. Sift (A). 
把(A) 过筛。

2. Mix together (B).
材料(B)搅拌均匀。

3. Use a whisk, beat (C) until stiff peak.
把(C) 的蛋白打至硬性发泡。

4. Gradually add (B) to (A), stir to mix until there's no more lumps. Do not over-mix the batter.
慢慢把(B)加入(A),搅拌均匀即可。

5. Fold in (C) in 2 batches until well combined.
把(C) 分2次加入面糊,搅拌均匀。

6. Cook in a preheated waffle maker for 5 minutes. Note: Add (D) into the batter right before you cook the waffle, else the waffle may turn out a bit dry.
把面糊分次/ 适量的倒入已预热的松饼机,撒上少许饼碎,盖上,烘烤5分钟即可。若喜欢我的食谱,可以LIKE和追随我的面书专页,不要错过最新食谱发布。

If you like my recipe, click here, LIKE & FOLLOW my facebook page to receive more recipe updates. Don't forget to change the setting to 'SEE FIRST' if you wish to see my post on your Facebook news feed. Enjoy!


Some feedback from those who have tried this recipe:


By 佩宜


Thursday, 26 May 2016

Stir Fry Broccoli & Prawns In Abalone Sauce 鲍鱼汁炒虾球西兰花


Stir fry broccoli and prawns is a very common dish in Chinese cuisine. This combination goes really well with simple sauces. Besides abalone sauce, I used to pair it with Hoisin sauce  , oyster sauce, chicken stock or just simple soy sauce gravy. You can mix and match the vegetables combination, for example add in some carrots, shiitake mushrooms etc...


One of the lunch that I have prepared for my 7yo son.
If you like my lunch idea, click here and follow Miki's Food Archives blog page to receive daily lunch idea and recipe updates.
Here's another combination - broccoli and snow peas.
Tips: Blanch the broccoli before stir frying with snow peas because snow peas.

Photo updated: 11 April 2017


Ingredients:

4 Large Prawns 
(peeled and deveined, season with some salt, white pepper, sesame oil and Shao Xing cooking wine)

160g Broccoli

3 Baby Corn

1/3 pkt White Bunashimeji Mushrooms

2 cloves Garlic (sliced)

2 slices Ginger

Some salt, add to taste

Dash of white pepper


Sauce: Mix together

1.5 tbsp Abalone Sauce

1/2 tsp Soy Sauce

1/2 tsp Sesame Oil

1.5 tbsp water  


Corn Starch Solution: Mix together

1 tsp Corn Flour

1/2 tbsp Water


Some Cooking Oil for cooking


Another combination, with squid this time.
This was my son's lunchbox. 


Photo updated: 20 April 2017.

If you are sharing this recipe, kindly attach the link to this blog instead of screen capture/ copy & paste/ use in your blog and claimed as your recipe! Thank you. 如果您要分享此食谱,请联系这个部落格的相关链接。敬请不要复制或改篇为自己的食谱。谢谢!

Method:

1. Heat oil in a cast iron pan, add in garlic and ginger, cook until fragrant.

2. Sprinkle some salt, add in broccoli and baby corn. Stir fry until there's no more sizzling sound. Add in mushrooms, gradually drizzle the sauce and continue stir frying. Add some white pepper and water, cover and let it simmer until the broccoli is cooked. 


3. Stir in corn starch solution. When the sauce is thicken, remove from heat and serve right away with rice. If you like my recipe, click here, LIKE & follow my facebook page to receive more recipe updates. Don't forget to change the setting to 'SEE FIRST' if you wish to see my post on your Facebook news feed. Enjoy! 

Wednesday, 25 May 2016

Green Tea Baguette 绿茶法国面包


Ever since I started baking baguettes, I’ve completely stopped buying them from stores. There’s just something so satisfying about homemade baguettes fresh from the oven!
After making my 
charcoal baguette and plain baguette, this time I decided to try something a little different... a Green Tea Baguette!
Just look at that beautiful green colour… isn’t it lovely? :) The subtle aroma of green tea makes these baguettes extra special, and they’re just as crispy on the outside and soft inside as the classic version.


It tastes really good! I can eat it plain, just like this...


My 7yo son likes it with cheese and baby spinach.
This is the only way my son eat RAW spinach :D 


I normally toast the baguette before serve but this time, my 7yo prepared breakfast.
The little chef said no need to toast because it already tastes so good! :D 


Ingredients: Yield 4 medium baguettes

500g Baguette Flour 

1 tsp Salt

10g Castor Sugar

1.5 tsp Instant Yeast

370g Water (adjust accordingly)

2 tsp Green Tea Powder (for baking)

3 tbsp Oil


If you are sharing this recipe, kindly attach the link to this blog instead of screen capture/ copy & paste/ use in your blog and claimed as your recipe! Thank you.

如果您要分享此食谱,请联系这个部落格的相关链接。敬请不要复制或改篇为自己的食谱。谢谢!


Method:

1. In a stand mixer, mix all dry ingredients. (Kitchenaid speed 1)

2. Mix in water (Speed 1). Knead for 25 minutes (Speed 2). Gradually add in oil. Knead another 5 minutes until the dough is glossy and elastic. 

3. Cover with cling wrap. Let it proof for 60 minutes or doubled in size.

4. Transfer to a floured work top. The dough is very sticky, make sure to use generous amount of flour to handle the dough.

5. Divide dough into 4 portions. Shape the dough into baguette. Place on a lined baking tray. I don't have baguette tray, so I used aluminium foil to divide the baguette. 


6. Cover with cling wrap. Let it proof for 30minutes. 

7. Bake in a preheated oven 200'C for 20 minutes. When it's ready, transfer to the rack to cool. Slice and enjoy!  If you like my recipe, click here, follow my facebook page to receive more recipe updates. Don't forget to favourite my pages if you wish to see my post on your news feed. 


Monday, 23 May 2016

Lotus Root & Arrowroot Pork Ribs Soup ~ Pressure Cooker Recipe 莲藕粉葛排骨汤-解热去躁,松弛神经,补血强身


The recipe that I'm sharing in this blog post is pressure cooker method. If you do not have a pressure cooker, click here to read the method using normal pot.


Ingredients: (Yield 4 servings)

300g Pork Ribs

270g Lotus Root

160g Arrow Roots

1 Dried Cuttlefish (washed, soak in hot water for 15 minutes, discard water)

5 Red Seedless Dates

3 Dried Oyster

1 Fig (US large fig)

1 litre Hot Water

Some Sea Salt or Himalayan Salt (add to taste, optional)


If you are sharing this recipe, kindly attach the link to this blog instead of screen capture/ copy & paste/ use in your blog and claimed as your recipe! Thank you.

如果您要分享此食谱,请联系这个部落格的相关链接。敬请不要复制或改篇为自己的食谱。谢谢!


Method:

1. Wash the pork ribs, immerse in hot boiling water for 5 minutes. Discard the water.

2. Put all ingredients (except salt) in the pressure cooker. I am using 4.5L WMF Perfect Pro pressure cooker.

3. Close with the cover and set the knob to 2.


4. Use medium heat until the cooking indicator rises to the 2nd orange ring.


5. Reduce heat to low and let it cook for 30 minutes.

6. When the cooking is over, turn off the heat. Wait till the indicator (orange ring) go down or turn the knob to lock/ unlock to release pressure. When there's no more pressure, unlock and open the cover. The soup is ready by now.


7. Optional: Add salt to taste, if using. Repeat step 3 - step 5, cook for 10 minutes. 

8. Repeat step 6 or just leave it covered and serve later. The remaining heat will further enhance the flavour of the soup. If you like my recipe, click here, follow my facebook page to receive more recipe updates. Don't forget to change the setting to 'SEE FIRST' if you wish to see my post on your Facebook news feed. 


Wednesday, 18 May 2016

Vegetable Pancake/ Omelette 煎蔬菜蛋饼


A simple and nutritious egg pancakes, packed with nutrients and loaded with vegetables. I have a picky eater at home, making food with 'hidden treasure' is my forte! Hid all the vegetables and I don't need to nag 'eat your vegetables please.....'. It makes a great snacks, side dish or even for breakfast. 


Look at the fingers.....someone can't wait to eat his food :)


Ingredients:

3 Eggs 鸡蛋 3粒

1/4 tsp Chicken Powder 鸡精粉 1/4小匙

Dash of White Pepper 胡椒粉 少许


* 2 Broccoli (florets, chopped) 西兰花 2小朵,切碎

* 1 tbsp Shredded Carrot 胡萝卜碎 1 汤匙

* 1 French Beans (chopped) 四季豆 1条,切碎

* Can be replaced with any vegetables of your preference. 以上蔬菜可以随意更改

1/4 Sausage (use nitrate-free and MSG free sausage, chopped), can be replaced with ham. 香肠 1/4条,切碎

3 tbsp Shredded Parmesan Cheese (optional) 芝士碎 3汤匙,可以不放

Pinch of Salt 少许盐

Cooking Oil 油


If you are sharing this recipe, kindly attach the link to this blog instead of screen capture/ copy & paste/ use in your blog and claimed as your recipe! Thank you. 如果您要分享此食谱,请联系这个部落格的相关链接。敬请不要复制或改篇为自己的食谱。谢谢! 


Method:

1. In a bowl, lightly beat egg + chicken powder + white pepper. Set aside. 
现将鸡蛋+鸡精粉+胡椒粉打散,混合。


2. Heat oil in a skillet, add in chopped broccoli, french beans and sausage, add a pinch of salt, stir fry until the 'greens' are cooked. Transfer to the bowl, mix with egg and carrot.
放少许油热锅,把西兰花,四季豆和香肠加少许盐,炒香。把炒香的蔬菜和香肠,倒入鸡蛋和胡萝卜碎混合。

3. Heat oil in the same skillet, pour in the egg mixture. When the egg is about to set, sprinkle  shredded parmesan (if using). Flip over.
再加一些油,热锅, 把蛋浆倒入锅。撒上芝士。翻面,煎至熟。

4. When it's fully cooked, turn off heat. Slice and serve.
切片,即可享用。若喜欢我的食谱,可以LIKE和追随我的面书专页,不要错过最新食谱发布。

If you like my recipe, click here, LIKE & FOLLOW Miki's Food Archives Facebook page to receive more recipe updates. Don't forget to change the setting to 'SEE FIRST' if you wish to see my post on your Facebook news feed. Enjoy!


Monday, 9 May 2016

Pan-fried Salted Fish Pork Bun 咸鱼肉碎煎包


This is simply a delicious and juicy minced pork bun filled with some fragrant salted fish. It makes a great snacks, light meal or even breakfast! 


Ingredients: (Yield 7 mini buns)

If you are sharing this recipe, kindly attach the link to this blog instead of screen capture/ copy & paste/ use in your blog and claimed as your recipe! Thank you.

如果您要分享此食谱,请联系这个部落格的相关链接。敬请不要复制或改篇为自己的食谱。谢谢!

Bun: 外皮

100g Flour 面粉 100克

50g Hot Water 沸水 50克

20g Cold Water 冷水 20克


Filling: 馅料

150g Minced Meat 肉碎 150克

20g Salted Fish  梅香咸鱼 20克

1/2 tbsp Ginger Juice 姜汁 半汤匙

1/2 tbsp Chopped Spring Onion 青葱半汤匙,切碎

1/2 tbsp Chopped Small Onion 小葱头半汤匙,切碎


Seasoning: 调味

1.5 tsp Soy Sauce 酱油 1 1/2 茶匙

Dash of White Pepper 少许胡椒粉

1.5 tsp Sesame Oil 麻油 1 1/2 茶匙

1 tsp Shao Xing Hua Tiao Wine 绍兴花雕酒 1 茶匙


Method:

1. Stir together hot water and flour. Stir in cold water, form a dough. Cover and let it rest in the fridge for 30 minutes. 
把沸水加入面粉,搅拌。再加入冷水,搅拌成面团。盖好,放进冰箱休面30分钟。

2. Mean while, heat some oil in the skillet, fry the salted fish until fragrant. Remove from heat, set aside to cool.
把咸鱼煎香。待凉。

3. In a bowl, add all filling and seasoning ingredients. Stir until well combined. By now, the mixture should smell really good! 
将所有馅料和调味料搅拌均匀。这时候,肉馅已经是好香的,对吧?

4. When the dough is ready, knead for 2-3 minutes. Divide the dough into 7 portions. Wrap  the filling. (refer to the step by step in the picture)
先把面团揉2-3分钟。然后分成7份。包馅料(可以参考以上的图)。

5. Heat some oil in the skillet, cook the bun for 1-2 minutes or until the bottom is slightly brown, add some water, cover the skillet with lid, let it cook until no more sizzling sound. Remove the lid, flip over the bun, cook until both sides are golden brown. 
先把锅烧热,放少许油,把包子煎1-2分钟。加少许水,盖上锅盖。煎干水后把另一面煎至金黄色即可!

6. Serve immediately.
离锅后,乘热吃!若喜欢我的食谱,可以LIKE和追随我的面书专页,不要错过最新食谱发布。


If you like my recipe, click here, follow my facebook page to receive more recipe updates. If you already LIKED my page but did not see my recipes on your Facebook News Feed, click here, go to my page:

~ select FOLLOWING (next to LIKED)

~ change the setting to SEE FIRST


Enjoy!

Note: Don't forget to soak and dry the salted fish before pan fry.


This recipe is adapted from a recipe shared by Wai Leng. 谢谢Wai Leng分享
  
Related Posts Plugin for WordPress, Blogger...