Click LIKE & follow us on Facebook for recipe updates

COOK WITH LOVE FOR A HAPPY HIM

Singapore home cooking/ baking/ food & recipe blog features more than 500 tried & tested, quick & easy kid friendly recipes with steps by steps tutorial.


Follow us on Instagram: mfa_dingoozatfood


If you're a company looking for possible collaboration, feel free to send me a message via Miki's Food Archives Facebook Fan Page or email to miki9mak@gmail.com


Search This Blog

Monday 29 July 2019

Diary Of A Wimpy Kid Birthday Cake “小屁孩日记”生日蛋糕


It's that time of the year again.... Every year, I'd make birthday cake for my boy. This year, for his 10th birthday, he wanted a Greg Heffley, Diary of a Wimpy Kid theme birthday cake..... "I just want a plain and simple cake" that's what I was told. 


The character from Diary of a Wimpy Kid book... 

So here comes a simple Diary of a Wimpy Kid birthday cake with blackcurrant and dark chocolate duo-flavour cake frosted with fresh cream, topped with a homemade edible Greg Heffley cake topper. 


Homemade Greg Heffley cake topper.
Greg Heffley, Diary of a Wimpy Kid.


Instead of just plain white cake, I thought of making blue and white stripes design just like the old school exercise book with blue lines. Well, this was my very first attempt making stripes cake. Although it looks simple and plain, actually it's really not easy to frost the blue and white stripes design, especially with fresh cream. 


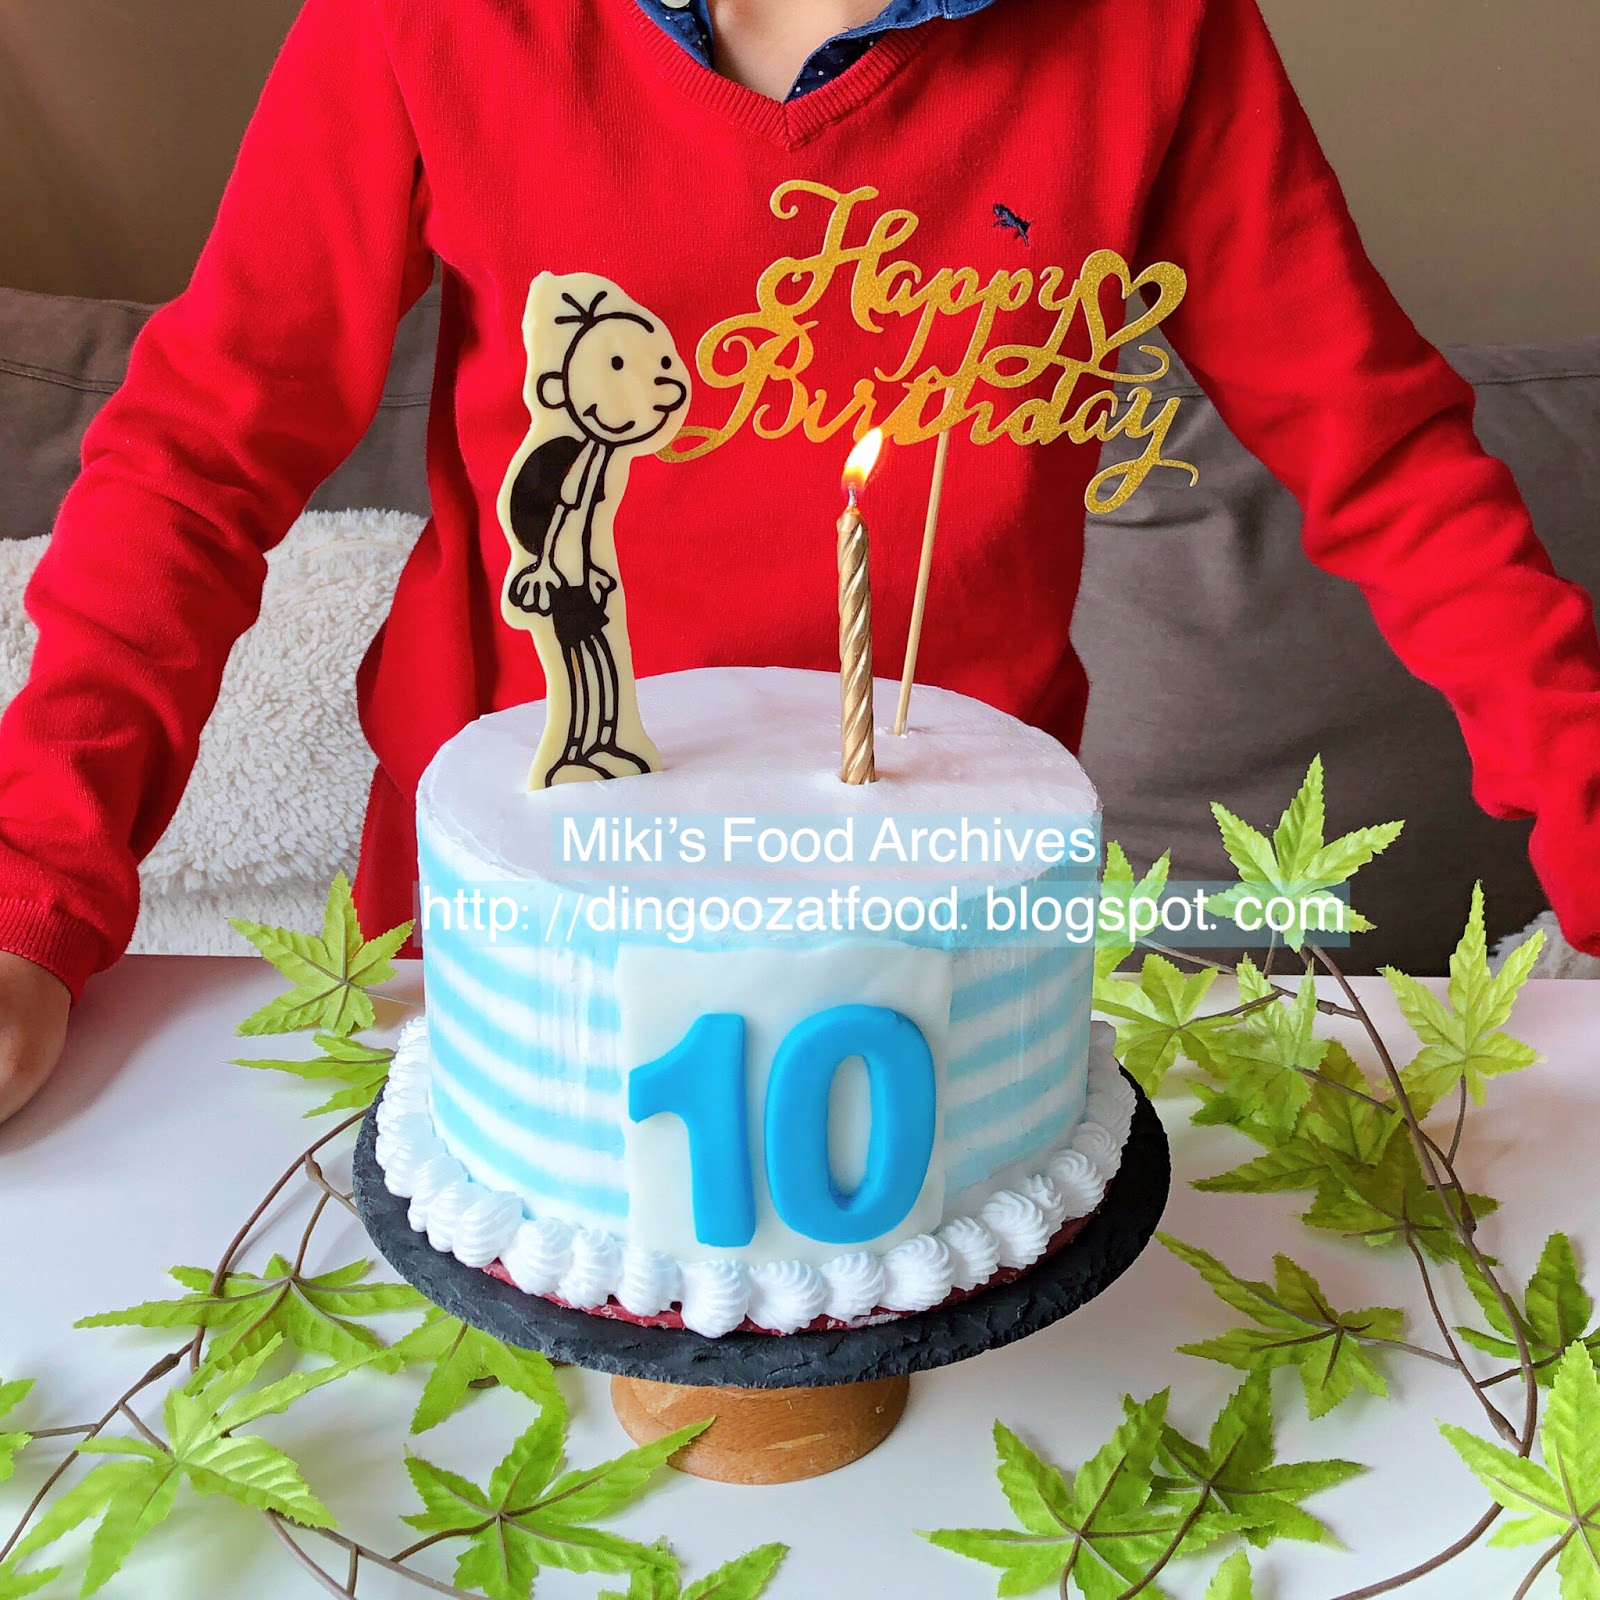
I'm glad that he was happy with his birthday cake, he said he especially love the blue colour....and of course, the number 10 on the cake that he told me to add on...


If you wish to try the cake recipe, click the link here 蛋糕食谱: The Perfect Sponge Cake Recipe 点击进入《海绵蛋糕食谱》

If you are sharing this recipe/ blog content, kindly attach the link to this blog instead of screen capture/ copy & paste/ use in your blog. No parts of the content of this blog may be reproduced without prior written permission. All rights reserved. Thank you. 如果您要分享此食谱/内容,请联系这个部落格的相关链接。敬请不要复制或改篇为自己的食谱。谢谢!如需要阅读中文版,请在网页的右边点击Translate,然后选择中文翻译。

Thanks for reading, I hope you are inspired after reading my blog. If you love to see my food, click hereLIKE & follow Miki's Food Archives Facebook page or follow us on Instagram: mfa_dingoozatfood  to receive more recipe updates. Don't forget to change the setting to 'SEE FIRST' if you wish to see my post on your Facebook news feed. 

Enjoy!

Wednesday 17 July 2019

Pompompurin Mini Custard Muffins 布丁狗卡士达麦芬


These delightful mini Pompompurin custard muffins are quick and easy to make at home. It can be served as it is or serve with homemade custard. I coated the top with homemade custard, draw Pompompurin facial details using melted chocolate. There's only one decorated mini muffin in the picture because that's the last one left for my photoshoot...


Ingredients: 
材料
Recipe adapted from here

(A)

1 Egg 鸡蛋 1粒

100g Sugar 细砂糖 100克

60g Milk 牛奶 60克

65g Coconut Oil/ Cooking Oil 椰子油/菜油 65克

1 tsp Vanilla Extract 香草精 1小匙


(B)

125g Cake Flour 低筋面粉 125克

1/2 tsp Baking Powder 发粉 1/2小匙

1/2 tsp Baking Soda 小苏打 1/2小匙


Optional: Custard 自制卡士达酱, 适量 
《Homemade Custard Recipe 自制卡士达酱食谱》


If you are sharing this recipe/ blog content, kindly attach the link to this blog instead of screen capture/ copy & paste/ use in your blog. No parts of the content of this blog may be reproduced without prior written permission. All rights reserved. Thank you. 如果您要分享此食谱/内容,请联系这个部落格的相关链接。敬请不要复制或改篇为自己的食谱。谢谢!


Method:

1. Preheat oven 175'C.
预热烤箱 175度。

2. Mix (A) in a bowl. Sift in (B) in another bowl. 
把材料 (A) 搅拌均匀,材料(B)过筛。


3. Pour (A) into (B), mix well with a hand whisk. Do not over mix the batter.
把 (A) 加入 (B),搅拌均匀。不要过度搅拌,不然麦芬会变硬。


4. Pour the batter evenly into muffin tray. Bake in a preheated oven for 10-15 minutes or until cooked through. Serve as plain vanilla muffin or coat with homemade custard.
把面糊平均的倒入麦芬烤盘。放进已预热的烤箱,烘烤10-15分钟或至熟,即可。喜欢高颜值的话,可以沾上卡士达酱,然后用融化巧克力画上布丁狗细节。若喜欢我的食谱,可以LIKE和追随我的面书专页,不要错过最新食谱发布。
If you like my recipe, click hereLIKE & follow Miki's Food Archives Facebook page or follow us on Instagram: mfa_dingoozatfood  to receive more recipe updates. Don't forget to change the setting to 'SEE FIRST' if you wish to see my post on your Facebook news feed. 

Enjoy!

Monday 15 July 2019

Beef Satay Spaghetti 沙爹牛肉意粉


I love spicy food, so when I'm eating alone, I would cook spicy food for myself. This is one of my favourite recipe because it's simple and quick to cook in just one pan and it's so delicious!


Ingredient: 材料

100g Spaghetti 意面 100克

100g Beef Belly Slices/ Ground Beef 牛肉片/ 肉碎 100克
(can be replaced with other meat 不吃牛肉的话,可以改其它肉类)

2 cloves Garlic (sliced) 蒜头 2瓣 切片

2 tbsp chopped Onion 洋葱碎 2汤匙

1 tbsp chopped Red Chili 红辣椒碎 1汤匙

20g Asparagus 芦笋 20克

Some oil for cooking 橄榄油/ 菜油 适量

Pinch of Sea Salt, optional 盐 适量


Marinade: 腌料

1 tsp Light Soy Sauce 酱油 1小匙

1 tsp Sesame Oil 麻油 1小匙

2 tbsp Satay Sauce 沙爹酱 2汤匙

1/2 tsp Corn Flour 玉米粉/ 粟粉 1/2 小匙


Sauce: 酱汁

2 tbsp Pasta Water 煮了意面的水 2汤匙

3 tbsp Satay Sauce 沙爹酱 3汤匙

1 tsp Fish Sauce 鱼露 1小匙


If you are sharing this recipe/ blog content, kindly attach the link to this blog instead of screen capture/ copy & paste/ use in your blog. No parts of the content of this blog may be reproduced without prior written permission. All rights reserved. Thank you. 

如果您要分享此食谱/内容,请联系这个部落格的相关链接。敬请不要复制或改篇为自己的食谱。谢谢!


Method: 步骤

1. Place beef in a bowl, add in marinade ingredients, mix well and let marinate for 15 minutes. 
牛肉加入腌料,拌均后腌15分钟。

2. Cook spaghetti according to package instructions, reserve 2 tbsp pasta water.
煮好意面后取2汤匙煮意面的水,备用。


If using Shabu-shabu beef that is much thiner, use blanched asparagus. 

3. Meanwhile, heat oil in a skillet, add in garlic, onion and red chili, fry until fragrant. 
平底锅里烧热少许油,加入蒜头,洋葱和红辣椒,爆香。


4. Add in beef and asparagus, stir fry until cooked through. Add in sauce ingredients, mix well, season with some salt, if needed. Toss in cooked spaghetti and serve right away.
加入牛肉和芦笋,炒熟后快速加入酱汁和少许盐调味,加入意面拌均后即可享用。若喜欢我的食谱,可以LIKE和追随我的面书专页,不要错过最新食谱发布。
If you like my recipe, click hereLIKE & follow Miki's Food Archives Facebook page or follow us on Instagram: mfa_dingoozatfood  to receive more recipe updates. Don't forget to change the setting to 'SEE FIRST' if you wish to see my post on your Facebook news feed. 

Enjoy!


Wednesday 10 July 2019

Pan Seared Scallops With Sweet Fruity Glaze 甜酱煎带子


A quick and easy seared scallops with sweet fruity glaze simply made using orange juice, tomato puree, honey and bean sauce. Created this dish some times back in 2018...


Ingredients: 材料

10 Scallops 带子 10个

1 clove Garlic (crushed) 蒜茸 1 小匙

1/4 tsp grated Ginger 姜蓉 1/4 小匙

Pinch of Sea Salt 海盐 少许

Pinch of Black Pepper 黑胡椒 少许

10g Unsalted Butter 牛油 10克

Some oil for cooking 油 适量


Sauce: 酱汁

1 tsp Bean Paste (minced/ pureed) 豆酱 1小匙

1 tsp Honey 蜜糖 1小匙

1 tsp Concentrated Tomato Puree 番茄膏 1小匙

1 tbsp Fresh Orange Juice 橙汁 1汤匙


If you are sharing this recipe/ blog content, kindly attach the link to this blog instead of screen capture/ copy & paste/ use in your blog. No parts of the content of this blog may be reproduced without prior written permission. All rights reserved. Thank you. 如果您要分享此食谱/内容,请联系这个部落格的相关链接。敬请不要复制或改篇为自己的食谱。谢谢!


Method: 步骤

1. Wash and pat dry the scallops with kitchen towel. Place scallops in a bowl, add in garlic and ginger, mix well, let it sit for 15 minutes. Pat dry with kitchen towel.
带子洗净抹干。加入蒜茸和姜蓉,拌均后待15分钟。抹干。

2. Heat oil in a skillet until just smoking, add in scallops, do not move the scallops until well browned. 
平底锅加入油,加热至冒烟,加入带子煎至底部上色。煎的过程不要移动带子。


3. Season the scallops with salt and pepper, add in butter, flip the scallops. When the scallops are browned on both sides, discard excess oil, add sauce and toss to coat. Remove from heat, serve right away.
加少许盐和黑胡椒调味,加入牛油,翻面继续煎至上色。把多余的油倒掉,加入酱汁快速拌均后即可享用。若喜欢我的食谱,可以LIKE和追随我的面书专页,不要错过最新食谱发布。
If you like my recipe, click hereLIKE & follow Miki's Food Archives Facebook page or follow us on Instagram: mfa_dingoozatfood  to receive more recipe updates. Don't forget to change the setting to 'SEE FIRST' if you wish to see my post on your Facebook news feed. 

Enjoy!


Thursday 4 July 2019

Penguin Custard Steamed Bun 企鹅造型卡士达包


Soft and fluffy steamed bun filled with homemade custard and made into little penguins. Knead the dough using Song Cho bread maker #dough function, it's so quick and easy.


Song Cho Bread Maker SC-BK06A

Features:


  • * Sleek body design, large LED display
  • * 14 functions (basic, french, whole wheat, sweet, gluten free, sandwich, cake, bake, rise, rise dough, dough, jam, yoghurt and home made)
  • * 13-hour programmable timer
  • * Ceramic-coated bread barrel for easy cleaning
  • * 10 minutes' power cut-off memory function
  • * Bread weight: 680g to 900g
  • * Bread barrel: 19L x 14W x 17H cm
  • * Techincal Specs: Rated voltage 220/240V~50Hz, Rated power 550W


Ingredients: Yield 8 buns
材料

130g Cold Milk 冷牛奶 130克

30g Sugar 细砂糖 30克

1 1/2 tsp Oil 油 1 1/2小匙

225g Plain Flour/ All Purpose Flour/ Hong Kong Pau Flour  中筋面粉/包粉 225克

3/4 tsp Instant Dry Yeast 即溶酵母 3/4小匙

Black Dough: Food Grade Charcoal Powder 食品级黑炭粉 少许

Yellow Dough: Ground Turmeric 黄姜粉 少许

1- 2tbsp Fresh Milk, if needed 牛奶,适量

8 tbsp Homemade Custard Filling 卡士达馅 8汤匙


If you are sharing this recipe/ blog content, kindly attach the link to this blog instead of screen capture/ copy & paste/ use in your blog. No parts of the content of this blog may be reproduced without prior written permission. All rights reserved. Thank you. 

如果您要分享此食谱/内容,请联系这个部落格的相关链接。敬请不要复制或改篇为自己的食谱。谢谢!


Method: 步骤

1. Take out bread barrel from Song Cho Bread Maker. Install the stirring rod. Add Milk > Castor Sugar > Oil > Flour > Yeast into bread barrel. 
将牛奶》细砂糖》油》面粉》酵母跟次序放入松厨面包机。


2. Return bread barrel into Song Cho bread maker, press bread barrel down, turn it by clockwise and make sure it is installed firmly. Select <#11 DOUGH > , press < START >.
安装好后按键选择 《#11 DOUGH》,按 《START》。


3. When the dough is ready, transfer the dough onto table top. Portion out 8x 40g plain dough. Divide remaining dough into 2 portions, knead in some ground turmeric to make yellow dough, charcoal powder to make black dough. Add some milk when kneading the dough.
把打好的面团拿出,先割出8份各40克的白面团。剩余的面团分两份,分别加入黄姜粉和黑碳粉,搓均匀。搓入粉类时必须加少许牛奶。


Tips: While working on each colour dough, keep the remaining dough in the refrigerator. 
小贴士:还没操作的面团先用保鲜纸盖好放进冰箱。

4. Plain dough: Gently knead each dough and roll into small round balls. Wrap in custard fillings.
白面团:每份揉成小球状。包入馅料。


5. Shape black and yellow colour dough into penguin facial and body details as shown in the pictures. Brush some milk on the plain dough before adding details.
黑色和黄色面团作企鹅细节,参考下图。包子上涂少许牛奶才放上黑色和黄色面团。


6. Let it proof for about 50 minutes or doubled in size. Steam on high heat for 15 minutes. When it's done, turn off heat. Let it sit in the steamer for 5 minutes before removing from the steamer. 
做好造型后发酵大概50分钟或双倍大。放进蒸炉大火蒸15分钟。 蒸好后熄火,待5分钟才把包子拿出。待凉后即可享用。若喜欢我的食谱,可以LIKE和追随我的面书专页,不要错过最新食谱发布。
If you like my recipe, click hereLIKE & follow Miki's Food Archives Facebook page or follow us on Instagram: mfa_dingoozatfood  to receive more recipe updates. Don't forget to change the setting to 'SEE FIRST' if you wish to see my post on your Facebook news feed. 

Enjoy!


Related Posts Plugin for WordPress, Blogger...