Click LIKE & follow us on Facebook for recipe updates

COOK WITH LOVE FOR A HAPPY HIM

Singapore home cooking/ baking/ food & recipe blog features more than 500 tried & tested, quick & easy kid friendly recipes with steps by steps tutorial.


Follow us on Instagram: mfa_dingoozatfood


If you're a company looking for possible collaboration, feel free to send me a message via Miki's Food Archives Facebook Fan Page or email to miki9mak@gmail.com


Search This Blog

Sunday, 30 January 2022

Cute Tiger Pumpkin Steamed Buns 超萌小老虎造型南瓜馒头


Usher in the year of Tiger with some cute and yummy tiger theme pumpkin steamed buns. 
These steamed buns are soft and fluffy with a tad of sweetness. Made using my usual steamed bun recipe, added some fresh pumpkin in the dough to get the bright natural colour. 

My kid loves this so much that he can't bear to eat the tiger face! 😝

Cute tiger steamed bun with sliced luncheon meat for the kid.

My boy says it's too cute, he can't bear to eat the face >.<


Ingredients: 

65g Pumpkin Puree 南瓜泥 65克

10g Sugar 细砂糖 10克

1 tsp Oil 油 1小匙

150g Plain Flour/ Pao Flour 中筋面粉/包粉 150克

1/2 tsp Instant Dry Yeast 即溶酵母 1/2小匙

Some Milk 牛奶 适量


If you are sharing this recipe/ blog content, kindly attach the link to this blog instead of screen capture/ copy & paste/ use in your blog. No parts of the content of this blog may be reproduced without prior written permission. All rights reserved. Thank you. 如果您要分享此食谱/内容,请联系这个部落格的相关链接。敬请不要复制或改篇为自己的食谱。谢谢!


Method: 步骤

1. Combine dough ingredients, knead the dough until glossy and smooth.
将所有面团材料放进搅拌机搅拌成团至光滑。


2. Shape as desired, use picture above as reference. 
分割后造型, 可参考上图。

3. Let it proof doubled in size. Steam for 15 minutes. When it's done, turn off heat. Let it sit for 5 minutes before removing/ open the lid. 
做好后发酵至双倍大。蒸15分钟。 蒸好后熄火,待5分钟才把馒头拿出, 即可享用。若喜欢我的食谱,可以LIKE和追随我的面书专页,不要错过最新食谱发布。

If you like my recipe, click hereLIKE & follow Miki's Food Archives Facebook page or follow us on Instagram: mfa_dingoozatfood  to receive more recipe updates. Don't forget to change the setting to 'SEE FIRST' if you wish to see my post on your Facebook news feed. Enjoy!


Sunday, 23 January 2022

Cute Tiger Bread Usher In The Year Of Tiger 萌虎面包迎新年


Chinese New Year is nearing, sharing here is my very first attempt making tiger theme bread art, a fun baking to usher in the roaring year of the Tiger! 


These bread are not only cute, they're very soft and full of buttery aroma. If you'd like to try making it at home, tap the link below for recipe.


Thanks for reading, I hope you are inspired after reading my blog. If you love to see my food, click hereLIKE & follow Miki's Food Archives Facebook page or follow us on Instagram: mfa_dingoozatfood  to receive more recipe updates. Don't forget to change the setting to 'SEE FIRST' if you wish to see my post on your Facebook news feed. 

Enjoy!

Friday, 14 January 2022

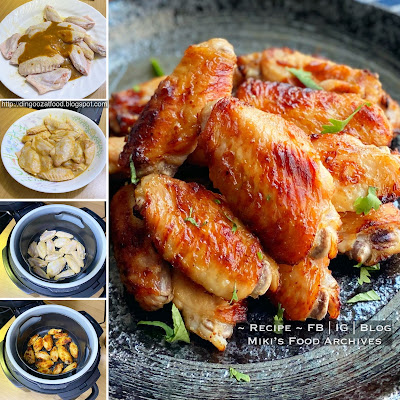
Air Fried Belacan Chicken Wings 气炸马来峇拉煎鸡翅膀


Marinated with Asian belacan spices, these chicken wings are infused with so much flavour and shiok to eat! Preparation is easy, just marinate the wings and throw them into the air-fryer or you can bake them in an oven.


Air-fried Belacan Chicken Mid Wings are tasty and easy to cook!

Ingredients: yield 2 servings
中文食谱:请在网页的右边点击Translate,然后选择中文翻译

12 Chicken Mid Wings


Marinade:


2 tsp Belacan Powder


1 tsp Curry Powder


1 tbsp Corn Flour


1/2 tsp Salt


1/8 tsp White Pepper


2 tsp Light Soy Sauce


1 tsp Sesame Oil


1/2 tsp Onion Powder


If you are sharing this recipe/ blog content, kindly attach the link to this blog instead of screen capture/ copy & paste/ use in your blog. No parts of the content of this blog may be reproduced without prior written permission from Miki's Food Archives. All rights reserved. Thank you. 

如果您要分享此食谱/内容,请联系这个部落格的相关链接。敬请不要复制或改篇为自己的食谱。谢谢!


Method: 

1. Combine all ingredients, let marinate for 2 hours or overnight. 


3. Air-fry 180'C 15 minutes or until cooked through, serve right away. Note: Spray/ brush some oil on the chicken wings and basket before cooking. 
若喜欢我的食谱,可以LIKE和追随我的面书专页,不要错过最新食谱发布。If you like my recipe, click hereLIKE & follow Miki's Food Archives Facebook page or follow us on Instagram: mfa_dingoozatfood  to receive more recipe updates. Don't forget to favourite my pages if you wish to see my post on your news feed. 

Friday, 7 January 2022

Pink Velvet Slit-top Chiffon Cake 粉红丝绒戚风蛋糕


This Pink Velvet Chiffon Cake is so light, airy, soft, and moist. Actually, the boy wanted to have red velvet cake but I don’t want to add so much coloring to it, so I made a pink one. It’s my first time baking this new flavor, glad it turned out well 💕


Unlike traditional chiffon cake that we used to bake in tube pans, this chiffon cake is baked in a normal 6 inches round pan with a slit top to have a nice controlled cracked top with a star top and lovely Totoro pictures imprinted on the cake using a hot stamp tool. I'm using the same recipe as my Chocolate Slit-top Chiffon Cake, replace the cocoa powder with red velvet cocoa powder << Tap here for the recipe>>.   Hot Stamp Tool can be purchased from DGZ SHOP


Thursday, 6 January 2022

Easy Stir-fry Ee Fu Noodles aka Yi Mein 干烧伊面/伊府面


Ee Fu noodles are commonly served in restaurants, it's a popular noodle dish served during Chinese New Year.  Sharing here is a very simple stir-fry Ee Fu Noodles recipe that everyone can easily prepare at home without hassle.

Ingredients:
中文食谱:请在网页的右边点击Translate,然后选择中文翻译

3pcs Ee Fu Noodles, blanched

100g Roasted Pork

6 Large Prawns

1pc Fish Cake, sliced

6 Shiitake Mushrooms (soaked, reserve the water)

4 cloves Garlic, minced

1 tbsp Rice Wine

1 stalk Spring Onion

Some salt and pepper, add to taste

Some oil for cooking 


Sauce:

2 tbsp Oyster Sauce

1 tbsp Maggi Seasoning

1 tsp Sugar


If you are sharing this recipe/ blog content, kindly attach the link to this blog instead of screen capture/ copy & paste/ use in your blog. No parts of the content of this blog may be reproduced without prior written permission. All rights reserved. Thank you. 

如果您要分享此食谱/内容,请联系这个部落格的相关链接。敬请不要复制或改篇为自己的食谱。谢谢!


Method:

1. Add some oil to the wok, turn on medium heat. When the oil is heated, add in garlic, stir fry until fragrant. 

I cooked this dish using Song Cho stainless steel wok, 
a multiply stainless steel wok without chemical coating, it's safe to use in any cooking including deep-frying. 
For more information about the product, visit Song Cho e-shop for details.


2. Add in roasted pork and mushrooms, stir fry for a minute, season with salt and pepper. Drizzle rice wine, add in mushroom water (and/ or some chicken broth, optional), noodles and sauce. Mix well and bring to a boil. 

3. Add in prawns and fish cake. When the prawns are cooked, garnish with spring onion and serve right away.  

若喜欢我的食谱,可以LIKE和追随我的面书专页,不要错过最新食谱发布。
If you like my recipe, click hereLIKE & follow Miki's Food Archives Facebook page or follow us on Instagram: mfa_dingoozatfood  to receive more recipe updates. Don't forget to change the setting to 'SEE FIRST' if you wish to see my post on your Facebook news feed. 

Enjoy!


Tuesday, 28 December 2021

Easy Stir-fry Pork Belly With Salted Fish 咸鱼花腩煲


Thinly sliced pork belly coated with thick savoury sauce, packed with a rich umami flavour, this dish goes well with rice and porridge. This is one of my frequently-cooked dishes, previously I've shared the rice cooker, wok, and air-fryer methods. Sharing here on this blog post is another easy method.


Ingredients: 
材料

300g Pork Belly, sliced 花肉 300克,切片

1 stalks Spring Onion 1 棵青葱

Some oil for cooking 油,适量


(A)

1 tsp Tapioca Flour 木薯粉 1小匙

1 tsp Sesame Oil 麻油 1小匙

1 tsp Shao Xing Hua Tiao Wine 绍兴花雕酒 1小匙


(B)

30g Salted Fish, diced 咸鱼 30克,切粒

3-4 Dried Chili 辣椒干 3-4条

Note:
This recipe is non-spicy and kid-friendly, double the dried chilies amount if you love hot & spicy.
这食谱的咸鱼花腩不辣,适合小朋友的口味。喜欢辣的可以放六条辣椒干。

1 Onion, cut into chunks 洋葱 1粒,切块

5 cloves Garlic 蒜头 5瓣

7 slices Ginger 姜 7片


(C) - add all ingredients to a bowl, mix well. 将所有材料C混合,拌均

1/2 tbsp Light Soy Sauce 酱油 1/2 汤匙

1 tsp Castor Sugar 细砂糖 1小匙

1 tbsp Oyster Sauce 蚝油 1汤匙

1 tbsp Shao Xing Hua Tiao Wine 绍兴花雕酒 1汤匙

1.5 tsp Dark Soy Sauce 黑酱油 1.5小匙

80ml Water 水 80毫升


(D) - add all ingredients to a bowl, mix well. 将所有材料D混合,拌均

1/2 tsp Corn Flour 玉米粉/粟粉 1/2 小匙

1/2 tbsp Water 水 1/2 汤匙


If you are sharing this recipe/ blog content, kindly attach the link to this blog instead of screen capture/ copy & paste/ use in your blog. No parts of the content of this blog may be reproduced without prior written permission. All rights reserved. Thank you. 

如果您要分享此食谱/内容,请联系这个部落格的相关链接。敬请不要复制或改篇为自己的食谱。谢谢!

Method: 步骤

1. 
Add (A) into pork belly, mix well. Cover with cling wrap and let marinate in the refrigerator for at least 2 hours.
花肉加入(A),拌均。盖上保鲜纸,放进冰箱腌至少两小时。


2. Add 1/2 tbsp oil to the pot. Add in salted fish. Air-fry 180'C 5mins. 
锅里加入少许油,气炸咸鱼180 度5分钟,备用。


3. Remove the salted fish, set aside. Add in the remaining (B) ingredients, stir fry until fragrant.
加入其余的(B)材料,爆香。

4. Add in marinated pork belly, stir fry until half cooked. Stir in (C), mix well. 
加入花肉,炒香至半熟。加入(C),拌均。

5. Bring to a boil, reduce heat and simmer until the pork is fully cooked. Stir in (D), mix well. Add in salted fish. 
大火烧开后转小火,焖至花肉熟透。加入(D),拌均。加入咸鱼。

6. When the sauce is thickened and glossy, garnish with spring onion/ coriander, serve warm with steamed rice or porridge. 
收汁,加入青葱,即可享用。
若喜欢我的食谱,可以LIKE和追随我的面书专页,不要错过最新食谱发布。If you like my recipe, click hereLIKE & follow Miki's Food Archives Facebook page or follow us on Instagram: mfa_dingoozatfood  to receive more recipe updates. Don't forget to favourite my pages if you wish to see my post on your news feed. 

Thursday, 16 December 2021

Miso Chicken Wings 和风味噌酱烧鸡翼


These Miso Chicken Wings are packed with umami flavour and they're incredibly easy to make. Just marinate the wings and throw them into the air-fryer or an oven if you have one at home. 


Ingredients: yield 2 servings
中文食谱:请在网页的右边点击Translate,然后选择中文翻译

10 Mid Wings 

1 tbsp Corn Flour

2 cloves Garlic, mashed

1 + 1/2 tbsp Miso Paste

1 + 1/2 tbsp Light Soy Sauce

1 tbsp Mirin 

1 tsp Sesame Oil


If you are sharing this recipe/ blog content, kindly attach the link to this blog instead of screen capture/ copy & paste/ use in your blog. No parts of the content of this blog may be reproduced without prior written permission from Miki's Food Archives. All rights reserved. Thank you. 

如果您要分享此食谱/内容,请联系这个部落格的相关链接。敬请不要复制或改篇为自己的食谱。谢谢!


Method: 

1. Combine all ingredients, let marinate for 2 hours or overnight. 


2. Air-fry 180'C 10-12mins or until cooked through, serve right away. 若喜欢我的食谱,可以LIKE和追随我的面书专页,不要错过最新食谱发布。If you like my recipe, click hereLIKE & follow Miki's Food Archives Facebook page or follow us on Instagram: mfa_dingoozatfood  to receive more recipe updates. Don't forget to favourite my pages if you wish to see my post on your news feed. 

Friday, 10 December 2021

Mochi Kaya Puff aka Kaya Kok 麻薯咖椰角


Feeling so nostalgic when making these old-school Kaya Puff aka Kaya Kok, it's one of my favourite afternoon snacks when I was a child. Kaya puffs are flaky pastries filled with Kaya, this recipe that I'm sharing here is a twist from the traditional Kaya puffs, instead of just Kaya, I added some mochi in it and this gives the puffs a double texture filling, tastes so good! 


Ingredients:
中文食谱:请在网页的右边点击Translate,然后选择中文翻译

Mochi:

25g Glutinous Rice Flour 

15g Rice Flour

10g Corn Flour

10g Coconut Oil/ Cooking Oil

90g Milk

15g Icing Sugar


Water Dough:

160g Plain Flour

55g Salted Butter

70g Water

1 tsp Icing Sugar


Oil Dough:

100g Plain Flour

60-65g Shortening/ Lard/ Butter

~~~~~~~~~~~~~~~~~~~~~~~

Kaya

Egg Wash


If you are sharing this recipe/ blog content, kindly attach the link to this blog instead of screen capture/ copy & paste/ use in your blog. No parts of the content of this blog may be reproduced without prior written permission. All rights reserved. Thank you. 如果您要分享此食谱/内容,请联系这个部落格的相关链接。敬请不要复制或改篇为自己的食谱。谢谢!

Method:

1. Mix all mochi ingredients in a bowl, pour through a sieve. Cover with aluminium foil, steam for 20 minutes, stir with a pair of wooden chopsticks until smooth, set aside.

2. Mix all water dough ingredients, cover with cling wrap, let it rest for 30 minutes. Divide dough into smaller portions. Mix all oil dough ingredients, cover with cling wrap, let it rest for 30 minutes. Divide dough into smaller portions.


3. Roll out the water dough (flat and round). Place oil dough in the middle, wrap up and seal. Roll it out long and flat, roll up. Rotate the dough 90', roll out again (long and flat), then roll-upHold up 2 sides and seal, let it rest for 15 minutes. Repeat for the rest. Roll the dough round and flat, wrap in kaya and mochi filling as shown in the picture above. 

4. Egg wash and bake 170'C for 20 minutes or until golden. 若喜欢我的食谱,可以LIKE和追随我的面书专页,不要错过最新食谱发布。If you like my recipe, click hereLIKE & follow Miki's Food Archives Facebook page or follow us on Instagram: mfa_dingoozatfood  to receive more recipe updates. Don't forget to favourite my pages if you wish to see my post on your news feed. 

Monday, 6 December 2021

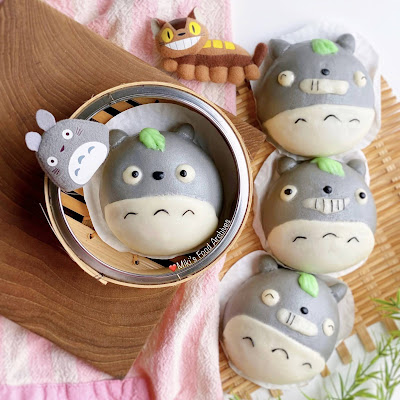
Totoro Steamed Buns With Curry Potato Filling 龙猫造型咖喱马铃薯包子


Totoro is one of the character foods that I often made for my kid who loves his little buddy... the one under the table below... :P


Another design that I've tried... My Neighbour Totoro Steamed Bun with  BBQ pork fillings, aren't they cute?
Made using natural colour from edible charcoal powder (grey and black) and green tea powder  (green).
Photo: September 2019


Ingredients: 

Dough recipe 面团材料: 

85g Milk 牛奶 85克

20g Sugar 细砂糖 20克

1 tsp Oil 油 1小匙

150g Plain Flour/ Pao Flour 中筋面粉/包粉 150克

1/2 tsp Instant Dry Yeast 即溶酵母 1/2小匙

~~~~~~~~~~~~~~~~~~~~~~~~~~~~~~~~~~~~~

Some Charcoal Powder 碳灰粉 少许

Some Green Tea Powder 绿茶粉 少许

1-2 tbsp Milk, if needed 牛奶,适量

Some Chicken & Potato Dry Curry Filling 鸡肉马铃薯干咖喱馅
Tap the link for recipe 点击链接进入 


If you are sharing this recipe/ blog content, kindly attach the link to this blog instead of screen capture/ copy & paste/ use in your blog. No parts of the content of this blog may be reproduced without prior written permission. All rights reserved. Thank you. 如果您要分享此食谱/内容,请联系这个部落格的相关链接。敬请不要复制或改篇为自己的食谱。谢谢!


Method: 步骤

1. Combine dough ingredients, knead the dough until glossy and smooth.
将所有面团材料放进搅拌机搅拌成团至光滑。


2. Shape as desired, use picture above as reference. For coloured dough: take out small portion of dough, knead in some milk + charcoal powder/ green tea powder.
分割后包入馅料,造型可参考上图。

3. Let it proof for about 50 minutes or doubled in size. Steam for 15 minutes. When it's done, turn off heat. Let it sit for 5 minutes before removing open the lid. 
做好后发酵50分钟或双倍大。蒸15分钟。 蒸好后熄火,待5分钟才把包子拿出。待凉后即可享用。若喜欢我的食谱,可以LIKE和追随我的面书专页,不要错过最新食谱发布。

If you like my recipe, click hereLIKE & follow Miki's Food Archives Facebook page or follow us on Instagram: mfa_dingoozatfood  to receive more recipe updates. Don't forget to change the setting to 'SEE FIRST' if you wish to see my post on your Facebook news feed. Enjoy!


Related Posts Plugin for WordPress, Blogger...