Click LIKE & follow us on Facebook for recipe updates

COOK WITH LOVE FOR A HAPPY HIM

Singapore home cooking/ baking/ food & recipe blog features more than 500 tried & tested, quick & easy kid friendly recipes with steps by steps tutorial.


Follow us on Instagram: mfa_dingoozatfood


If you're a company looking for possible collaboration, feel free to send me a message via Miki's Food Archives Facebook Fan Page or email to miki9mak@gmail.com


Search This Blog

Friday, 29 May 2020

Pressure Cooker Soy Sauce Chicken 酱油鸡腿【高压锅食谱】


Soy Sauce Chicken is a Cantonese favourite cuisine. Most people cook this dish using a whole chicken, braise in a pot of soy sauce flavored watery gravy. It is quite tedious to braise a whole chicken as you need to stand by the stove, rotate the chicken to get an even color and flavor. Fred not! My method is simplified and easy. 

Pressure Cooker Recipe - Easy Soy Sauce Chicken

I cooked the chicken and rice at the same time using Ninja Foodi multi-cooker. Ninja Foodi is a combination of a pressure cooker and air fryer in one pot, it's super-efficient and time-saving. The package comes with a reversible grilling and steaming rack, which comes in handy when I need to cook two dishes at the same time. Cooked on high pressure for 3 minutes and let it sit for a while before releasing pressure, simple meal ready under 20 minutes. 

Besides pressure cooking and air frying, there are other functions such as steam, slow cook, sear/ saute, bake/ roast, grill, dehydrate, sous vide, yoghurt, and keep warm. This cooker helps prepare quick meals without hassle, which I highly recommend to everyone who loves easy and hassle-free cooking with fewer pots and pans to wash. If you're interested, you can use our exclusive discount code to buy at the best market rate. I've attached the details and links below for easy reference.

SINGAPORE:
Ninja Foodi can be purchased from Ninja Kitchen Official Website. Cart out with Promo Code: MIKISNSG to get a 10% discount for any Ninja-Shark products.

MALAYSIA:

Ninja Foodi can be purchased via Ninja Shark Official Website. Cart out with Promo Code: MFAOP300 to get the lowest price deal.


Ingredients: Yield 3 servings 
中文食谱:请在网页的右边点击Translate,然后选择中文翻译

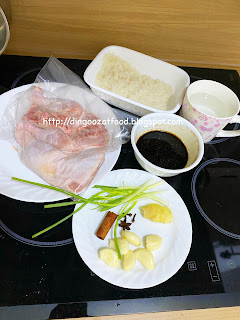
3 Chicken Legs
(season with a pinch of salt, white pepper, sesame oil, and cornflour)

6 cloves of Garlic (pounded) 

1 thumb-size Ginger (12g) 

1-2 stalk Spring Onion 

350g-400g Water 

50g Shao Xing or Chinese Rice Wine 

1-2 tbsp Dark Soy Sauce 

65g Light Soy Sauce 

27g Rock Sugar 

1/8 tsp Five Spice 

1 Cinnamon Stick 

1 Star Anise (small, optional) 

3 Cloves 

If you are sharing this recipe/ blog content, kindly attach the link to this blog instead of screen capture/ copy & paste/ use in your blog. No parts of the content of this blog may be reproduced without prior written permission. All rights reserved. Thank you. 如果您要分享此食谱/内容,请联系这个部落格的相关链接。敬请不要复制或改篇为自己的食谱。谢谢!

Method: 

1. Put all ingredients (except chicken legs) in the inner pot of Ninja Foodi. 


2. Set Saute/Sear (HI) mode, bring to a boil. Add in marinated chicken leg and coat the chicken with sauce. 


3. If cooking with rice, place the steaming rack and rice on top. Close the lid, seal. Set Pressure Cook (HI) for 3 minutes. 


Rice and water ratio is 1:1.5


4. When the cooking is done, let it sit for 10 minutes before release the remaining pressure.  
Serve warm with rice, noodles, or porridge. 

Note: Let the chicken leg soak in the gravy for longer to get a darker color. 
若喜欢我的食谱,可以LIKE和追随我的面书专页,不要错过最新食谱发布。
If you like my recipe, click hereLIKE & follow Miki's Food Archives Facebook page or follow us on Instagram: mfa_dingoozatfood  to receive more recipe updates. Don't forget to change the setting to 'SEE FIRST' if you wish to see my post on your Facebook news feed. 

Enjoy!


Wednesday, 27 May 2020

Baked Fish Parcel With Garlic & Ginger 纸包姜蒜烤鱼柳


Another quick and easy way of cooking fish fillet other than steaming. Just add seasoning, wrap up and bake using Ninja Foodi Bake/Roast function, simple and delicious baked fish ready in 10 minutes, easy preparation and less washing/ cleaning :D 


Ingredients:  
中文食谱:请在网页的右边点击Translate,然后选择中文翻译

1pc Fish Fillet 

1 Coriander Root

1 thumb size Ginger, sliced

1-2 cloves Garlic, sliced


Seasoning:

1/2 tsp Salt

1/8 tsp White Pepper

2 tsp Cooking Wine

1 tsp Sesame Oil

1 tsp Light Soy Sauce

1 tsp Abalone Sauce

Garnish: Some Coriander and red chili (optional)


If you are sharing this recipe/ blog content, kindly attach the link to this blog instead of screen capture/ copy & paste/ use in your blog. No parts of the content of this blog may be reproduced without prior written permission. All rights reserved. Thank you. 如果您要分享此食谱/内容,请联系这个部落格的相关链接。敬请不要复制或改篇为自己的食谱。谢谢!

Method: 

1. Rub seasoning on fish fillet. Place all ingredients on a parchment/ baking paper, wrap up.


2. Let marinate while preheating Ninja Foodi Baked/Roast Mode 200'C 5 mins. 
 The Ninja Foodi that I'm using is a combination of a pressure cooker and air fryer in one appliance. Besides pressure cooking and air frying, there are other functions such as steam, slow cook, sear/ saute, bake/ roast, grill, dehydrate, sous vide, yoghurt, and keep warm. This cooker helps prepare quick meals without hassle, which I highly recommend to everyone who loves easy and hassle-free cooking with fewer pots and pans to wash. If you're interested, you can use our exclusive discount code to buy at the best market rate. I've attached the details and links below for easy reference.

SINGAPORE:
Ninja Foodi can be purchased from Ninja Kitchen Official Website. Cart out with Promo Code: MIKISNSG to get a 10% discount for any Ninja-Shark products.

MALAYSIA:

Ninja Foodi can be purchased via Ninja Shark Official Website. Cart out with Promo Code: MFAOP300 to get the lowest price deal.


3. Place parcel on the reversible rack, close the lid. 


4. Set Bake/Roast mode 200'C 10 minutes. When it's ready, open the parcel, garnish with coriander and red chili, serve right away. 

若喜欢我的食谱,可以LIKE和追随我的面书专页,不要错过最新食谱发布。
If you like my recipe, click hereLIKE & follow Miki's Food Archives Facebook page or follow us on Instagram: mfa_dingoozatfood  to receive more recipe updates. Don't forget to change the setting to 'SEE FIRST' if you wish to see my post on your Facebook news feed. 


Enjoy!

Monday, 25 May 2020

Lotus Root & Sweet Corn Pork Ribs Soup 莲藕玉米排骨汤 - 清热消痰、健脾开胃、补血养颜,润肠排毒,增强新陈代谢,降血脂


Nourishing and nutritious soup that helps to boost metabolism, improve digestion and blood circulation etc... 


This is a time-saving recipe using Ninja Foodi multi-cooker. Cooking time: 30 minutes. If cooking this soup over the stovetop, need to cook for at least 2 hours to get these soft and tender pork ribs. Well, if you're not eating the meat, it's ok to shorten the cooking time. 

Lotus Root Pork Ribs Soup along with other dishes.
Photo updated: Nov 2021

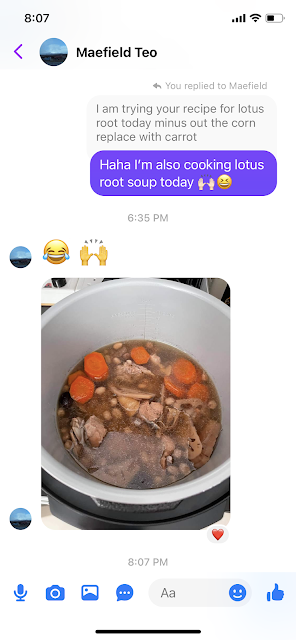
Lotus Root & Sweet Corn Chicken Soup, cooked using the same recipe, replaced the pork ribs with a chicken carcass and added some carrots.
Cooking time: 20mins

Photo updated: March 2023

 The Ninja Foodi that I'm using is a combination of a pressure cooker and air fryer in one appliance. Besides pressure cooking and air frying, there are other functions such as steam, slow cook, sear/ saute, bake/ roast, grill, dehydrate, sous vide, yoghurt, and keep warm. This cooker helps prepare quick meals without hassle, which I highly recommend to everyone who loves easy and hassle-free cooking with fewer pots and pans to wash. If you're interested, you can use our exclusive discount code to buy at the best market rate. I've attached the details and links below for easy reference.

SINGAPORE:
Ninja Foodi can be purchased from Ninja Kitchen Official Website. Cart out with Promo Code: MIKISNSG to get a 10% discount for any Ninja-Shark products.

MALAYSIA:

Ninja Foodi can be purchased via Ninja Shark Official Website. Cart out with Promo Code: MFAOP300 to get the lowest price deal.


Ingredients: 


300g Pork Ribs 排骨 300克
(blanched 用热水烫过)

2 sections Lotus Roots (peeled and cut into chunks) 莲藕 2节

1 Sweet Corn 玉米 1 根

6 Seedless Red Dates 红枣 6粒

1 Dried Cuttlefish (softened) 鱿鱼 1 片

Some salt to taste 盐 适量

1 litre Hot Water 热水 

If you are sharing this recipe/ blog content, kindly attach the link to this blog instead of screen capture/ copy & paste/ use in your blog. No parts of the content of this blog may be reproduced without prior written permission. All rights reserved. Thank you. 如果您要分享此食谱/内容,请联系这个部落格的相关链接。敬请不要复制或改篇为自己的食谱。谢谢!


Watch the video tutorial for method/ steps 步骤在视频里👇:
若喜欢我的食谱,可以LIKE和追随我的面书专页,不要错过最新食谱发布。
If you like my recipe, click hereLIKE & follow Miki's Food Archives Facebook page or follow us on Instagram: mfa_dingoozatfood  to receive more recipe updates. Remember to favourite my pages if you wish to see my post on your news feed. 


By readers, some feedback from those who have tried this recipe:


Friday, 22 May 2020

How to make Pandan Juice / Pandan Extract


Pandan aka screwpine leaves is widely used in cooking and baking in Asian countries. I have many recipes using Pandan leaves in cooking and baking cakes, bread, kuih, steamed bun and other desserts. To extract the Pandan juice, it's important to have a good blender or unless you have the patience you can use a mortar and pestle to slowly pound the leaves and extract the juice, that's what my parents used to do. :D 


Appliance: Ninja Blender, can be purchased from Ninja Kitchen Official Website. Cart out with Promo Code: MIKISNSG to get a 10% discount for any Ninja-Shark products via their website.
Watch this video tutorial to see how to easily make fresh Pandan juice/ extract at home 👇 Note: For concentrated Pandan extract - refrigerate the Pandan juice overnight and you will find the juice segregated into two layers. The darker green layer at the bottom is the concentrated pandan extract that you may use for recipes such as Spiral Pandan Mantou, Pandan muffins etc.

If you like my recipe, click hereLIKE & follow Miki's Food Archives Facebook page or follow us on Instagram: mfa_dingoozatfood  to receive more recipe updates. Remember to favourite my pages if you wish to see my posts on your news feed. 


If you are sharing this recipe/ blog content, kindly attach the link to this blog instead of screen capture/ copy & paste/ use in your blog. No parts of the content of this blog may be reproduced without prior written permission. All rights reserved. Thank you. 如果您要分享此食谱/内容,请联系这个部落格的相关链接。敬请不要复制或改篇为自己的食谱。谢谢!


Thursday, 21 May 2020

EB Prawn Paste Mushroom Rice 香菇虾滑饭


I've been trying to keep meals simpler these days as we're doing our part to stay at home during circuit breaker, no daily groceries shopping as I used to do. I bought all my ingredients online once or twice a week and mostly frozen food for easy storage. 

This is a super easy one pot meal cooked using EB frozen prawn paste. I really love this prawn paste in leaf-shape, it's versatile, quick and easy to cook from frozen. The texture is chewy and juicy with big chunks of prawn meat, so tasty! In case you'd like to buy 👉EB prawn paste is available at NTUC. ;) Find out more at EB FOOD SG.

Watch recipe video tutorial 视频食谱:


Ingredients: Yield 2-3 servings 
材料 - 2-3 人份

220g Rice 白米 220克

4 Shiitake Mushrooms (soaked & diced, reserve 90g water) 香菇 4朵,浸泡至软,取90克浸泡香菇的水,备用

2 tbsp Shredded Carrot 胡萝卜丝 2汤匙

240g Water 水 240克

1 tsp grated Ginger 姜茸 1茶匙

1 tsp mashed Garlic 蒜茸 1茶匙

1 tbsp Light Soy Sauce 酱油 1汤匙

2 tsp Sugar 细砂糖 2茶匙

1 tsp Sesame Oil 麻油 1茶匙

1/8 tsp White Pepper 胡椒粉 1/8茶匙

1/8 tsp Salt 盐 1/8茶匙

1 pkt EB Small Prawn Paste Leaf 小叶虾滑 1包

1 tbsp Chinese Rice Wine 白米酒 1汤匙

Garnish: 1 tbsp chopped Spring Onion 青葱碎 1汤匙 


If you are sharing this recipe/ blog content, kindly attach the link to this blog instead of screen capture/ copy & paste/ use in your blog. No parts of the content of this blog may be reproduced without prior written permission. All rights reserved. Thank you. 如果您要分享此食谱/内容,请联系这个部落格的相关链接。敬请不要复制或改篇为自己的食谱。谢谢!


Method: 
步骤

1. In a pan/ pot, add in rice, mushrooms, mushroom water, carrot, water, ginger, garlic, light soy sauce, sugar, sesame oil, white pepper and salt. 
把白米,香菇,浸泡香菇的水,胡萝卜丝,水,姜茸,蒜茸,酱油,细砂糖,麻油,胡椒粉和盐加入平底锅。

2. Top with frozen prawn paste, drizzle 1 tbsp rice wine on the prawn paste, cover the pan/ pot with a lid.
加入冷冻的小叶虾滑,把白米酒淋在虾滑上,盖上锅盖。

3. Turn on heat, bring to a boil. Reduce heat to low, simmer for 20 minutes. Turn off heat and let it sit for 10 minutes, garnish with spring onion and serve right away.
开大火煮滚后转小火,焖煮20分钟。煮熟后静置10分钟,撒上青葱碎,即可享用。若喜欢我的食谱,可以LIKE和追随我的面书专页,不要错过最新食谱发布。
If you like my recipe, click hereLIKE & follow Miki's Food Archives Facebook page or follow us on Instagram: mfa_dingoozatfood  to receive more recipe updates. Don't forget to change the setting to 'SEE FIRST' if you wish to see my post on your Facebook news feed. Enjoy!


Wednesday, 20 May 2020

Fish Finger Onigirazu/ Rice Sandwich 鱼柳饭团


Delicious Onigirazu aka rice sandwich made using air-fried cod finger along with some sides. This is super easy to prepare using frozen battered seafood. Just throw everything into the air fryer and let it do the frying, No oily or soggy fried food, no greasy kitchen. The fish fingers and seafood all turned out perfectly crispy, better than deep fried of course ;)


I cooked all these using Ninja Foodi, the 2 in 1 pressure cooker and air fryer in one pot. Pressure-cooked Japanese rice for 3 minutes, use Saute/Sear mode to fry the egg and Air-Crisp mode to air fry the seafood combo and fish fingers. Everything cooked in one pot, so convenient!

Besides pressure cooking and air frying, there are other functions such as steam, slow cook, sear/ saute, bake/ roast, grill, dehydrate, sous vide, yoghurt, and keep warm. This cooker helps prepare quick meals without hassle, which I highly recommend to everyone who loves easy and hassle-free cooking with fewer pots and pans to wash. 
Ninja Foodi can be purchased from Ninja Kitchen Official Website. Cart out with Promo Code: MIKISNSG to get a 10% discount for any Ninja-Shark products via their website
Ingredients: 
中文食谱:请在网页的右边点击"Translate",然后选择中文翻译

*200g Japanese Rice (soaked 30 minutes)

*250g Water (for cooking rice)

2 Eggs, lightly beaten, season with salt and pepper

1 pkt Frozen Cod Finger

Some seaweed, crab sticks, lettuce, mayonnaise, any sauce or sides of your choice.

Onigirazu lunch for the kiddo
A wholesome meal that's great for packing lunchbox/ bento as well.
Photo updated: August 2023
If you are sharing this recipe/ blog content, kindly attach the link to this blog instead of screen capture/ copy & paste/ use in your blog. No parts of the content of this blog may be reproduced without prior written permission. All rights reserved. Thank you. 
如果您要分享此食谱/内容,请联系这个部落格的相关链接。敬请不要复制或改篇为自己的食谱。谢谢!

Method:

1. Cook Japanese rice using Ninja Foodi - Add water and rice in the pot, pressure cook (HI) for 3 minutes, let it sit for 10 minutes, release the remaining pressure. Remove the rice from the pot, set aside to cool. 


2. Wipe the pot, set Sear/ Saute mode (HI), heat some oil and fry the egg, set aside. Place Cook & Crisp basket in the pot. Set Air-Crisp mode 200'C, preheat for 5 minutes. Add in the frozen cod finger. 


3. Air Crisp mode 200'C 6-8 minutes.


4. When the fish finger is ready, gather all ingredients.


5. Assemble the onigirazu according to your own preferences. Below are some ideas for reference. 

The base: Place seaweed at the bottom, follow by rice , lettuce and some mayonnaise.
Add cod finger, topped with some Tonkatsu sauce.

or cod finger, crab stick with some mayonnaise.

Another combination of cod finger, egg, crab stick and prawn,
with some Thai chilli sauce.

A combination of cod finger, egg and crab stick with mayonnaise.


6. After adding the fillings, top with lettuce and rice, wrap up, slice and serve. Tips: Use a sheet of cling wrap to help hold the seaweed together. ;) 
<< Click HERE >> to view more Ninja Foodi recipes and cooking videos, including easy one-pot-meal, chicken curry, roast chicken, roast pork ribs, crispy chicken, porridge, fish recipes, bread, kid-friendly snacks, and many more...
If you like my recipe, click hereLIKE & follow Miki's Food Archives Facebook page or follow us on Instagram: mfa_dingoozatfood  to receive more recipe updates. Remember to favourite my pages if you wish to see my post on your news feed. Enjoy!

Related Posts Plugin for WordPress, Blogger...