Click LIKE & follow us on Facebook for recipe updates

COOK WITH LOVE FOR A HAPPY HIM

Singapore home cooking/ baking/ food & recipe blog features more than 500 tried & tested, quick & easy kid friendly recipes with steps by steps tutorial.


Follow us on Instagram: mfa_dingoozatfood


If you're a company looking for possible collaboration, feel free to send me a message via Miki's Food Archives Facebook Fan Page or email to miki9mak@gmail.com


Search This Blog

Saturday, 29 October 2016

Pokemon Go Happy Halloween Cookies 精灵宝可梦万圣节饼干


Happy Halloween 2016! What a perfect reason for me to bake and decorate cookies! :D 


Take a break from Pokemon hunt, made some really sweet and tasty treats for the kids on the once a year Trick Or Treat at our condominium. Aren't they cute? 


Take a closer look....


....and some spooky marshmallows...


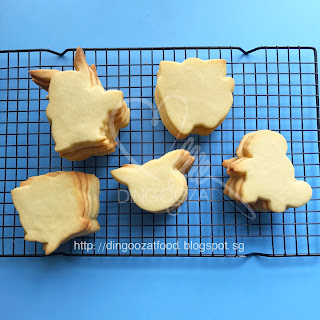
Alright, I know what's the next question: How to shape the Pokemon cookies? 

Well, this is pretty easy. All you need is the cookie cutter that is available at my online shop. You can pm me via Miki's Food Archives blog page for details.


Ready stock. 
Pokemon cookies, made using these good quality stainless steel cutters.

These are sugar cookies made with my secret recipe. Yes, this recipe will remain 'secret' because the dough is very hard to handle, not pliable and really needs some skill to work with it. Therefore, I would rather keep it than sharing it to avoid any disappointment. However, I would recommend another recipe that works well with royal icing. Although it's not as tasty as sugar cookies, but it is a lot more user friendly, it is easy to shape. 


This is the recipe that I previously used to make squirrel cookies and bear cookies. 


Ingredients: 材料


80g Unsalted Butter (softened) 无盐牛油 80克,软化

60g Icing Sugar 糖粉 60克

25g Egg (lightly beaten) 鸡蛋 25克 ,打散

1/4 tsp Vanilla Extract 香草精 1/4 小匙


150g Cake Flour 低粉 150克


If you are sharing this recipe, kindly attach the link to this blog instead of screen capture/ copy & paste/ use in your blog and claimed as your recipe! Thank you.

如果您要分享此食谱,请联系这个部落格的相关链接。敬请不要复制或改篇为自己的食谱。谢谢!


Method: 步骤

1. Cream butter and icing sugar until smooth. 
把牛油和糖粉打至松发。

2. Gradually beat in egg and vanilla extract.
分次加入鸡蛋和香草精。

3. Add in flour and mix with low speed.Use a spatula to scrape the sides and bottom. Form a dough. 
慢慢加入低粉,搅拌均匀成面团。

4. Cover the dough with cling wrap, roll out the dough to about 1cm thick and refrigerate for at least 1 hour.
用保鲜纸把面团盖好,擀平大概1cm厚,放进冰箱冷藏1小时。


To assemble and bake:

1. When you are ready to bake, remove the dough from the refrigerator. Let it soften until the dough is pliable to roll. 
把面团放置室温,少许软化即可造型。

2. Flour your rolling pin and rolling surface. Roll out the dough to about 0.5cm thick, use a cookie cutter to cut out the dough. Carefully place the cut out cookie on a lined baking tray. Repeat for the rest. (You can purchase the Pokemon cookie cutters here. )
把面团擀平至0.5cm厚, 用饼模切出精灵宝可梦造型,放在已铺好油纸的烤盘上。(饼模可以到我的专页购买:点击这里

3. Bake in a preheated oven 180’C for about 15 minutes or until they are set and barely browned around the edges.
放进已预热的烤箱,以180度烘烤15分钟。

    To decorate:


    1. Remove cookies from the oven, let it rest on the baking tray for  5 minutes. Transfer the cookies onto a cooling rack, let it cool completely. 
    烘烤完成后从烤箱取出饼干,饼干在烤盘上5分钟后才把饼干放在架子上待凉。

    2. When cookies are completely cool, ice and decorate as desired. 
    饼干完全室温后即可装饰。若喜欢我的食谱,可以LIKE和追随我的面书专页,不要错过最新食谱发布。

    If you like my recipe, click hereLIKE & FOLLOW my facebook page to receive more recipe updates. Don't forget to change the setting to 'SEE FIRST' if you wish to see my post on your Facebook news feed. Enjoy!


    Thursday, 20 October 2016

    Soft Pandan Loaf 斑斓软面包,中种面团


    Pandan aka screw pine, this is the plant that's available year long at my parent's house even before I was born, I guess. I am familiar with the fragrance and sweet aroma of pandan leaves because my mom used to make sweet soup and cakes using pandan leaves. We love anything with pandan flavour! Well, what I mean here, it's truly the extract from fresh pandan leaves, not pandan paste or artificial pandan essence. Those are 'not acceptable' by the food critic in our house. 

    I was pampered with all the yummy homemade food prepared by my mom when I was young, now it's time for me to do it for the next generation. :D 


    Home baked pandan bread for my son to eat during school recess.
    If you are packing food for kids, LIKE and FOLLOW >> Miki's Food Archives Facebook to receive more school snack ideas. 

    This soft pandan loaf recipe was adapted from the Pandan Custard Bun. This time I would like to make a tall standing loaf, hence, I modified the recipe to yield lighter and fluffier bread. And yes, it's a successful one! 


    Home baked bread always taste good and fragrant. This Pandan loaf added with freshly extracted pandan juice that made it even more aromatic. This recipe yield soft and fluffy bread that stay soft for days. 


    Ingredients:

    Sponge Dough: 中种面团:

    200g Bread Flour 高筋面粉 200克

    4g Instant Yeast 酵母 4克

    20g Milk Powder 奶粉 20克

    25g Egg (lightly beaten) 蛋液 25克

    100g Pandan Juice (blend pandan leaves with water) 斑斓汁  100克 (斑斓叶加水打汁)


    Main Dough: 主面团

    65g Bread Flour 高筋面粉 65克


    45g Sugar 幼糖 45克

    1/2 tsp Salt 盐 半小匙


    27g Pandan Juice 斑斓汁  27克 (斑斓叶加水打汁)


    30g Unsalted Butter (softened) 牛油 30克 


    If you are sharing this recipe, kindly attach the link to this blog instead of screen capture/ copy & paste/ use in your blog and claimed as your recipe! Thank you.

    如果您要分享此食谱,请联系这个部落格的相关链接。敬请不要复制或改篇为自己的食谱。谢谢!


    Method:

    1. In a mixing bowl, mix together all sponge dough ingredients. Cover with cling wrap, let it proof for 1 hour. 
    将中种面团的材料搅拌成软面团,用保鲜纸盖好,发酵1小时。

    2. Add in all main dough ingredients (except butter) to the sponge dough, knead to form a dough. Gradually knead in butter.
    将主面团的所有材料(除了牛油)加入中种面团,揉成面团。慢慢加入牛油。

    3. Continue to knead until the dough passes the windowpane test. Watch this video if you are unsure what is windowpane test.
    继续揉至面筋扩展,表面光滑


    3. Transfer the dough onto the worktop, roll out the dough to 1.5cm thick, roll up and put the dough into a baking tin. 
    把面团擀平(大概1.5cm厚),卷起。放进烤盘。


    Mine is a non-stick baking tin, so I did not grease the tin.
    Lightly grease your baking tin if there's no non-stick coating. 

    4. Cover with cling wrap and let it proof for 1 hour or doubled in size. 
    用保鲜纸盖好,发酵1小时。


    5. Bake in a preheated oven 180'C for 20 minutes (lowest rack), transfer to middle rack, bake another 5 minutes. 
    放入已预热的烤箱,烘180度 20分钟(最底层),换去中层,烘烤5分钟即可。每个烤箱的温度不同,烘烤温度和时间须自行调整。若喜欢我的食谱,可以LIKE和追随我的面书专页,不要错过最新食谱发布。

    If you like my recipe, click hereLIKE & follow Miki's Food Archives Facebook page or follow us on Instagram: mfa_dingoozatfood  to receive more recipe updates. Don't forget to change the setting to 'SEE FIRST' if you wish to see my post on your Facebook news feed. 

    Enjoy!

    By readers, some feedback from those who have tried this recipe:


    By Lila Cow 
    By Charlene Ratana
    Feedback from Charlene Ratana
    By Jessie Sng

    By Jenice Kim Jen

    By Dora Wee


    By Lisa Siah

    By Liz Lim


    By Celine Tan

    By Liz Lim

    By Karyin Toon

    By Ng ML

    By Kel Sya


    By Julie Guek


    Tuesday, 11 October 2016

    Delectable Churro Bites 迷你西式油条


    Everyone knows what is Churro, by the look and taste. Do you know the history of Churro? Most people call it 西班牙油条 in Chinese, sounds like it's originated from Spain. Although the origin of Churro is still unclear, but I find this 'history' of Churro quite interesting...

    The origin of churros is unclear. One theory is they were brought to Europe from China by the Portuguese. The Portuguese sailed for the Orient and, as they returned from Ming Dynasty China to Portugal, they brought along with them new culinary techniques, including modifying the dough for youtiao, also known as Youzagwei in southern China, for Portugal. However, they modified it by introducing a star design because they did not learn the skill of "pulling" the dough (the Chinese Emperor made it a capital crime to share knowledge with foreigners)[citation needed]. As a result, churros are not "pulled" but rather extruded out through a star-shaped die.[1] ~ Source: Wikipedia


    Now, in this blog post, I'm going to share the deep fried version of my churros. The mini bite size churros that I customised for the young ones. I made these for my 7yo son to snack on without making much mess at home. You probably can't imagine how much cinnamon sugar my poodle had as a treat from the floor when my son eat the regular size churros. Try this idea if you have young children at home.


    Look at this cute little churro, ohh dear....I want to pop it into my mouth right away! :P 

    Last year (2015), I have shared the Baked Churros recipe 

    >> Click here if you wish to try the baked version. 


    Recipe adapted from here.

    Ingredients: 

    40g Unsalted Butter 无盐牛油 40克

    1/2 cup Water 水 125克

    1 tbsp Sugar 糖 1汤匙

    Pinch of Salt 盐 少许

    1 Egg (lightly beaten) 鸡蛋 1粒, 打撒

    1/2 tsp Vanilla Extract 香草精 半小匙

    70g Flour 面粉 70克


    Cinnamon Sugar Coating: Combine all ingredients in a bowl.

    1.5 tbsp Sugar 糖 1.5汤匙

    1 tsp Ground Cinnamon 肉桂粉 1小匙

    把糖和肉桂粉放进一个碗里,混合均匀备用。


    Oil for deep frying. 食油, 适量


    If you are sharing this recipe, kindly attach the link to this blog instead of screen capture/ copy & paste/ use in your blog and claimed as your recipe! Thank you. 如果您要分享此食谱,请联系这个部落格的相关链接。敬请不要复制或改篇为自己的食谱。谢谢! 


    Method: 

    1. In a saucepan, heat up water, butter, sugar and salt, bring to boil. Turn off heat.
    把牛油,水,糖和盐放进锅里煮滚,熄火。

    2. Stir in flour. Mix well with a spatula.
    加入面粉,用刮刀搅拌均匀。


    3. Add in egg in 2 batches. Stir in vanilla extract. Mix well.
    分2次把鸡蛋加入,要不停搅拌,加入香草精。


    4. Form a sticky soft dough.
    搅拌均匀。


    5. Transfer the dough into a piping bag with a nozzle.
    把面团放进裱花袋里。(看下图)


    6. Heat up oil in a saucepan until the temperature reaches 180'C. Carefully pipe the dough over the pot of oil to a length about 2cm, use scissors to cut it off to release into the oil.
    烧热油,大概180度。把面团挤出大概2cm 长,用剪刀剪断。面团会掉进热油内,小心不要烫到手。


    7. Deep fry until golden brown. Transfer the cooked churros onto a lined plate/ basket, let it sit for a minute. Transfer the churros into the bowl of cinnamon sugar, roll to coat. Repeat for the rest.
    炸至金黄色即可。把炸好的油条放置在吸油纸上1分钟,然后放进之前准备好的肉桂糖的碗里,撒上肉桂糖。

    8. Serve right away. 即可享用。若喜欢我的食谱,可以LIKE和追随我的面书专页,不要错过最新食谱发布。
    If you like my recipe, click hereLIKE & follow Miki's Food Archives Facebook page or follow us on Instagram: mfa_dingoozatfood  to receive more recipe updates. Don't forget to change the setting to 'SEE FIRST' if you wish to see my post on your Facebook news feed. 


    Enjoy!


    Some feedback from those who have tried this recipe:


    By KH Chew 
    By Rosie Wee

    By Rosina Hong

    By Shirlyn Tye


    Thursday, 6 October 2016

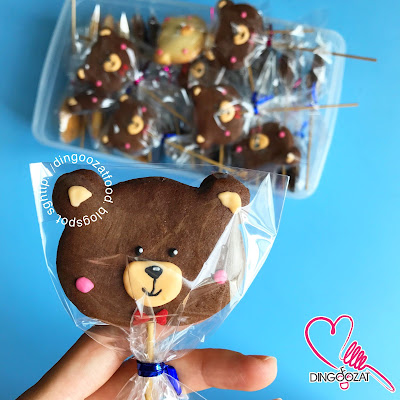
    Chocolate Bear Cookie Pops 小熊巧克力曲奇棒


    Happy Children's Day! 

    Every year at this time, I would create something NEW for the kids. In the past, I have made Flowery Jam Stick (year 2014) and Beetroot Bear Jelly (year 2016) for the kindergarten children. This year, I have decided to bake some cookies for the kids, my new creation :)


    Cookies become a special treat when shaped into adorable chocolate bear cookie pops. If you think these cute bear cookie pops would be the kid's favourite, you'd only be half right because grown up like them too ;)


    My boy call them...the boy and girl bear ;)


    In-the-making-gallery:


     Can anyone tell me how many Bear Cookie Pops altogether.....


    Packed....these cookie pops smells really good and they taste good too!


    Ingredients: (Yield 26 Cookies, recipe adapted from here)

    160g Unsalted Butter (softened) 无盐牛油 160克

    120g Icing Sugar 糖粉 120克

    50g Egg (lightly beaten) 鸡蛋 50克,打撒

    1 tsp Vanilla Extract 香草精 1小匙

    260g Cake Flour 低粉 260克

    40g Cocoa Powder 无糖可可粉 40克

    26 Bamboo Skewer 竹签 26支

    Royal Icing or melted chocolate for decoration 糖霜或巧克力装饰


    If you are sharing this recipe, kindly attach the link to this blog instead of screen capture/ copy & paste/ use in your blog and claimed as your recipe! Thank you.

    如果您要分享此食谱,请联系这个部落格的相关链接。敬请不要复制或改篇为自己的食谱。谢谢!


    Method:

    Prepare chocolate cookie dough: 准备面团

    1. Cream butter and icing sugar until smooth. 
    把牛油和糖粉打至松发。

    2. Gradually beat in egg and vanilla extract.
    分次加入鸡蛋和香草精。

    3. Add in flour and cocoa powder, mix with low speed.
    加入低粉和可可粉搅拌均匀即可。

    4. Use a spatula to scrape the sides and bottom. Form a dough. Cover the dough with cling wrap, roll out the dough to about 1cm thick and refrigerate for at least 1 hour.
    把面团取出,用保鲜纸包好,擀平至1cm厚。放冰箱冷藏一小时。

    To assemble and bake: 造型烘烤

    1. When you are ready to bake, remove the chocolate dough from the refrigerator. Let it soften until the dough is pliable to roll. 
    从冰箱取出面团,放至少许软化。


    2. Flour your rolling pin and rolling surface. Roll out the dough to about 0.7cm thick, use a bear cookie cutter to cut out the dough. 
    桌上和面团撒些低粉,把面团放在桌上,擀平至0.7cm厚。用小熊模切出小熊形状曲奇。参考下图。


    3. Carefully place the cut out cookie on a lined baking tray. Insert a skewer as shown in the picture below. Repeat for the rest.
    把小熊曲奇放在铺了油纸的烤盘上,在小熊曲奇底部插一支竹签。


    4. Bake in a preheated oven 180’C for about 13-15 minutes or until they are set.
    做好后放进已预热的烤箱,以180度烘烤13-15分钟。


      To decorate: 装饰

      1. Remove cookies from the oven, let it rest on the baking tray for  5 minutes. Transfer the cookies onto a cooling rack, let it cool completely. 
      把曲奇从烤箱里取出,让曲奇在烤盘上待5分钟,才把曲奇放在架上待凉。


      2. When cookies are completely cool, ice and decorate as desired. 
      随意装饰。


      Note: 


      1. You can use any cookie cutter to cut shapes as desired.
      如果没有小熊模具,也可以用其它饼模。

      2. You can use chocolate or store-bought royal icing to decorate the cookies. 
      可以用糖霜或融化的巧克力画上细节/装饰。
      若喜欢我的食谱,可以LIKE和追随我的面书专页,不要错过最新食谱发布。

      If you like my recipe, click hereLIKE & follow my facebook page to receive more recipe updates. Don't forget to change the setting to 'SEE FIRST' if you wish to see my post on your Facebook news feed. Enjoy!


      Some feedback from those who have tried this recipe:


      By Kirra Ferguson

      Adorable teddy bear cookies, by Kirra Ferguson


      Related Posts Plugin for WordPress, Blogger...