Click LIKE & follow us on Facebook for recipe updates

COOK WITH LOVE FOR A HAPPY HIM

Singapore home cooking/ baking/ food & recipe blog features more than 500 tried & tested, quick & easy kid friendly recipes with steps by steps tutorial.


Follow us on Instagram: mfa_dingoozatfood


If you're a company looking for possible collaboration, feel free to send me a message via Miki's Food Archives Facebook Fan Page or email to miki9mak@gmail.com


Search This Blog

Friday 30 November 2018

Pooh Onigiri Christmas Bento 维尼熊圣诞饭团便当


Christmas is nearing, ho ho ho.... Pooh bear is ready for Christmas! 


We just returned home from a short trip to Malaysia, I was so busy unpacking thus haven't have time to shop for groceries. Made a simple bento for my boy using Chuka Idako, Unagi and spinach served with pumpkin rice ball (Pooh Bear onigiri). 

This time, I only managed to take one in-the-making photo, just to show the Christmas tree wannabe....


Thanks for reading, I hope you are inspired after reading my blog. If you love to see my food, click hereLIKE & follow Miki's Food Archives Facebook page or follow us on Instagram: mfa_dingoozatfood  to receive more recipe updates. Don't forget to change the setting to 'SEE FIRST' if you wish to see my post on your Facebook news feed. 

Enjoy!

Thursday 15 November 2018

Honey Glazed Chicken Wings 蜜汁鸡翼/鸡翅膀


Easy Chinese style Honey Glazed Chicken Wings, a foolproof recipe that everyone could replicate this dish at home. These sticky, juicy and tasty chicken wings are finger-licking good! 

You can bake these delicious wings in an oven or air-fryer. The best way is to cook using Ninja Foodi. The chicken wings turned out succulent and tender, way better than oven-baked and it's a lot faster.  The Ninja Foodi heat distribution is even and it heats up really fast compared to my other air fryer. The deep pot could prevent oil/ residues splatter all over the crisping lid making it easy to maintain and clean. 

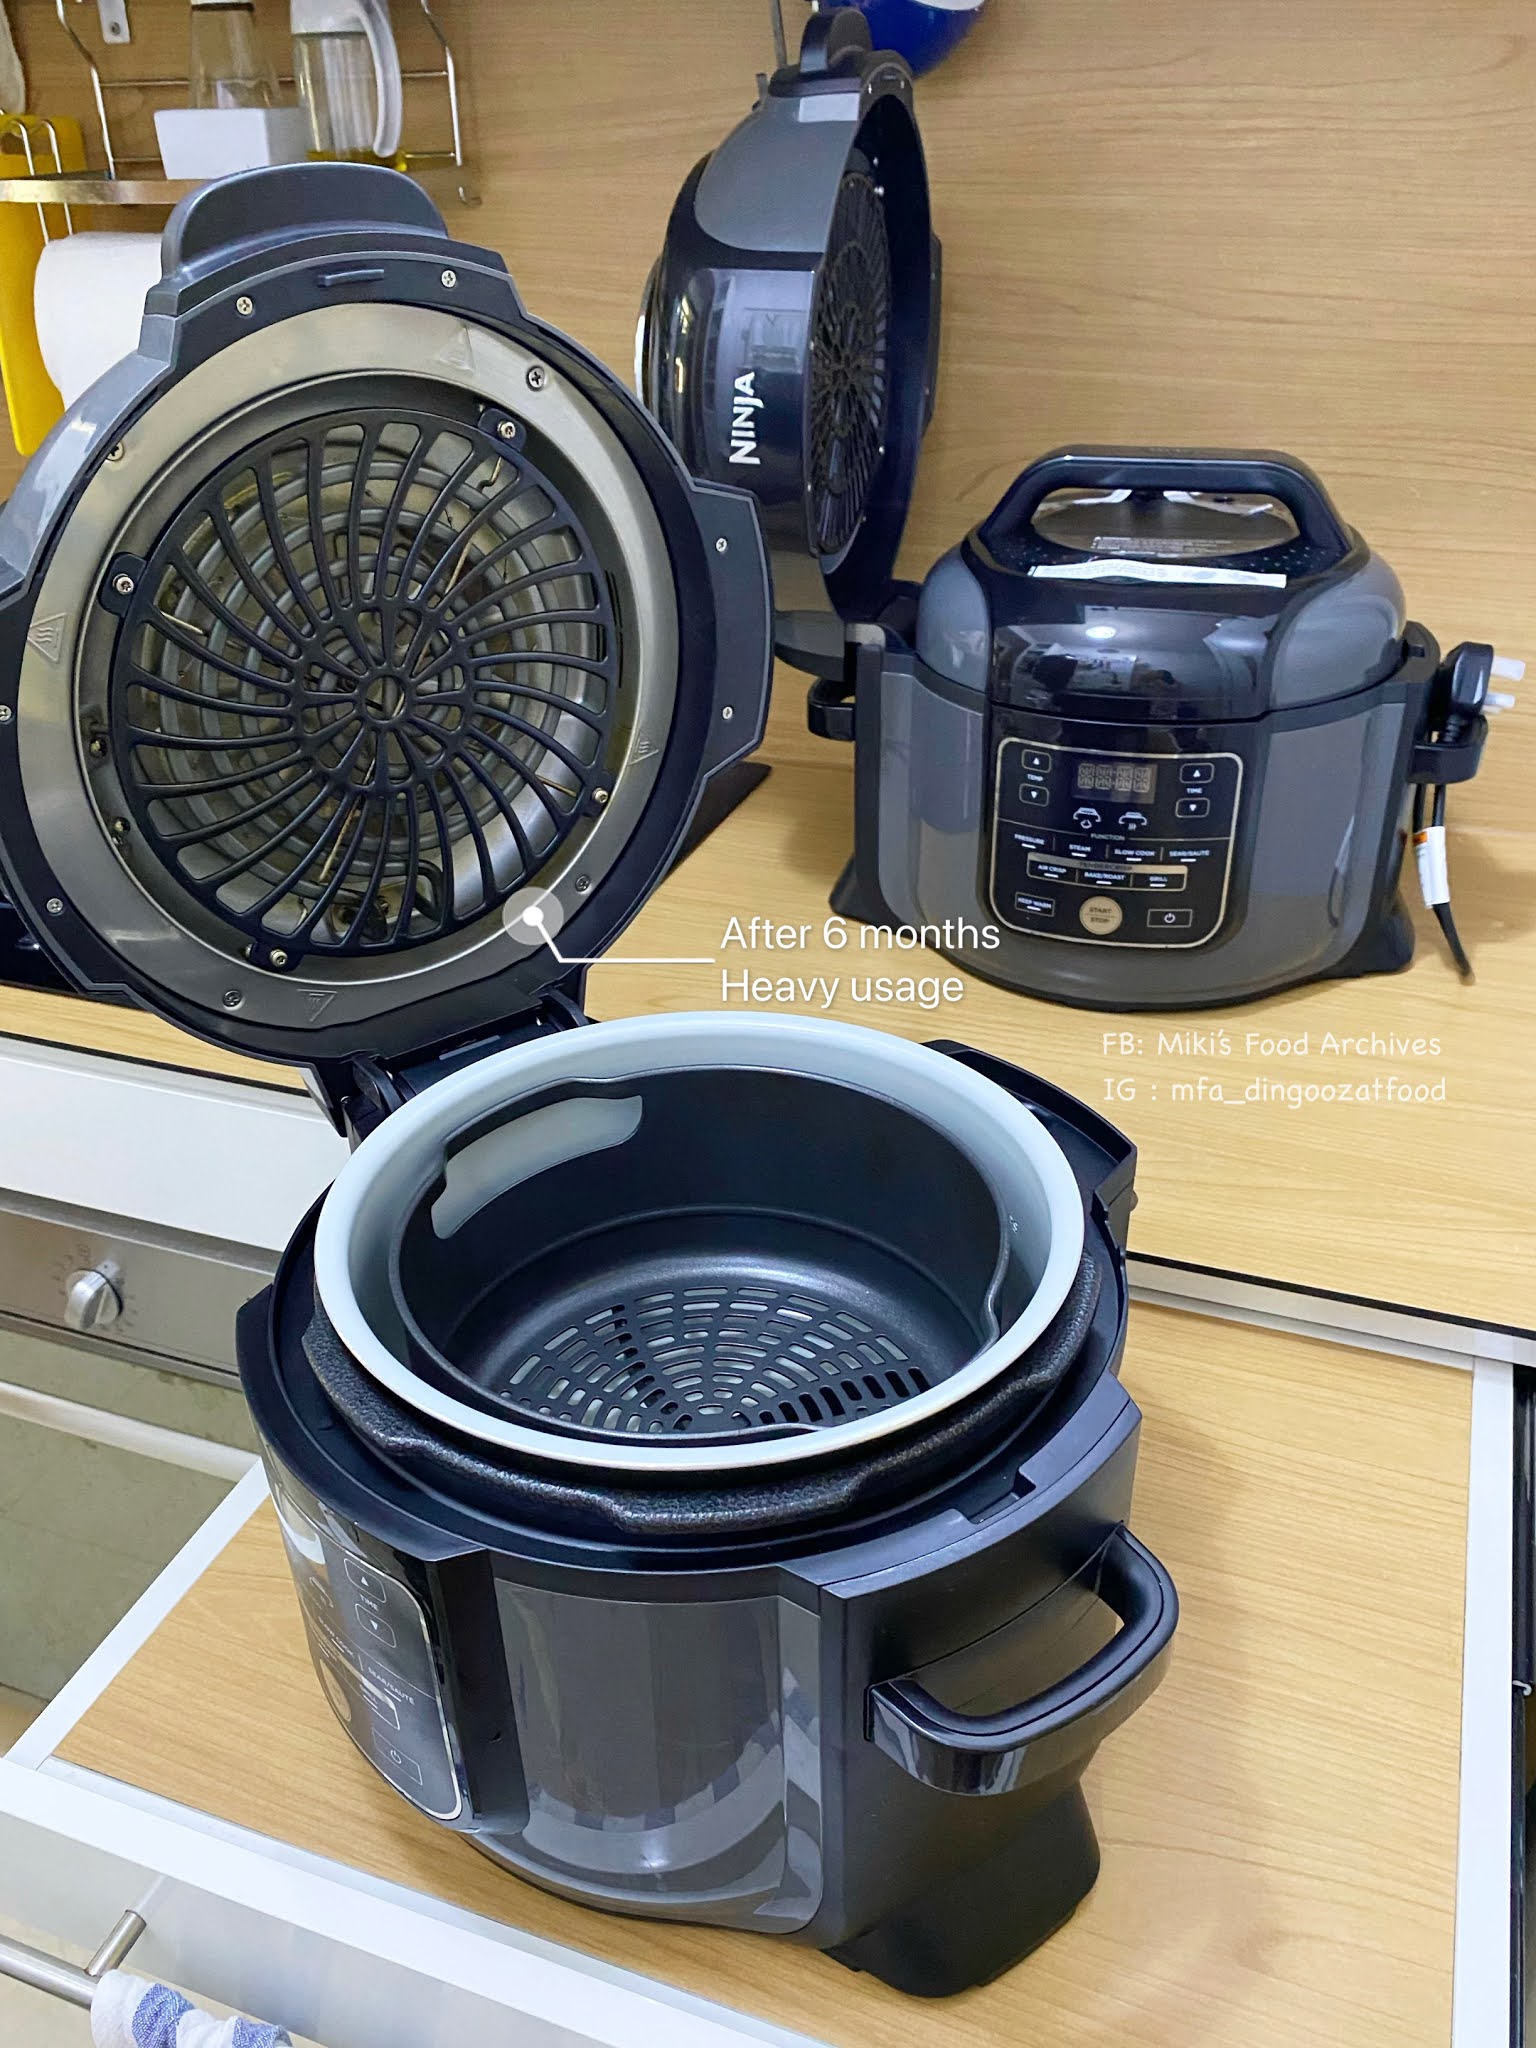
The one in front is my Ninja Foodi OP300 after 6 months of heavy usage, the crisping lid is still as good. The one simple step is to wipe it clean with a damp cloth after use.


This recipe is adapted from my popular Baked Chicken Chop Recipe 
Ingredients: 
材料

4 Chicken Wings (cut into half, tip removed.) or 8 Mid-joint Wings 鸡翅膀 8 段

1 tbsp Honey 蜂蜜 1汤匙

Marinade: 腌料

1 tbsp Sugar 细砂糖 1汤匙

1 tbsp Oyster Sauce 蚝油 1 汤匙

1/4 tsp Garlic Pepper 大蒜胡椒或黑胡椒 1/4小匙

1 tbsp Char Siew Sauce 叉烧酱 1汤匙

1 tbsp Shao Xing Hua Tiao Wine 绍兴花雕酒 1汤匙

1/2 tsp Salt 盐 1/2 小匙

1 tsp Corn Flour 玉米粉/粟粉 1小匙


If you are sharing this recipe/ blog content, kindly attach the link to this blog instead of screen capture/ copy & paste/ use in your blog. No parts of the content of this blog may be reproduced without prior written permission. All rights reserved. Thank you. 
如果您要分享此食谱/内容,请联系这个部落格的相关链接。敬请不要复制或改篇为自己的食谱。谢谢!

Method: 步骤

1. Wash and dry the chicken wings with kitchen towels. 
将鸡翅膀洗净,抹干。


2. Mix all marinades in a bowl, pour the marinade over the chicken wings. Mix well and cover with cling wrap. Keep in the refrigerator and let marinate overnight.
把所有腌料混合,加入鸡翅膀,拌均。用保鲜纸盖好放进冰箱腌隔夜。

3. Remove the marinated chicken wings from the refrigerator. Let it sit on the counter for 30 minutes, bring to room temperature.
从冰箱取出鸡翅膀,放置室温30分钟或回室温。

4. Preheat Ninja Foodi Air-Crisp Mode 180'C, 3 minutes. 

If you do not have an air-fryer at home, you can consider getting a Ninja Foodi All-In-One multi-cooker that comes with multiple functions:  Air-fry, pressure cook, steam, slow cook, sear/ saute, bake/ roast, grill, dehydrate, sous vide, yoghurt, and keep warm functions. This cooker helps prepare quick meals without hassle, which I highly recommend to everyone who loves easy and hassle-free cooking with fewer pots and pans to wash. If you're interested, you can use our exclusive discount code to buy at the best market rate. I've attached the details and links below for easy reference.

SINGAPORE:
Ninja Foodi can be purchased from Ninja Kitchen Official Website. Cart out with Promo Code: MIKISNSG to get a 10% discount for any Ninja-Shark products.

MALAYSIA:

Ninja Foodi can be purchased via Ninja Shark Official Website. Cart out with Promo Code: MFAOP300 to get the lowest price deal.


Place chicken wings in the Cook & Crisp Basket, Air-Crisp for 10 minutes. Baste with honey, continue to cook for 2 minutes. Serve right away.
气炸180 度 10分钟,涂少许蜜糖,继续气炸2分钟。即可。


Honey Glazed Chicken Leg, using the same recipe,
cooked in Ninja Foodi OP300. 
Photo updated: 14 Jan 2021

Made our all times favourite honey-glazed chicken leg using the same recipe,
cooked in Ninja Foodi 
Photo updated: Nov 2022

Oven-baked version:

5. Transfer the chicken wings onto a lined baking pan. Reserve the marinade.
将鸡翅膀放在已铺油纸的烤盘上。腌汁留着。

6. Bake in a preheated oven 180'C for 15 minutes. Baste with the reserved marinade.
放进已预热的烤箱,以180度,烘烤15分钟。取出,刷上腌汁。

7. Continue to bake for 10 minutes, brush some honey and bake another 5 minutes. Remove the chicken wings from the oven, and let them sit for 10 minutes before serving.
继续烘烤10分钟,刷蜂蜜,继续烘烤5分钟。取出,待10分钟后即可享用。若喜欢我的食谱,可以LIKE和追随我的面书专页,不要错过最新食谱发布。

If you like my recipe, click hereLIKE & follow Miki's Food Archives Facebook page or follow us on Instagram: mfa_dingoozatfood  to receive more recipe updates. Don't forget to change the setting to 'SEE FIRST' if you wish to see my post on your Facebook news feed. 

Enjoy!

By readers, some feedback from those who have tried this recipe:


Feedback from Evelyn Loke and Elizabeth Leong

Sunday 11 November 2018

Old School Butter Cake 古早味牛油蛋糕


When I was a child, I only get to eat this cake during Chinese New Year when my mom baked butter cakes and fruit cakes for praying. Now that I can bake this cake at home, I don't need to wait till Chinese New Year, love this with a cup of coffee. ;) 


This old-school butter cake is rich, fragrant, and moist. Need not keep in the fridge, wrap with cling wrap or keep in an airtight container, which can be kept at room temperature for up to a week. 


If you do not have an oven at home, you can bake the butter cake in a multi-cooker - Ninja Foodi and Ninja AirGrill are the appliances that I'd highly recommend. These butter cake loaves were baked using Ninja Foodi Bake/ Roast mode, turned out nicely brown, soft, and moist, as good as the oven-baked version.

Chocolate chips butter cake baked using Ninja Foodi

Chocolate Marble Butter Cake, Plain Butter Cake, and Mixed Fruit Cake 
Baked using Ninja AirGrill

Take a closer look at this butter cake that I've baked using the multi-cooker
It's so moist, soft, and velvety just like the one baked in an oven! 


Made this rich and moist chocolate marble cake using the same butter cake recipe.
Note: mix some cocoa powder with half of the batter.
Photo updated: Oct 2022


<< Click HERE >> to view more Ninja Foodi recipes and cooking videos, including easy one-pot-meal, chicken curry, roast chicken, roast pork ribs, crispy chicken, porridge, fish recipes, bread, kid-friendly snacks, and many more...


Ingredients: 
材料

170g Salted Butter (softened) 含盐牛油 170克,软化

120g Castor Sugar 细砂糖 120克

~~~~~~~~~~~~~~~~~~~~~

3 Egg Yolk 蛋黄 3粒

1 tsp Vanilla Extract 香草精 1小匙

150g Self Raising Flour 自发面粉 150克

45g Fresh Milk 鲜奶 45克

~~~~~~~~~~~~~~~~~~~~~

3 Egg White 蛋白 3粒

40g Castor Sugar 细砂糖 40克


Photo updated: March 14, 2019


If you are sharing this recipe/ blog content, kindly attach the link to this blog instead of screen capture/ copy & paste/ use in your blog. No parts of the content of this blog may be reproduced without prior written permission. All rights reserved. Thank you. 如果您要分享此食谱/内容,请联系这个部落格的相关链接。敬请不要复制或改篇为自己的食谱。谢谢!

Method:
步骤

1. In a mixing bowl, cream butter and sugar. 
牛油和120克细砂糖打发。


2. Beat in egg yolk one at a time. Beat in vanilla extract. 
分次加入蛋黄和香草精。


3. Sift in half of the flour, fold with a spatula.
过筛加入一半的自发粉,用刮刀轻轻拌均。


4. Add in milk, mix until well combined. Fold in the remaining flour. Do not over-mix the batter.
加入牛奶,拌均。过筛加入剩下的自发粉,拌匀即可,不能过度搅拌。


5. In another mixing bowl, beat egg white until foamy. Gradually add in castor sugar and continue to beat until stiff peak.
另一个碗里打发蛋白,分次加入40克细砂糖,打发至干性发泡。


6. Fold egg white into egg yolk batter in 3 batches. Transfer the batter to a lined baking tin/ loaf tin. Tap the baking tin on the worktop 2-3 times.
把蛋白分次加入蛋黄糊,用刮刀拌均。把面糊倒入已铺油纸的烤盘,轻轻在桌面敲几下。


oven-baked


For mini butter cake: Preheat Ninja Foodi Bake/ Roast mode 3mins,
bake 160'C 10mins, 120'C 10mins.
家里没有烤箱的话,也可以用多功能气炸/高压锅烘烤。

Mini butter cake baked in Ninja Foodi OP300 multi-cooker,
added chocolate chunks for the kid.

Another attempt, baked using Ninja Grill 150'C 30mins. Made 3 different flavours using one recipe - chocolate marble butter cake, mixed fruit cake, and original butter cake. Glad that the cakes turned out so moist and perfect! 

Ninja Foodi and Ninja Grill can be purchased from Ninja Kitchen Singapore Official Website. Cart out with Promo Code: MIKISNSG to get a 10% discount for any Ninja-Shark products. If you're residing in Malaysia, you can purchase Ninja Foodi via Ninja Shark MY Official Website. Cart out with Promo Code: MFAOP300 to get the lowest price deal.


7. If you're using an oven >> Bake in a preheated oven 160'C for 60 minutes or until cooked through. Remove the cake from the oven, let it rest in the baking tin for 5 minutes, un-mold and let it cool on the rack. Slice and enjoy. 
放进已预热的烤箱,以160度烘烤60分钟或至熟。烘烤完成后从烤箱取出蛋糕,待5分钟后把蛋糕脱模,放在架上待凉后即可享用。这蛋糕用保鲜纸盖上,可放置室温长达一星期都不会坏/发霉,无需冷藏。若喜欢我的食谱,可以LIKE和追随我的面书专页,不要错过最新食谱发布。
If you like my recipe, click hereLIKE & follow Miki's Food Archives Facebook page or follow us on Instagram: mfa_dingoozatfood  to receive more recipe updates. Don't forget to change the setting to 'SEE FIRST' if you wish to see my post on your Facebook news feed. 

Enjoy!

By readers, some feedback from those who have tried this recipe:


By Susan Ho

By Jia Pei


By Kel Sya

By Kel Sya


By Ivy Ow

Wednesday 7 November 2018

Black Pepper Roast Chicken 黑胡椒烤鸡腿


A quick and simple yet flavourful Black Pepper Roast Chicken that is perfect for busy days lunch and dinner. The meat is deliciously succulent and tender, the black pepper is not overpowering and kids-friendly, even my kid who does not eat hot/ spicy food loves this. 


Serving suggestions: This is versatile as it can be served Asian way with rice and veggies as side dishes or Western style with salads or bun.


Ingredients: 2 servings 
材料,两人份

2 Chicken Legs (with skin, cut into half) 鸡腿 2个,切半

1 tsp Corn Flour 玉米粉/粟粉 1小匙

2 tbsp Black Pepper Sauce 黑胡椒酱 2汤匙
(any brand, adjust the seasoning accordingly 任何牌子都可以,自行调味)

2 tbsp Abalone Sauce 鲍鱼汁 2汤匙

1 tsp Castor Sugar 细砂糖 1小匙

1 tbsp Light Soy Sauce 酱油 1汤匙


If you are sharing this recipe/ blog content, kindly attach the link to this blog instead of screen capture/ copy & paste/ use in your blog. No parts of the content of this blog may be reproduced without prior written permission. All rights reserved. Thank you. 如果您要分享此食谱/内容,请联系这个部落格的相关链接。敬请不要复制或改篇为自己的食谱。谢谢!


Method:
步骤

1. Wash and pat dry chicken with kitchen towel. Add in the rest of the ingredients, mix well with hand. Do a little massage to the chicken. (I normally wear glove when handling raw meat and seasoning). Cover and let marinate in the fridge for at least 2 hours or overnight for best flavour.
鸡腿洗净抹干,加入其余的材料,拌均。盖上保鲜纸,放进冰箱腌隔夜。


2. Remove the chicken from fridge. Transfer the chicken onto a lined baking tray. Reserve the sauce. Let it sit for 30 minutes or until return to room temperature. 
取出鸡肉, 放在一铺上油纸的烤盘,把多余的酱汁留着,放置30分钟或回室温。


3. Bake in a preheated oven 180'C for about 25 minutes, baste with the remaining sauce, bake for 10 minutes or until cook through. Serve warm.
放进已预热的烤箱,以180度烘烤25分钟,涂上剩余的酱汁,继续烘烤10分钟或至熟,即可享用。若喜欢我的食谱,可以LIKE和追随我的面书专页,不要错过最新食谱发布。
If you like my recipe, click hereLIKE & follow Miki's Food Archives Facebook page or follow us on Instagram: mfa_dingoozatfood  to receive more recipe updates. Don't forget to change the setting to 'SEE FIRST' if you wish to see my post on your Facebook news feed. 


Enjoy!

Friday 2 November 2018

Sticky Sweet Vinegar Pork Ribs 糖醋排骨(免油炸)


This is a simplified Sticky Sweet Vinegar Pork Ribs recipe cooked without deep frying. Braised the ribs in low heat until tender, thicken the sauce to glaze the pork ribs without adding any starch solution, this recipe is so simple and healthier than ever.


Sticky Sweet Vinegar Pork Ribs served with crabstick egg roll, stir fry spinach and rice.
This rice bowl is for my 10yo boy, lunch after school. :)
Photo updated: 19 August 2019

Ingredients:
材料

600g Pork Ribs 排骨 600克

Some Toasted Sesame Seeds for garnishing 熟芝麻 少许

Some oil for cooking 油 适量

Some Water 水 适量

Sauce 酱料:

4 tbsp Light Soy Sauce 酱油 4 汤匙
(adjust the amount according to the saltiness of the soy sauce 不同牌子的酱油咸味都不同,需自行调整咸度)

*3 tbsp Castor Sugar 细砂糖 3汤匙

2 tbsp Zhen Jiang Vinegar/ Black Vinegar 镇江醋/浙醋 2汤匙

1 tbsp Rice Wine 米酒 1汤匙

1/4 tsp Dark Soy Sauce 黑酱油 1/4 小匙

* For glossy glaze, replace castor sugar with rock sugar. 

Tender and tasty Sweet Vinegar Pork Ribs 
Easily cooked without deep-frying

If you are sharing this recipe/ blog content, kindly attach the link to this blog instead of screen capture/ copy & paste/ use in your blog. No parts of the content of this blog may be reproduced without prior written permission. All rights reserved. Thank you. 如果您要分享此食谱/内容,请联系这个部落格的相关链接。敬请不要复制或改篇为自己的食谱。谢谢!

Method:
步骤

1. Rinse pork ribs with hot boiling water. Drain and set aside.
排骨用热水烫过,滤干备用。


2. In another bowl, mix together all sauce ingredients, set aside. 
将酱汁材料混合,备用。

3. Add some oil to a wok. Heat the oil and stir-fry the pork ribs until both sides are slightly brown. 
锅里倒入适量的油(冷锅下油),烧热后加入排骨稍微拌炒至两面上色。


4. Add in sauce and water just enough to cover the pork ribs.
加入酱料和适量的水(刚盖过排骨)。


5. Bring to a boil, reduce heat, cover and simmer until the meat is tender.
煮滚后转小火,盖上,焖煮至软。

6. Increase heat to thicken the sauce, stir to coat the pork ribs with sauce. Remove from heat, garnish with toasted sesame and serve warm with rice.
转大火收汁,撒上芝麻点缀,即可享用。若喜欢我的食谱,可以LIKE和追随我的面书专页,不要错过最新食谱发布。
If you like my recipe, click hereLIKE & follow Miki's Food Archives Facebook page or follow us on Instagram: mfa_dingoozatfood  to receive more recipe updates. Remember to favourite my pages if you wish to see my post on your feed. 

Enjoy!

By readers, some feedback from those who have tried this recipe:


By Serene Hui Ling 
By Suyan.ysy


Related Posts Plugin for WordPress, Blogger...