Click LIKE & follow us on Facebook for recipe updates

COOK WITH LOVE FOR A HAPPY HIM

Singapore home cooking/ baking/ food & recipe blog features more than 500 tried & tested, quick & easy kid friendly recipes with steps by steps tutorial.


Follow us on Instagram: mfa_dingoozatfood


If you're a company looking for possible collaboration, feel free to send me a message via Miki's Food Archives Facebook Fan Page or email to miki9mak@gmail.com


Search This Blog

Saturday, 13 November 2021

Sous Vide Honey Glazed Pork Ribs 蜜汁烧排骨【舒肥低温烹调法】


I've cooked this countless times, this is one of our favourite grilled ribs recipes. This time, I've tried Sous Vide + Grill method.


Starts with Sous Vide and finishes with a quick grill. The meat turned out super tender and succulent, slightly charred on the outside. Verdict: both Sous Vide and Pressure Cook results are much better and tastier than oven-roast ribs. 


Ingredients: 

中文食谱:请在网页的右边点击Translate,然后选择中文翻译

1 slab of Baby Pork Ribs 


Honey


Seasoning: 


2 tbsp Shao Xing Hua Tiao Cooking Wine 


1 tbsp Sugar 


2 Cloves Garlic (Mashed) 

1 tbsp Hoisin Sauce 

1 tbsp Char Siew Sauce 

2 tbsp Ketchup/ Tomato Sauce 

2 tbsp Light Soy Sauce 

1/4 tsp Chinese Five Spice Powder 


1/2 tsp Black Pepper


If you are sharing this recipe/ blog content, kindly attach the link to this blog instead of screen capture/ copy & paste/ use in your blog. No parts of the content of this blog may be reproduced without prior written permission. All rights reserved. Thank you. 
如果您要分享此食谱/内容,请联系这个部落格的相关链接。敬请不要复制或改篇为自己的食谱。谢谢!


Method:

1. Mix seasoning and pork ribs, marinate for 2 hours. 
Place the pork ribs in sous vide bag without overlapping, sealed.

2.  Add 2.5 litre of water into the pot. SOUS VIDE 74'C 12 hours. 


3. When it's ready, grill the ribs for 10 minutes, baste halfway and glaze with honey. Slice and serve right away.
若喜欢我的食谱,可以LIKE和追随我的面书专页,不要错过最新食谱发布。If you like my recipe, click hereLIKE & follow Miki's Food Archives Facebook page or follow us on Instagram: mfa_dingoozatfood  to receive more recipe updates. Don't forget to favourite my pages if you wish to see my post on your news feed. 


Tuesday, 9 November 2021

Sous Vide Fish Fillet With Garlic Butter Sauce 蒜香奶油鱼柳【舒肥真空低温烹调法】


Sous Vide is pronounced "sue-veed", is a cooking technique that utilizes precise temperature control in a water bath to cook food to the exact level of doneness. Sous Vide is an excellent method for preparing fish. It helps to preserve the flavour, saving more nutritional elements and keeps the fish moist and tender. This technique produces results that are impossible to achieve through other cooking methods. 


Ingredients:
中文食谱:请在网页的右边点击Translate,然后选择中文翻译

2 slices Fish Fillet


1/2 tsp Garlic Salt


A dash of White Pepper


1 tsp Sesame Oil


1 tsp Mirin


2 cloves Garlic, minced


10g Salted Butter


1/4 Dried Chili - Tap here for <Homemade Dried Chili Recipe>


If you are sharing this recipe/ blog content, kindly attach the link to this blog instead of screen capture/ copy & paste/ use in your blog. No parts of the content of this blog may be reproduced without prior written permission. All rights reserved. Thank you. 如果您要分享此食谱/内容,请联系这个部落格的相关链接。敬请不要复制或改篇为自己的食谱。谢谢!

Method:

1. Combine fish fillet with salt, pepper, sesame oil and mirin. Place the fish fillet in sous vide bag without overlapping, sealed. 


2. Add 2.5 litre of water into the pot. SOUS VIDE 55'C 30mins. 

3. When the fish fillet is ready, heat some oil, stir fry garlic and chili until fragrant, add in butter and the gravy from the fish fillet. Pour the garlic butter sauce on the fish fillet and serve right away. Video tutorial available on my Instagram: mfa_dingoozatfood

若喜欢我的食谱,可以LIKE和追随我的面书专页,不要错过最新食谱发布。If you like my recipe, click hereLIKE & follow Miki's Food Archives Facebook page or follow us on Instagram: mfa_dingoozatfood  to receive more recipe updates. Don't forget to favourite my pages if you wish to see my post on your news feed. 

By readers... Some feedback from those who have tried this recipe:


By Priscilla


Friday, 5 November 2021

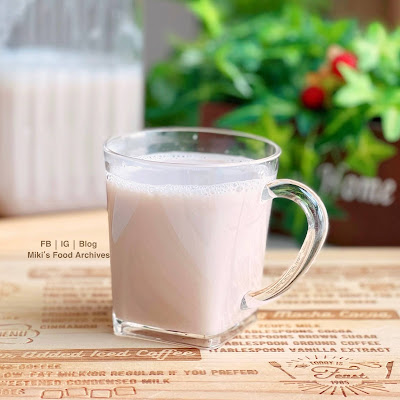
Homemade Walnut Soy Milk 自制核桃豆奶【养生饮料】


Walnut Soy Milk is not only delicious, but it's also rich in natural nutrients that can help support a healthy body, skin and brain. This plant-based milk is packed with omega-3 fatty acids and antioxidants, also contains good fats, biotin, vitamin E and B6.  

Easy & healthy plant-based Walnut Soy Milk
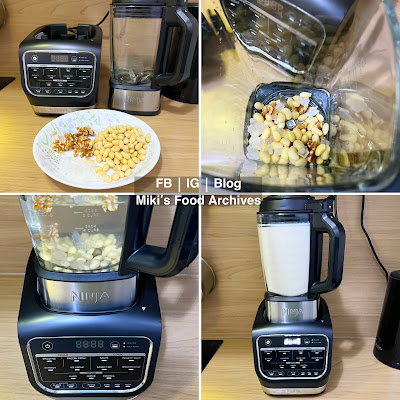
Made using Ninja Foodi Cold & Hot Blender 

Ever since I've got my blender, I have reduced my coffee intake, replaced it with healthy plant-based milk. I can easily make soy milk in the morning. Just add all ingredients into the blender and let it cook + blend, freshly made soy milk will be ready in 15mins. 


Homemade Walnut Soy Milk along with Chinese breakfast crepe 煎面粉糕
Photo updated: Jan 2022

Ingredients: 
中文食谱:请在网页的右边点击Translate,然后选择中文翻译

80g Dried Soy Bean, soaked overnight

20g Walnut

30g Rock Sugar

800ml Water


If you are sharing this recipe/ blog content, kindly attach the link to this blog instead of screen capture/ copy & paste/ use in your blog. No parts of the content of this blog may be reproduced without prior written permission. All rights reserved. Thank you. 如果您要分享此食谱/内容,请联系这个部落格的相关链接。敬请不要复制或改篇为自己的食谱。谢谢!


Method: 

1. Add all ingredients into the blender. 


2. Select <COOK - HIGH>, let it boil for 10mins. Switch to <BLEND - HIGH>, blend until smooth. Pour the soy milk through a strainer, serve warm or chilled. 若喜欢我的食谱,可以LIKE和追随我的面书专页,不要错过最新食谱发布。If you like my recipe, click hereLIKE & follow Miki's Food Archives Facebook page or follow us on Instagram: mfa_dingoozatfood  to receive more recipe updates. Don't forget to favourite my pages if you wish to see my post on your news feed. 

Thursday, 4 November 2021

Peanut Root Soup 花生根增高汤


Have you ever heard of peanut root soup? Old folks believe that regular consumption of this soup can help growing kids grow taller. 

I do believe that a person's height is very much of the genetics, the rest is due to environmental factors and lifestyle choices. Whether or not this soup is effective in boosting the child's growth, this soup is nutritious, nourishing and known to be strengthening the overall health. So, there's no harm in adding this to your home-cooking menu.

Peanut roots are available at local wet markets. When you buy fresh peanut roots from the wet market, it comes in a big bunch of 1kg or more which is too much for one-time usage. To avoid wastage, you can clean the peanut roots and dehydrate the roots to extend the shelf life.


Fresh peanut roots

Dried Peanut Roots


Ingredients:
中文食谱:请在网页的右边点击Translate,然后选择中文翻译

100g Peanut Root

1 Chicken Carcass/ Black Chicken/ 250g Pork Ribs (blanched)

4-5 Red Dates

1 litre Hot Water 

2 tbsp Wolfberries/ Goji Berries

Salt, add to taste


If you are sharing this recipe/ blog content, kindly attach the link to this blog instead of screen capture/ copy & paste/ use in your blog. No parts of the content of this blog may be reproduced without prior written permission. All rights reserved. Thank you. 如果您要分享此食谱/内容,请联系这个部落格的相关链接。敬请不要复制或改篇为自己的食谱。谢谢!

Method:

1. Add all ingredients (except wolfberries and salt) into a pot. 


2. Leftover peanut roots for later use: dehydrate 6-8 hours. Keep in an air-tight container. I usually do this at night and "harvest" the dried food the next morning. 


Peanut Root Soup cooked with black chicken

3. Bring the soup to a boil, lower heat and simmer for 90 minutes. Add wolfberries and some salt to taste, and continue to simmer for 30 minutes. Serve warm.若喜欢我的食谱,可以LIKE和追随我的面书专页,不要错过最新食谱发布。If you like my recipe, click hereLIKE & follow Miki's Food Archives Facebook page or follow us on Instagram: mfa_dingoozatfood  to receive more recipe updates. Don't forget to favourite my pages if you wish to see my post on your news feed. 

Tuesday, 2 November 2021

Stir-fry Kam Heong Stingray 甘香魔鬼鱼


A simple stir-fry stingray dish in aromatic Kam Heong sauce, flavourful and goes well with rice and porridge. 


Ingredients:
中文食谱:请在网页的右边点击Translate,然后选择中文翻译

470g Stingray


60g Dried Shrimp (chopped)


3 cloves Garlic (chopped)


3 Shallot (chopped)


Handful of Curry Leaves 


Thumb size Ginger


1 tbsp Curry Powder


1 Red Chilli or Bird's Eye Chili 


Some oil for cooking


Marinade:


1 tsp Corn Flour


1 tsp Salt


1/4 tsp White Pepper 


1 tsp Sesame Oil


1 tbsp Shao Xing Wine


Sauce:


1.5 tbsp Oyster Sauce


1/2 tbsp Light Soy Sauce


1/4 tsp Dark Soy Sauce


1/2 tsp Sugar


If you are sharing this recipe/ blog content, kindly attach the link to this blog instead of screen capture/ copy & paste/ use in your blog. No parts of the content of this blog may be reproduced without prior written permission. All rights reserved. Thank you. 

如果您要分享此食谱/内容,请联系这个部落格的相关链接。敬请不要复制或改篇为自己的食谱。谢谢!


Method:

1. Combine stingray and marinade ingredients, let it sit
 for 15mins.


2. Add some oil to the wok, turn on the heat. When the oil is hot, stir fry stingray until half-cooked, set aside.


I cooked this dish using Song Cho stainless steel wok, 
a multiply stainless steel wok without chemical coating, it's safe to use in any cooking including deep-frying. 
For more information about the product, visit Song Cho e-shop for details.


3. Stir fry ginger, shallot, garlic and dried shrimps until fragrant, stir in curry powder, add sauce and some water, bring to a boil. Add stingray, simmer until the sauce has thickened, add curry leave and chili. When it’s completely cooked, turn off the heat and serve right away.

若喜欢我的食谱,可以LIKE和追随我的面书专页,不要错过最新食谱发布。
If you like my recipe, click hereLIKE & follow Miki's Food Archives Facebook page or follow us on Instagram: mfa_dingoozatfood  to receive more recipe updates. Don't forget to change the setting to 'SEE FIRST' if you wish to see my post on your Facebook news feed. 

Enjoy!


Saturday, 30 October 2021

Homemade Dried Chili/ Dehydrated Chili 自制干辣椒


Drying chilies is an ideal way to preserve the leftover for future use, it's very versatile and useful in our daily cooking. Dehydrated foods are without preservatives and it's more hygienic when making them at home.

Dehydrated/ Dried Chilies 


Ingredients:
中文食谱:请在网页的右边点击Translate,然后选择中文翻译

Red Chilies 


If you are sharing this recipe/ blog content, kindly attach the link to this blog instead of screen capture/ copy & paste/ use in your blog. No parts of the content of this blog may be reproduced without prior written permission. All rights reserved. Thank you. 如果您要分享此食谱/内容,请联系这个部落格的相关链接。敬请不要复制或改篇为自己的食谱。谢谢!

Method:

1. Wash and pat dry the chilies. Cut off the stems, arrange the chilies on the crispier basket or dehydrator rack.


2. DEHYDRATE 8 hours. You can do this at night and "harvest" the dried foods the next morning. Do adjust the dehydrating time according to the size of the chilies. 若喜欢我的食谱,可以LIKE和追随我的面书专页,不要错过最新食谱发布。If you like my recipe, click hereLIKE & follow Miki's Food Archives Facebook page or follow us on Instagram: mfa_dingoozatfood  to receive more recipe updates. Don't forget to favourite my pages if you wish to see my post on your news feed. 

Wednesday, 20 October 2021

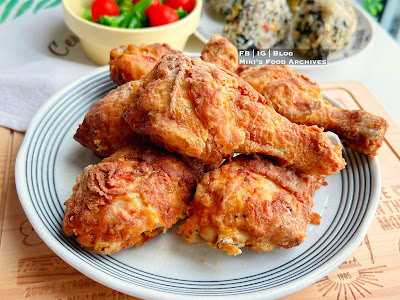
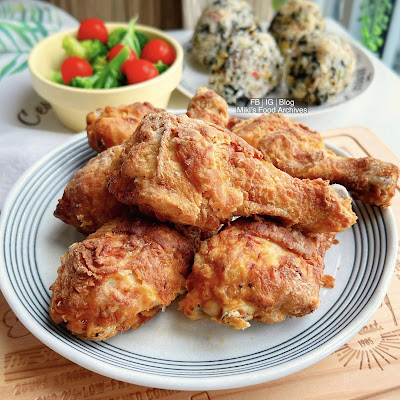
Homemade KFC | Air Fried Crispy Chicken 香料炸鸡【免油炸】


Homemade KFC... not Kentucky Fried Chicken, this is my Kid's Favourite Chicken (KFC) :P

A simple version of crunchy fried chicken marinated with aromatic spices, cooked without deep-frying to achieve the crunchiness with minimal oil used. This air-fried version tastes as good as deep-fried.


Ingredients: 
中文食谱:请在网页的右边点击“Translate”,然后选择中文翻译

6 Chicken Drumstick 

1 Egg White

Crispy Flour (enough to coat the chicken drumstick)


Seasoning:

1/2 tsp Onion Powder

1 tbsp Curry Powder 

Some Rotisserie Seasoning + Garlic Salt, add to taste

1 tsp Corn Flour

Note: The drumsticks sizes may vary, do adjust the amount of flour and seasoning accordingly.

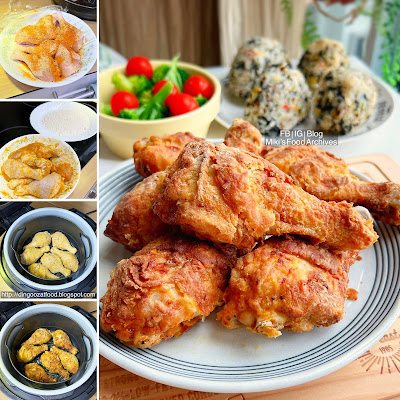
Homemade Air Fryer KFC - wannabe Crunchy Fried Chicken 


If you are sharing this recipe/ blog content, kindly attach the link to this blog instead of screen capture/ copy & paste/ use in your blog. No parts of the content of this blog may be reproduced without prior written permission. All rights reserved. Thank you. 如果您要分享此食谱/内容,请联系这个部落格的相关链接。敬请不要复制或改篇为自己的食谱。谢谢!

Method:

1. Combine chicken drumsticks and the seasoning ingredients, let marinate for at least 1 hour or overnight. 


2. Coat the chicken drumsticks with egg white and flour. You can deep-fry the chicken but I'd suggest using the easier and tastier air-fry method.

3. Spray/ brush some oil on the cooking basket, place chicken on the basket, spray/ brush some oil on the chicken, air-fry 180'C 15mins. Serve right away. 若喜欢我的食谱,可以LIKE和追随我的面书专页,不要错过最新食谱发布。
If you like my recipe, click hereLIKE & follow Miki's Food Archives Facebook page or follow us on Instagram: mfa_dingoozatfood  to receive more recipe updates. Don't forget to favourite my pages if you wish to see my post on your news feed. 

By readers... Some feedback from those who have tried this recipe:

By S_leng16


By Kelly Kin


Wednesday, 13 October 2021

Seafood Spaghetti/ Pasta In Tomato Sauce 海鲜番茄酱意大利面


This is another easy and quick way to cook pasta with homemade Tomato Sauce.

Stir-fry Seafood Spaghetti with homemade tomato sauce
Photo updated: Nov 2021


Stir-fry pasta with minced pork and ham using the same recipe, just changed the seafood to ground pork and ham. 
Photo updated: March 2022


Ingredients: 2 servings 
中文食谱:请在网页的右边点击Translate,然后选择中文翻译

2 cloves Garlic, chopped

1 tbsp Butter plus some oil for cooking

Handful of Mushroom 

60g Ham/ Bacon, diced

8 Scallops

6 Prawns

1/2 Squid, sliced

Some Salt & Pepper, add to taste

Water

120g Pasta - Spaghetti 


If you are sharing this recipe/ blog content, kindly attach the link to this blog instead of screen capture/ copy & paste/ use in your blog. No parts of the content of this blog may be reproduced without prior written permission. All rights reserved. Thank you. 如果您要分享此食谱/内容,请联系这个部落格的相关链接。敬请不要复制或改篇为自己的食谱。谢谢!

Method:

1. Heat some oil, sear the scallops, prawns, and squid, season with salt and pepper, set aside. Add in butter and garlic, stir fry until fragrant. Add in mushroom and ham/ bacon, stir fry to soften the mushrooms. Season with some salt and pepper, set aside.


2. Add some warm water into the pot - 2 cups level. Add a pinch of salt and the raw pasta (break-half as shown in the pic below). Close the pressure lid, set PRESSURE COOK (HI) - 1 minute.


3. When the cooking has completed, quick-release pressure. Discard the water. Add in all ingredients. Simmer and toss to combine the ingredients, serve right away. Note: The pasta is al dente after 1 min pressure cook. If you're not cooking for young children or the elderly (who usually preferred softer texture pasta), just toss in sauce and serve. Adjust the cooking time if you're not using spaghetti. 若喜欢我的食谱,可以LIKE和追随我的面书专页,不要错过最新食谱发布。If you like my recipe, click hereLIKE & follow Miki's Food Archives Facebook page or follow us on Instagram: mfa_dingoozatfood  to receive more recipe updates. Don't forget to favourite my pages if you wish to see my post on your news feed. 
Related Posts Plugin for WordPress, Blogger...