Pages

Sunday, 30 October 2022

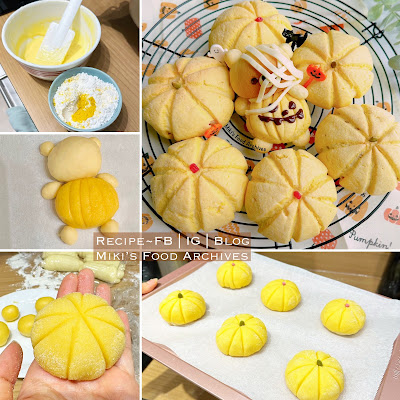
Pumpkin Melon Pan 南瓜日式菠萝包


Japanese Melon Pan is one of our favourite bread I often bake at home with different flavours such as strawberry melon pan, matcha melon pan, original and melon flavour melon pan. This time, I made pumpkin melon pan with caramel fillings, shaped into pumpkins and a little bear that's too cute to spook! :P Happy Halloween!

Cute Turtle Japanese Melon Pan, plain and matcha flavour
Tap here for recipe
.
Love these sugar-coated crispy crusts, soft and fluffy
Japanese Melon Pan filled with sweet melon bits. 


Strawberry Melon Pan filled with strawberry bits.
Tap here for recipe


Ingredients:
中文食谱:请在网页的右边点击Translate,然后选择中文翻译


Melon Pan Toppings:

80g Cake Flour

1/4 tsp Baking Powder

1 tsp Pumpkin Powder

25g Salted Butter

30g Icing Sugar

25g Egg

Some Castor Sugar 


If you are sharing this recipe/ blog content, kindly attach the link to this blog instead of screen capture/ copy & paste/ use in your blog. No parts of the content of this blog may be reproduced without prior written permission. All rights reserved. Thank you. 如果您要分享此食谱/内容,请联系这个部落格的相关链接。敬请不要复制或改篇为自己的食谱。谢谢!


The preparation/ method is the same as the original and Matcha Melon Pan recipe that I've shared previously, tap here for the steps. 


若喜欢我的食谱,可以LIKE和追随我的面书专页,不要错过最新食谱发布。If you like my recipe, click hereLIKE & follow Miki's Food Archives Facebook page or follow us on Instagram: mfa_dingoozatfood  to receive more recipe updates. Don't forget to favourite my pages if you wish to see my post on your news feed. 


Friday, 28 October 2022

Easy Coleslaw Recipe 包菜沙拉【简单美味家常做法】


Coleslaw is a favourite side dish served next to savoury meats, making it at home is pretty easy. Sharing here is my favourite coleslaw recipe, a basic one that's quick to make and calls for simple ingredients, just cabbage and carrots toss in a creamy dressing with a hint of sweetness.


Ingredients: 
中文食谱:请在网页的右边点击Translate, 然后选择中文翻译

220g Cabbage, shredded

1/2 Carrot, shredded

Coleslaw Dressing:

40g Mayonnaise

30g Buttermilk

10g Sugar

1/2 tsp Apple Cider Vinegar

Pinch of Salt & Black Pepper


If you are sharing this recipe/ blog content, kindly attach the link to this blog instead of screen capture/ copy & paste/ use in your blog. No parts of the content of this blog may be reproduced without prior written permission. All rights reserved. Thank you. 如果您要分享此食谱/内容,请联系这个部落格的相关链接。敬请不要复制或改篇为自己的食谱。谢谢!


Method: 

1.
 Combine the dressing ingredients.


2. Toss with shredded cabbage and carrot, refrigerate for 1 hour or more before serving. 

若喜欢我的食谱,可以LIKE和追随我的面书专页,不要错过最新食谱发布。If you like my recipe, click hereLIKE & follow Miki's Food Archives Facebook page or follow us on Instagram: mfa_dingoozatfood  to receive more recipe updates. Don't forget to "FAVOURITE" the pages if you wish to see my post on your news feed. 

Sunday, 23 October 2022

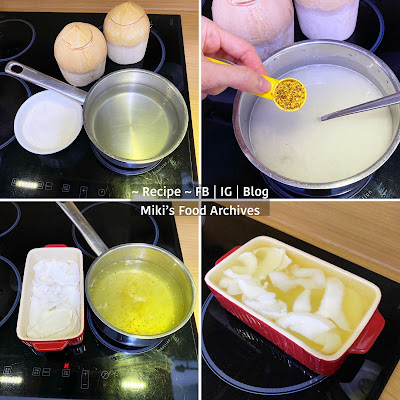
Osmanthus Coconut Jelly 椰汁桂花糕


Light and refreshing coconut jelly infused with the fragrance of the osmanthus flower, it's a perfect dessert on a hot scorching day.


Ingredients: 
材料

2 Coconut (640g Coconut Water) 椰子 

125g Konnyaku Premix Jelly Powder 蒟蒻果冻粉 

1 tsp Osmanthus Flower 桂花


If you are sharing this recipe/ blog content, kindly attach the link to this blog instead of screen capture/ copy & paste/ use in your blog. No parts of the content of this blog may be reproduced without prior written permission. All rights reserved. Thank you. 如果您要分享此食谱/内容,请联系这个部落格的相关链接。敬请不要复制或改篇为自己的食谱。谢谢!


Method: 步骤

1. Gently heat coconut water, gradually stir in jelly powder. 
将椰子水
加入锅里加热,慢慢加入果冻粉,不断搅拌。

2. Continue stirring. Bring to a boil and add in osmanthus flower. Turn off the heat and constantly stir until the jelly powder is fully dissolved.
继续搅拌,加热至煮滚/烧开后加入桂花。熄火,继续搅拌至果冻粉完全溶解。


3. Place coconut flesh in the jelly container, and pour in the jelly mixture (optional: pour through a sieve to filter out the osmanthus flowers). Let it cool, cover, and keep in the refrigerator for 4 hours. Serve chilled.
和椰子肉一起加入模里待凉后盖好放进冰箱。四小时后即可享用。
若喜欢我的食谱,可以LIKE和追随我的面书专页,不要错过最新食谱发布。If you like my recipe, click hereLIKE & follow Miki's Food Archives Facebook page or follow us on Instagram: mfa_dingoozatfood  to receive more recipe updates. Don't forget to "FAVOURITE" the pages if you wish to see my post on news feed. 

Thursday, 20 October 2022

Soft & Buttery Condensed Milk Bread 炼奶甜面包【奶香浓郁、超松软拉丝手撕面包】


This easy homemade condensed milk bread recipe yields an incredibly soft and fluffy texture with sweet buttery and milky flavour, simply delectable! Great for breakfast, bento or snack any time of the day.


Ingredients: 
中文食谱:请在网页的右边点击Translate,然后选择中文翻译

150g Fresh Milk

20g Condensed Milk

1 tsp Instant Dry Yeast

220g Bread Flour

30g Cake Flour

40g Castor Sugar

25g Egg (lightly beaten)

30g Salted Butter (softened)

Condensed Milk Paste:

25g Condensed Milk

20g Salted Butter


If you are sharing this recipe/ blog content, kindly attach the link to this blog instead of screen capture/ copy & paste/ use in your blog. No parts of the content of this blog may be reproduced without prior written permission. All rights reserved. Thank you. 如果您要分享此食谱/内容,请联系这个部落格的相关链接。敬请不要复制或改篇为自己的食谱。谢谢!


Method:

1. Mix together the paste ingredients, cover and keep chilled in the fridge. 

2. Prepare the dough using straight dough method  <<CLICK HERE for detailed method>>


3. Roll out the dough, evenly spread the paste fillings, roll up and seal. Egg wash and bake at 180'C 15mins.

若喜欢我的食谱,可以LIKE和追随我的面书专页,不要错过最新食谱发布。If you like my recipe, click hereLIKE & follow Miki's Food Archives Facebook page or follow us on Instagram: mfa_dingoozatfood  to receive more recipe updates. Don't forget to favourite my pages if you wish to see my post on your news feed. 

Thursday, 13 October 2022

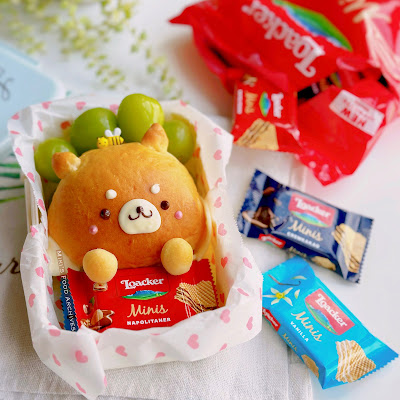
Cute Puppy Bread 可爱小狗造型面包


I love making cute bread as it's always therapeutic for me. Making bread that is lovely to look at and enjoyable to eat is really fun. In the past, I have tried many bread designs <<CLICK HERE to view some of my bread collections>>. This is my first attempt at making Shiba Inu puppy bread 🐶


If you are sharing this blog content, kindly attach the link to this blog instead of screen capture/ copy & paste/ use in your blog. No parts of the content of this blog may be reproduced without prior written permission. All rights reserved. Thank you. 如果您要分享此内容,请联系这个部落格的相关链接。敬请不要复制或改篇为自己的食谱。谢谢!

I made these bread using my usual soft butter bread recipe <<CLICK HERE for Soft Butter Bread Recipe 点击进入~奶油软面包/餐包食谱>>, shaping method as shown in the picture below:


Made a simple and quick-to-pack breakfast bento that only takes 5-mins to put together,
that's the advantage of having cute bread made in advance :P


Thanks for reading, I hope you are inspired after reading my blog. If you love to see my food, click hereLIKE & follow Miki's Food Archives Facebook page or follow us on Instagram: mfa_dingoozatfood  to receive more recipe updates. Don't forget to favourite my pages if you wish to see my post on your news feed. 

Enjoy!

Tuesday, 11 October 2022

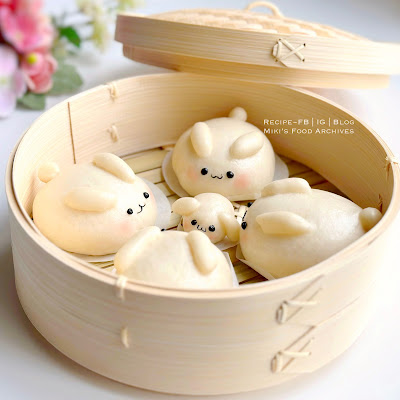
Cute Bunny Mantou aka Steamed Bun 可爱小白兔馒头|清水馒头做法 【Dairy-free Recipe】


Soft and fluffy mantou made with simple ingredients, hand-kneaded and it's dairy-free. It can be made with or without sugar and in different shapes or flavours as you wish! When done right, the steamed buns should be smooth and fluffy, and remain soft at room temperature. Leftovers can be kept in the freezer, and reheat before serving.

Watch the video below to see the mantou's texture, this video was taken after they were cooled at room temperature for 2 hours.


Ingredients: 
中文食谱:请在网页的右边点击Translate,然后选择中文翻译

125g Plain Flour 


30g Hot Water 


1 tsp Sugar (optional)


1/2 tsp Yeast 


40g Water (35’C) 


If you are sharing this recipe/ blog content, kindly attach the link to this blog instead of screen capture/ copy & paste/ use in your blog. No parts of the content of this blog may be reproduced without prior written permission. All rights reserved. Thank you. 

如果您要分享此食谱/内容,请联系这个部落格的相关链接。敬请不要复制或改篇为自己的食谱。谢谢!

Method: 

1. In a mixing bowl, combine flour and hot water, mix well with a pair of chopsticks then stir in sugar, if using.

2. In another small bowl, combine yeast and water, and mix well. Combine all ingredients (1+2) and mix to form a dough, cover and let it rest for 10 minutes. Add 1/2 tbsp pork lard and knead the dough for 10 minutes or until smooth and elastic, as shown in the picture below.


3. Divide the dough and shape it as desired. If you're making bunny, use the picture for reference. Add a little charcoal powder to a small portion of the dough to make the bunny's facial details.


4. Proof for 1 hour and steam for 15 minutes (no need to preheat the steamer). When it's done, turn off the heat and wait for 5 minutes before opening the cover. 
<< Click HERE >> to view more Ninja Foodi recipes and cooking videos, including easy one-pot-meal, chicken curry, roast chicken, roast pork ribs, crispy chicken, porridge, fish recipes, bread, kid-friendly snacks, and many more...

若喜欢我的食谱,可以LIKE和追随我的面书专页,不要错过最新食谱发布。If you like my recipe, click hereLIKE & follow Miki's Food Archives Facebook page or follow us on Instagram: mfa_dingoozatfood  to receive more recipe updates. Don't forget to favourite my pages if you wish to see my post on your news feed. 

Friday, 7 October 2022

Air-fried Crispy Dry Rub Chicken Wings | Louisiana Chicken Wings Wannabe 西式香料脆皮炸鸡【免油炸气炸锅食谱】


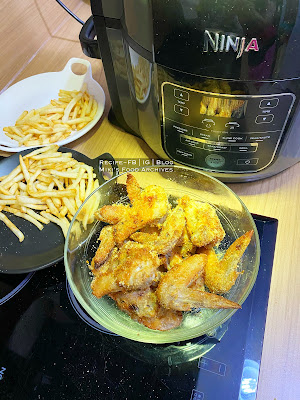
My son loves Wingstop's Louisiana chicken wings but their chicken wings don't taste "fresh" although the seasonings were good. Therefore I tried to replicate it at home, made my own dry rub, use fresh chicken wings instead of frozen ones, and air-fried using my trusty Ninja Foodi. Although it's not 100% taste-alike, they're garlicky, flavourful and tasty. 

Preparation is simple, just marinate the wings and throw them into the Ninja Foodi. The Ninja Foodi would cook the food with a delicious golden crisp finish and juicy inside with minimal oil used. The fries was cooked from frozen using Ninja Foodi as well, we topped it with cheese sauce, so yummy!


Ingredients: 
中文食谱:请在网页的右边点击Translate,然后选择中文翻译

8 Chicken Wings, cut into half

Bread Crumbs

Marinade:


2 tsp Corn Flour


2 tsp Garlic Salt 


1 tsp Onion Powder


1/4 tsp Dried Oregano 


Seasonings:


1/8 tsp White Pepper


1/4 tsp Lemon Pepper, or Garlic Pepper + pinch of salt


1/2 tsp Garlic powder


1/16 tsp of Cajun/ Chili Powder


1/4 tsp Onion Powder


Homemade Wingstop's Louisiana Chicken Wings along with cheese sauce french fries.
Everything is air-fried, so easy and tasty!


If you are sharing this recipe/ blog content, kindly attach the link to this blog instead of screen capture/ copy & paste/ use in your blog. No parts of the content of this blog may be reproduced without prior written permission from Miki's Food Archives. All rights reserved. Thank you. 

如果您要分享此食谱/内容,请联系这个部落格的相关链接。敬请不要复制或改篇为自己的食谱。谢谢!


Method: 

1. Combine marinade ingredients and chicken wings, and let marinate for an hour or overnight. 

2. Preheat Ninja Foodi AIRCRISP mode 200'C for 3 minutes. Lightly coat the chicken with some bread crumbs.

About Ninja Foodi Multi-Cooker: The Ninja Foodi that I'm using is a combination of a pressure cooker and air fryer in one appliance, it's super-efficient and time-saving. Besides pressure cooking and air frying, there are other functions such as steam, slow cook, sear/ saute, bake/ roast, grill, dehydrate, sous vide, yoghurt, and keep warm. This cooker helps prepare quick meals without hassle, which I highly recommend to everyone who loves easy and hassle-free cooking with fewer pots and pans to wash.

There are 2 models available in Singapore and Malaysia. If you're interested, you can use our exclusive discount code to buy at the best market rate. The discount is valid for orders from Singapore and Malaysia via Ninja Kitchen SG Website with 1-year warranty + home delivery (usually takes about 4 working days). I've attached the details and links below for easy reference.

Where to buy Ninja Foodi in Singapore & Malaysia at the best lowest price?

SINGAPORE:
Ninja Foodi can be purchased from Ninja Kitchen Official Website. Cart out with Promo Code: MIKISNSG to get a 10% discount for any Ninja-Shark products via their website.

MALAYSIA:

Ninja Foodi can be purchased via Ninja Shark Official Website. Cart out with Promo Code: MFAOP300 to get the lowest price deal.


3. Place chicken wings into the Cook & Crisp Basket, AIRCRISP 180'C for 8 minutes, flip/ toss the wings, then continue to cook another 8-10 minutes or until golden and crisp.


4. Coat the wings with seasoning, and serve right away with fries. Tap here for <<Air Fried French Fries Method>>.
Note: Spray/ brush oil on the chicken wings and basket before cooking. 

<< Click HERE >> to view more Ninja Foodi recipes and cooking videos, including easy one-pot-meal, chicken curry, roast chicken, roast pork ribs, crispy chicken, porridge, fish recipes, bread, kid-friendly snacks, and many more...

若喜欢我的食谱,可以LIKE和追随我的面书专页,不要错过最新食谱发布。If you like my recipe, click hereLIKE & follow Miki's Food Archives Facebook page or follow us on Instagram: mfa_dingoozatfood  to receive more recipe updates. Don't forget to favourite my pages if you wish to see my post on your news feed. 


Wednesday, 5 October 2022

Yam Paste/ Taro Paste With Almond Cream Dessert 芋泥杏仁露/杏仁糊


Smooth, creamy, and yummy yam/ taro paste with almond cream dessert is a combination of my two favourite Chinese desserts. 


Making it at home isn't difficult at all if you follow my simplified recipes, tap the link below to get the recipes:


If you are sharing this blog content, kindly attach the link to this blog instead of screen capture/ copy & paste/ use in your blog. No parts of the content of this blog may be reproduced without prior written permission. All rights reserved. Thank you. 如果您要分享此内容,请联系这个部落格的相关链接。敬请不要复制或改篇为自己的食谱。谢谢!

Thanks for reading, I hope you are inspired after reading my blog. If you love to see my food, click hereLIKE & follow Miki's Food Archives Facebook page or follow us on Instagram: mfa_dingoozatfood  to receive more recipe updates. Don't forget to favourite my pages if you wish to see my post on your news feed. 

Enjoy!

Tuesday, 4 October 2022

Rice Cooker Chinese Five Spice Braised Pork Rice With Eggs 五香卤肉饭【电饭锅食谱】


An easy version of Chinese braised pork rice with eggs that you can cook using your rice cooker. It's a great way to add eggs to the rice cooker so there's no need to cook the eggs separately and it's ideal for those who can't make perfect hard-boiled eggs. The eggs cooked in the rice cooker are perfectly done and easy to peel! 


Ingredients:
中文食谱:请在网页的右边点击Translate, 然后选择中文翻译

185g Pork Collar/ Belly


2 Egg, chilled


2/3 block Tau Kwa 


2 Clove


1 Cinnamon Stick


1 Star Anise 


10g Fried Shallot


1 cup Rice 


1 & 1/4 cup Water


Marinade:


1 tsp Tapioca Flour


1 tbsp Oyster Sauce


1 tbsp Rice Wine/ Mirin


1 tbsp Light Soy Sauce


1/4 tsp Chinese Five Spice 


1/2 tbsp Sesame Oil


1 tsp Dark Soy Sauce


1/8 tsp White Pepper 


Optional: 1 tbsp Shallot Oil, 1 tsp sweet soy sauce, and some coriander for garnishing


If you are sharing this recipe/ blog content, kindly attach the link to this blog instead of screen capture/ copy & paste/ use in your blog. No parts of the content of this blog may be reproduced without prior written permission. All rights reserved. Thank you. 如果您要分享此食谱/内容,请联系这个部落格的相关链接。敬请不要复制或改篇为自己的食谱。谢谢!

Method:

1. Combine pork and marinade ingredients, let marinate for 30 minutes or overnight.

I'm using Song Cho IH rice cooker
Click here for product details


2. Add all ingredients to the rice cooker pot. Select <RICE> <STANDARD>.


3. When the cooking has completed, stir in shallot oil and sweet soy sauce, if using. Garnish with coriander and serve warm with your favourite veggies for a complete wholesome meal!

若喜欢我的食谱,可以LIKE和追随我的面书专页,不要错过最新食谱发布。
If you like my recipe, click hereLIKE & follow Miki's Food Archives Facebook page or follow us on Instagram: mfa_dingoozatfood  to receive more recipe updates. Don't forget to change the setting to 'SEE FIRST' if you wish to see my post on your Facebook news feed. 

Enjoy!