Pages

Saturday, 24 July 2021

Totoro Swiss Roll [Vanilla - Matcha/ Green Tea Swiss Roll]


It's that time of the year again... Happy Birthday to my son, Louis... may you be healthy and happy always! ❤️


This year, we celebrated his lunar birthday instead because his birthday falls on a super busy school day. The boy wanted a Totoro swiss roll, so I made a simple one for him. 


Made using my favourite Classic Vanilla Swiss Roll recipe, added charcoal powder and green tea/ Matcha powder for the colour. Tastes good and is easy to bake.

Click here for the full recipe 中英文对照食谱. 点击这里 >> Classic Vanilla Swiss Roll Recipe. 

If you are sharing this recipe/ blog content, kindly attach the link to this blog instead of screen capture/ copy & paste/ use in your blog. No parts of the content of this blog may be reproduced without prior written permission. All rights reserved. Thank you. 如果您要分享此食谱/内容,请联系这个部落格的相关链接。敬请不要复制或改篇为自己的食谱。谢谢!

Thanks for reading, I hope you are inspired after reading my blog. If you love to see my food, click hereLIKE & follow Miki's Food Archives Facebook page or follow us on Instagram: mfa_dingoozatfood  to receive more recipe updates. Don't forget to change the setting to 'SEE FIRST' if you wish to see my post on your Facebook news feed. 

Enjoy!

Friday, 16 July 2021

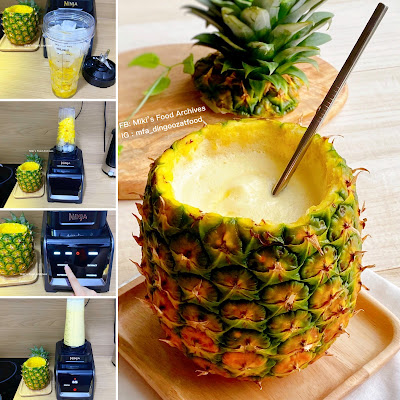
Homemade Pineapple Lemon Soda 凤梨柠檬苏打冻饮


This Pineapple Lemon Soda is the ultimate refreshing drink, it's fruit-filled, kid-friendly, and super easy to make at home. 


Ingredients:
中文食谱:请在网页的右边点击Translate,然后选择中文翻译

300g Fresh Pineapple

1 can Lemon Soda (180ml)

150g Ice Cubes plus some extra for serving


If you are sharing this recipe/ blog content, kindly attach the link to this blog instead of screen capture/ copy & paste/ use in your blog. No parts of the content of this blog may be reproduced without prior written permission. All rights reserved. Thank you. 如果您要分享此食谱/内容,请联系这个部落格的相关链接。敬请不要复制或改篇为自己的食谱。谢谢!


Method:

1. To start, you'll need a high-speed blender with really sharp blades that able to crush ice. I have tried a few brands of blenders, Ninja blender is the best so far. Ninja blender can be purchased from Ninja Kitchen Official Website. Cart out with Promo Code: MIKISNSG to get a 10% discount for any Ninja-Shark products via their website.


2. Add pineapple and ice cubes into the Ninja Blender Cup, select <SMOOTHIE> function, the program will run for 50 seconds. When it's ready, add in lemon soda and ice cube, serve right away

若喜欢我的食谱,可以LIKE和追随我的面书专页,不要错过最新食谱发布。If you like my recipe, click hereLIKE & follow Miki's Food Archives Facebook page or follow us on Instagram: mfa_dingoozatfood  to receive more recipe updates. Don't forget to change the setting to 'SEE FIRST' if you wish to see my post on your Facebook news feed. 


<< Click HERE >> to view more Ninja Blender recipes and cooking videos.

Tuesday, 6 July 2021

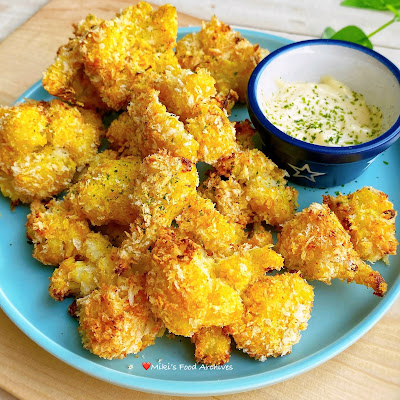
Air-Fried Crispy Breaded Cauliflower Bites 香脆花椰菜 【免油炸】


Cauliflower is my favourite veggie but the little one at home hates it. The only way to make him eat cauliflower is to transform this veggie into crispy bites that are flavourful and don't taste much like veggies. There are many methods for making crispy cauliflower, the method that I'm sharing in this blog post is simple and quick to make without deep-frying, it's healthier and incredibly delicious, even the most carnivorous meat-eating kids won't be able to resist these crispy, spiced cauliflower bites.


Here's the super-easy method - Pressure Cook and AirCrisp in the Ninja Foodi multi-cooker without deep-frying to achieve crispiness with minimal oil used. This air-fried version tastes as good as deep-fried, minus the oil and best of all, it's all done in one pot that makes cleaning a breeze. The Ninja Foodi deep pot could prevent oil/ residues splatter all over the crisping lid making it easy to maintain and clean. No oily food and greasy stove-top!


Ingredients:
中文食谱:请在网页的右边点击Translate,然后选择中文翻译

1 medium Cauliflower Head

1 Egg White

50g Bread Crumbs

Some Plain Flour


Seasonings:

1/4 tsp Turmeric Powder

1/4 tsp Garlic Powder

1/4 tsp Onion Powder

1/2 tsp Curry Powder

1/2 tsp Salt


If you are sharing this recipe/ blog content, kindly attach the link to this blog instead of screen capture/ copy & paste/ use in your blog. No parts of the content of this blog may be reproduced without prior written permission. All rights reserved. Thank you. 如果您要分享此食谱/内容,请联系这个部落格的相关链接。敬请不要复制或改篇为自己的食谱。谢谢!

Method:

1. Combine bread crumbs with seasonings, set aside. Add 1 cup water into the Ninja Foodi inner pot. Pressure Cook (Low) for 3 minutes, quick pressure release. 


Sprinkle some garlic salt on the cauliflowers if you like it more flavourful.

2. Coat the cauliflower with flour, egg white, and bread crumbs. Preheat Ninja Foodi AirCrisp mode 180'C 3mins. The Ninja Foodi that I'm using is a combination of a pressure cooker and air fryer in one appliance, it's super-efficient and time-saving. Besides pressure cooking and air frying, there are other functions such as steam, slow cook, sear/ saute, bake/ roast, grill, dehydrate, sous vide, yoghurt, and keep warm. I'd highly recommend cooking this in the Ninja Foodi, with much lesser oil used, the cauliflowers turned out so crispy on the outside and tender on the inside.  If you're interested to purchase the Ninja Foodi, here's a special deal for our readers:

SINGAPORE:
Ninja Foodi can be purchased from Ninja Kitchen Official Website. Cart out with Promo Code: MIKISNSG to get a 10% discount for any Ninja-Shark products.

MALAYSIA:

Ninja Foodi can be purchased via Ninja Shark Official Website. Cart out with Promo Code: MFAOP300 to get the lowest price deal.


3. Spray/ brush some oil on the Cook & Crisp Basket, place cauliflower on the basket, spray/ brush some oil on the cauliflower, AirCrisp 180'C 10mins, serve right away with your favourite dipping sauce. 

若喜欢我的食谱,可以LIKE和追随我的面书专页,不要错过最新食谱发布。If you like my recipe, click hereLIKE & follow Miki's Food Archives Facebook page or follow us on Instagram: mfa_dingoozatfood  to receive more recipe updates. Don't forget to change the setting to 'SEE FIRST' if you wish to see my post on your Facebook news feed. 

<< Click HERE >> to view more Ninja Foodi recipes and cooking videos, includes easy one-pot-meal, chicken curry, roast chicken, roast pork ribs, crispy chicken, porridge, fish recipes, bread, kid-friendly snacks, and many more...

Saturday, 3 July 2021

Air-Fried Taiwanese XXL Chicken Cutlet 台式炸鸡排 【免油炸】


Ever heard of the famous Taiwanese street food XXL fried chicken aka 豪大大鸡排? This Taiwanese Fried Chicken Cutlet comes in a huge flat piece of chicken with a crunchy coating seasoned with spices. It's actually pretty easy to make this at home by marinating the chicken meat, coat with flour, and deep-frying it till golden. 

When making it at home, I'd go for a simpler method cooked in the Ninja Foodi multi-cooker without deep-frying to achieve the crunchiness with minimal oil used. This air-fried version tastes as good as deep-fried, and best of all, it's all done in one pot that makes cleaning a breeze. The Ninja Foodi deep pot could prevent oil/ residues splatter all over the crisping lid making it easy to maintain and clean. No oily food and greasy stove-top! 


The Ninja Foodi multi-cooker that I'm using is a combination of a pressure cooker and air fryer in one pot, it's super-efficient and time-saving. The heat distribution is even and it heats up real fast compared to my other air fryer. Besides pressure cooking and air frying, there are other functions such as steam, slow cook, sear/ saute, bake/ roast, grill, and keep warm, just like a portable kitchen with a rice cooker, pressure cooker, air fryer, oven and stovetop functions, reasonable price, and highly versatile. 


Ingredients:
中文食谱:请在网页的右边点击Translate,然后选择中文翻译

1 Boneless Chicken Leg/ Chicken Breast (butterflied & flattened)

5 Soda Cream Cracker, crushed

1 Egg White

2 tbsp Plain Flour

Optional Seasoning: Pepper Salt, Five Spice Powder & Chili Powder


Marinade:

1 tbsp Corn Flour

1/4 tsp Onion Powder

1/2 tsp Garlic Salt

1/8 tsp Five Spice Powder

1/8 tsp White Pepper

1/2 tsp Sesame Oil


If you are sharing this recipe/ blog content, kindly attach the link to this blog instead of screen capture/ copy & paste/ use in your blog. No parts of the content of this blog may be reproduced without prior written permission. All rights reserved. Thank you. 如果您要分享此食谱/内容,请联系这个部落格的相关链接。敬请不要复制或改篇为自己的食谱。谢谢!

Method:

1. Coat the chicken meat with the marinade ingredients, let marinate for at least 1 hour or overnight. 


2. Coat the meat with flour, egg white, and soda cream cracker crumbs. Preheat Ninja Foodi AirCrisp mode 180'C 3mins. 

You can deep-fry the chicken cutlets but I'd suggest using the easier and tastier air-fry method. I'd highly recommend cooking this in the Ninja Foodi, much lesser oil used, and the chicken cutlets turned out so crispy on the outside and juicy inside. If you're interested to purchase the Ninja Foodi, here's a special deal for our readers:

SINGAPORE:
Ninja Foodi can be purchased from Ninja Kitchen Official Website. Cart out with Promo Code: MIKISNSG to get a 10% discount for any Ninja-Shark products.

MALAYSIA:

Ninja Foodi can be purchased via Ninja Shark Official Website. Cart out with Promo Code: MFAOP300 to get the lowest price deal.


3. Spray/ brush some oil on the Cook & Crisp Basket, place chicken cutlet on the basket, spray/ brush some oil on the chicken cutlet, AirCrisp 180'C 12mins. 


4. Cut it into smaller pieces, add seasoning (if using), serve right away. 

若喜欢我的食谱,可以LIKE和追随我的面书专页,不要错过最新食谱发布。If you like my recipe, click hereLIKE & follow Miki's Food Archives Facebook page or follow us on Instagram: mfa_dingoozatfood  to receive more recipe updates. Don't forget to change the setting to 'SEE FIRST' if you wish to see my post on your Facebook news feed. 

<< Click HERE >> to view more Ninja Foodi recipes and cooking videos, including easy one-pot-meal, chicken curry, roast chicken, roast pork ribs, crispy chicken, porridge, fish recipes, bread, kid-friendly snacks, and many more...

Friday, 2 July 2021

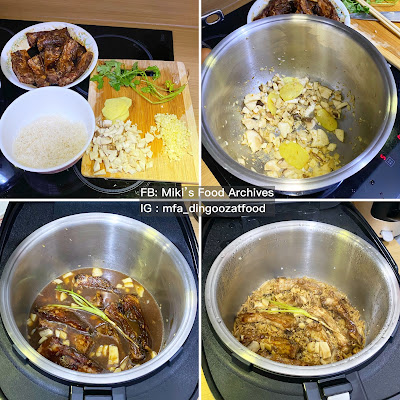
Soybean Paste aka Taucu Pork Ribs Rice 蒜香豆酱排骨焖饭


This is a simple one-pot rice recipe using pork ribs marinated in soybean paste aka Taucu, cooked together with some King oyster mushrooms in Song Cho IH rice cooker. 

Ingredients:
Yield 3 servings
中文食谱:请在网页的右边点击Translate, 然后选择中文翻译

600g Pork Ribs

1 + 1/2 cup Rice

2 cup Water

2 King Oyster Mushroom, diced

1 stalk Coriander

2 tbsp Garlic

1 thumb-size Ginger, sliced

1 tsp Salt

1 tbsp Sesame Oil

1 tbsp Cooking Oil

1 tbsp Shallot Oil

Some Sweet Dark Soy Sauce

Marinade:

1 tbsp Tapioca Flour

2 tbsp Light Soy Sauce

1 tbsp Rice Wine

1 tbsp Sugar

1/2 tbsp Dark Soy Sauce

Dash of White Pepper

1 + 1/2 tbsp Soybean Paste


If you are sharing this recipe/ blog content, kindly attach the link to this blog instead of screen capture/ copy & paste/ use in your blog. No parts of the content of this blog may be reproduced without prior written permission. All rights reserved. Thank you. 如果您要分享此食谱/内容,请联系这个部落格的相关链接。敬请不要复制或改篇为自己的食谱。谢谢!

Method:

1. Combine marinade ingredients and pork rib, let marinate for 1 hour.

2. Heat cooking oil and sesame oil in the pot, stir fry ginger and garlic till fragrant. Add in mushrooms, season with salt and pepper, stir fry for 1-2 minutes. 


3. Stir in rice and water. Add in marinated pork ribs and coriander root. Select <RICE> <STANDARD>


4. When the cooking has completed,  stir in some sweet dark soy sauce and shallot oil. Garnish with coriander, serve warm. 

若喜欢我的食谱,可以LIKE和追随我的面书专页,不要错过最新食谱发布。
If you like my recipe, click hereLIKE & follow Miki's Food Archives Facebook page or follow us on Instagram: mfa_dingoozatfood  to receive more recipe updates. Don't forget to change the setting to 'SEE FIRST' if you wish to see my post on your Facebook news feed. 

Enjoy!