Pages

Wednesday, 19 August 2020

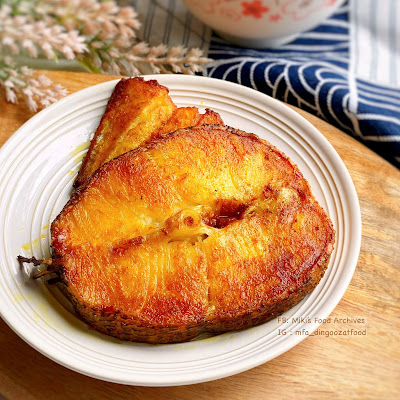
Air-Fried Fish With Curry Powder 咖喱粉煎鱼【气炸锅食谱】


Frying fish is such a breeze if you have a Ninja Foodi at home, cook without oil splattering around the kitchen. This 2 in 1 pressure cooker + air fryer does more than fry, they simply cook your food for you in a simple machine. If you love fish, look no further. This is definitely a worthy investment for you! You can use it to air fry, bake, grill, steam or stir fry fish, it will cook the food just right, no matter what kind of protein/ meat you're cooking.

The Ninja Foodi multi-cooker that I'm using is a combination of a pressure cooker and air fryer in one pot, it's super-efficient and time-saving. The heat distribution is even and it heats up really fast compared to my other air fryer. The deep pot could prevent oil/ residues from splattering all over the crisping lid making it easy to maintain and clean. 

The one in front is my Ninja Foodi OP300 after 6 months of heavy usage, the crisping lid is still as good. The one simple step is to wipe it clean with a damp cloth after use. 


Besides pressure cooking and air frying, there are other functions such as steam, slow cook, sear/ saute, bake/ roast, grill, dehydrate, sous vide, yoghurt, and keep warm. This cooker helps prepare quick meals without hassle, which I highly recommend to everyone who loves easy and hassle-free cooking with fewer pots and pans to wash. If you're interested, you can use our exclusive discount code to buy at the best market rate. I've attached the details and links below for easy reference.

SINGAPORE:
Ninja Foodi can be purchased from Ninja Kitchen Official Website. Cart out with Promo Code: MIKISNSG to get a 10% discount for any Ninja-Shark products.

MALAYSIA:

Ninja Foodi can be purchased via Ninja Shark Official Website. Cart out with Promo Code: MFAOP300 to get the lowest price deal.


Ingredients: 

1 slice Fish 鱼片

1 tsp Sesame Oil 麻油

1 tsp Oyster Sauce 蚝油

1 tsp Curry Powder 咖喱粉

A pinch of Garlic Salt 蒜盐


1/2 tsp Corn Flour 玉米粉


If you are sharing this recipe/ blog content, kindly attach the link to this blog instead of screen capture/ copy & paste/ use in your blog. No parts of the content of this blog may be reproduced without prior written permission. All rights reserved. Thank you. 

如果您要分享此食谱/内容,请联系这个部落格的相关链接。敬请不要复制或改篇为自己的食谱。谢谢!


Method: 

1. Combine all ingredients. Cover and marinate for 15 minutes. 
把所有材料混合,腌15分钟。

Ninja Foodi AirCrisp/ Air-fryer Fried Fish - Threadfin 

Ninja Foodi AirCrisp/ Air-fryer Fried Fish - Cod Fish
Taste better than pan-fried!

Ninja Foodi AirCrisp Salmon Fillet 
AirCrisp/ Air-fried for 8 mins, the skin is crispy!


Ninja Foodi Aircrisp Whole Pomfret Fish
AirCrisp/ Air-fried for 12 mins.


2.  Preheat Ninja Foodi - Set Air Crisp mode 210'C 5mins. 
Place marinated fish in the Cook & Crisp Basket, air-crisp/ air fry 210'C for 8-10 minutes or till cooked through. Serve right away. 
气炸210度8-10分钟或至熟。
Note: Spray a little oil on the basket and fish before air frying. Adjust the cooking time accordingly if cooking a bigger portion/ thicker fillet.

若喜欢我的食谱,可以LIKE和追随我的面书专页,不要错过最新食谱发布。If you like my recipe, click hereLIKE & follow Miki's Food Archives Facebook page or follow us on Instagram: mfa_dingoozatfood  to receive more recipe updates. Don't forget to favourite my pages if you wish to see my post on your news feed. 


Thursday, 13 August 2020

Homemade Achar/ Nyonya Acar 娘惹阿杂菜


Achar/ Acar is a mixture of pickled vegetables commonly served in Asian cuisine. It's generally made with different types of vegetables and fruits such as cucumber, carrots, pineapple, long beans, and cabbage, pickled in a well-seasoned vinegar concoction. It's an excellent side dish to increase appetite and goes well with greasy food such as nasi lemak and deep-fried food, it even tastes good on its own. During Chinese New Year, we serve Achar with prawn crackers and that's my top favorite pairing! ;)


The Achar recipe that I'm sharing here is a simplified version of Peranakan/ Nyonya Achar. 

Ingredients:
中文食谱:请在网页的右边点击Translate,然后选择中文翻译

2 Cucumber

1-2 Carrot

1/2 Pineapple

1/2 tsp Turmeric Powder

100g Rice Vinegar

100g Water

100g Sugar

1/2 tsp Salt (additional 2 tsp to dehydrate cucumber and carrots)

80g or more Gound Peanuts

2-3 tbsp Toasted Sesame Seeds

Some oil for cooking


(A)

3 Shallot

1 Onion

5 Dried Chili

3 cloves Garlic

2 Candle Nuts

1/2 thumb size Galangal

2-3 Red Chili

1 Lemongrass


If you are sharing this recipe/ blog content, kindly attach the link to this blog instead of screen capture/ copy & paste/ use in your blog. No parts of the content of this blog may be reproduced without prior written permission. All rights reserved. Thank you. 如果您要分享此食谱/内容,请联系这个部落格的相关链接。敬请不要复制或改篇为自己的食谱。谢谢!

Method:

1. Cut cucumber and carrot into strips, mix with 2 tsp salt, let it sit for an hour, squeeze out the liquid, set aside.

2. Add ingredients (A) and some water (optional) into a blender, blend till smooth. I'm using Ninja blender which is very effective and quick, take only seconds to blend the ingredients into a paste.  Ninja blender can be purchased from Ninja Kitchen Official Website. Cart out with Promo Code: MIKISNSG to get a 10% discount for any Ninja-Shark products via their website.


3. Heat some oil in a pan/ wok, add in the paste and turmeric powder. Stir fry till the oil seeps through. Add in vinegar, water, salt, and sugar. Bring the mixture to a boil, you may adjust the taste to your own preferences.


4. Let it cooled for a while. 


5. Combine all ingredients together, leave it to cool completely. Store in airtight jar/ glass containers. Keep refrigerated and serve the next day. Best consumed within 1-2 weeks. 

If you like my recipe, click hereLIKE & follow Miki's Food Archives Facebook page or follow us on Instagram: mfa_dingoozatfood  to receive more recipe updates. Don't forget to change the setting to 'SEE FIRST' if you wish to see my post on your Facebook news feed. Enjoy!


By readers, some feedback from those who have tried this recipe:


Wednesday, 5 August 2020

Crispy Salt & Pepper Chicken 盐酥鸡


Crispy and addictive to munch, this Salt & Pepper Chicken is pretty similar to the Taiwanese popular street food, only missing the basil leaves which I omitted, to avoid deep-frying oil splattering in the kitchen. :P  


Ingredients: 材料

300g Chicken Meat (skinless, cut into bite-size) 鸡肉

1 Egg White 蛋白 (optional)

Some Corn Flour / Potato Starch 玉米粉/地瓜粉

Some oil for cooking 油

Some Salt Pepper Seasoning 椒盐

Marinade:腌料

1 tsp Corn Flour 玉米粉

1 tsp Salt 盐

1/8 tsp White Pepper 胡椒粉

1 tsp Garlic 蒜茸

1/4 tsp Five Spice Powder 五香粉

1 tsp Chicken Powder 鸡粉


If you are sharing this recipe/ blog content, kindly attach the link to this blog instead of screen capture/ copy & paste/ use in your blog. No parts of the content of this blog may be reproduced without prior written permission. All rights reserved. Thank you. 如果您要分享此食谱/内容,请联系这个部落格的相关链接。敬请不要复制或改篇为自己的食谱。谢谢!


Method: 步骤

1. In a bowl, combine chicken and marinade ingredients, let marinate at least 1 hour or overnight.
鸡肉切块,加入腌料,腌制1小时以上或隔夜。


2. Stir in egg white. Coat chicken with flour.
加入蛋白,沾上粉。


3. Heat oil in a wok to 180'C.
锅里烧热油。


4. Deep fry chicken meat by batch, double-fry at 200'C. Sprinkle some salt pepper seasoning, toss and serve right away.
分批把鸡肉炸熟,回锅以高温炸至酥脆,撒上椒盐,即可享用。若喜欢我的食谱,可以LIKE和追随我的面书专页,不要错过最新食谱发布。
If you like my recipe, click hereLIKE & follow Miki's Food Archives Facebook page or follow us on Instagram: mfa_dingoozatfood  to receive more recipe updates. Remember to favorite my pages if you wish to see my post on your feed. 
Enjoy!