Pages

Thursday, 28 September 2017

Peppermint & Chocolate Ice Cream Mooncake 薄荷巧克力雪糕月饼


Homemade Peppermint & Chocolate Ice Cream Mooncake 薄荷巧克力雪糕月饼 - A refreshing no-bake chocolate mint mooncake made of fresh fruit, banana as fillings, and dark chocolate as the outer crust. It's definitely a healthier choice for the young and elderly at home. 

This is a recipe that I customized for the mooncake hater in my home, yeah...my dearest son. Making this for my 8yo, I preferred homemade ice cream without cream and sugar added. In the past, I made chocolate and vanilla ice cream using frozen bananas, it's so creamy and tastes good too. So this time, I tried a new flavour - peppermint. Surprisingly the boy loves it! 

<<Tap here>> for more homemade ice cream recipes made of banana, without cream.

Ingredients:
(yield 3)
中文食谱:请在网页的右边点击Translate,然后选择中文翻译
(A) - If using store-bought ice cream, omit this.

185g Frozen Banana

Few drops of Mint Extract

Green Food Colouring (optional)


(B)

120g Dark Chocolate (melted)

Some Shaved Chocolate (optional)


If you are sharing this recipe, kindly attach the link to this blog instead of screen capture/ copy & paste/ use in your blog and claimed as your recipe! Thank you. 如果您要分享此食谱,请联系这个部落格的相关链接。敬请不要复制或改篇为自己的食谱。谢谢!  


Method:

1. Coat mooncake mould with a thin layer of chocolate. Let it set in the freezer, about 5 minutes. If using store-bought ice cream, skip step 2.


2. Meanwhile, blend (A) in a blender until smooth. Add some shaved chocolate, if using. Mix gently with a spoon. The ice cream is ready.


3. Scoop the ice cream onto (1). 


4. Return to freezer. When the ice cream is set, layer the top with some melted chocolate. Cover and return to freezer, let it freeze for 4 hours or overnight. Cut the mooncakes with a warm knife and serve right away.


若喜欢我的食谱,可以LIKE和追随我的面书专页,不要错过最新食谱发布。

If you like my recipe, click hereLIKE & follow Miki's Food Archives Facebook page or follow us on Instagram: mfa_dingoozatfood  to receive more recipe updates. Don't forget to change the setting to 'SEE FIRST' if you wish to see my post on your Facebook news feed. 

Enjoy!

Sunday, 24 September 2017

Sweet Corn & Lotus Root Pork Ribs Soup 玉米莲藕排骨汤-增强新陈代谢,降血脂,润肠排毒


Sweet Corn & Lotus Root Pork Ribs Soup 玉米莲藕排骨汤。 A nutritious soup that helps to improve metabolism, improve digestion and blood circulation, reduce cholesterol and there are many more benefit to our health.

此汤清热消痰、健脾开胃、补血养颜,润肠排毒,增强新陈代谢,降血脂。


Ingredients: (Yield 2-3 servings)


300g Pork Ribs 排骨 300克

2 sections Lotus Roots (peeled and cut into chunks) 莲藕 2节

1 Sweet Corn 玉米 1 根

5 Seedless Red Dates 红枣 5粒

1 tbsp Chinese Almond (Nan Xing) 南杏 1汤匙

1 Dried Cuttlefish (softened) 鱿鱼 1 片

Some salt to taste 盐 适量


If you are sharing this recipe, kindly attach the link to this blog instead of screen capture/ copy & paste/ use in your blog and claimed as your recipe! Thank you.

如果您要分享此食谱,请联系这个部落格的相关链接。敬请不要复制或改篇为自己的食谱。谢谢!

Method:
步骤

1. Rinse the ribs with hot boiling water. Transfer to a pot. Add in the rest of the ingredients except salt.
将排骨用热水烫过。将所有材料(除了盐)放进锅里。


2. Add 2L hot water, bring to boil. Cook with high heat for 30 minutes. Reduce heat and simmer for 60 minutes.
加入两公升热水,大火煮滚。中大火煮30分钟,转小火煮60分钟。

3. Add salt to taste, cook another 30 minutes. Serve warm.
加少许盐调味。继续以小火煮30分钟即可。若喜欢我的食谱,可以LIKE和追随我的面书专页,不要错过最新食谱发布。


If you like my recipe, click hereLIKE & follow Miki's Food Archives Facebook page to receive more recipe updates. Don't forget to change the setting to 'SEE FIRST' if you wish to see my post on your Facebook news feed. Enjoy!


Thursday, 21 September 2017

Happy Cow Hard Boiled Eggs


Animal Theme Food Art - Happy Cow Hard Boiled Egg. These adorable cows are made of hard boiled eggs, cheese and seaweed (Nori). They're easy to make.


How I made it: 
中文食譜:請在網頁的右邊點擊Translate,然後選擇中文翻譯

1. Cook a hard boiled egg. Peeled and halved.


2. Use a round cutter, cut out the shape of the cow's head and add details using 2 types of cheese - light and darker colours. Place them on the hard boiled egg as shown in the picture below.


3. Use a pair of small scissors, cut out the face features/ details and place it on the cheese.


4. Cut out some seaweed to make the patches on the cow's body and it's ready! I served these with Salmon & Pumpkin Fried Rice + Stir Fry Pea Sprout With Shrimps. :)


Thanks for reading, I hope you are inspired after reading my blog. If you like my recipe, click hereLIKE & follow Miki's Food Archives Facebook page or follow us on Instagram: mfa_dingoozatfood  to receive more recipe updates. Don't forget to change the setting to 'SEE FIRST' if you wish to see my post on your Facebook news feed. 

Enjoy!

Friday, 15 September 2017

Winnie The Pooh Breakfast Sandwich 维尼熊芝士吐司


Bread Based Food Art - Winnie The Pooh Breakfast Sandwich 维尼熊芝士吐司: Kids all times favourite Disney character cheese sandwich. Making cute breakfast cheered me up in the morning!  


My not-so-little boy loves his breakfast!
My boy loves Winnie The Pooh and that is why I have so many Winnie The Pooh theme food. I made Winnie The Pooh birthday cake, Winnie The Pooh royal icing cookies,  Winnie The Pooh Fondant Cookies, Winnie The Pooh macaron and now, Winnie The Pooh cheese on bread. 


Here are some quick notes of how I made this cute Winnie The Pooh Breakfast Sandwich:

1. A thick slice of bread as base - I used my home baked bread, tap the link below to get the bread recipe.

<< Click/ Tap here for Light & Fluffy Japanese Sweet Bread recipe >>


2. Use 2 types of cheese - 1 light colour (pooh's shirt), 1 darker colour (pooh's body). Cut out Pooh Bear shape with a cutter or a knife. 


3. Place the cheese on the bread. Use a round cutter, cut out strawberry to make the balloon and cheese to make the bee.


4. Assemble - Draw the details with chocolate spread/ melted chocolate, add some raspberry gel/ jam to make Pooh's shirt RED. :)


Thanks for reading, I hope you are inspired after reading my blog. If you love to see my food, click hereLIKE & follow Miki's Food Archives Facebook page or follow us on Instagram: mfa_dingoozatfood  to receive more recipe updates. Don't forget to change the setting to 'SEE FIRST' if you wish to see my post on your Facebook news feed. 

Enjoy!

Thursday, 14 September 2017

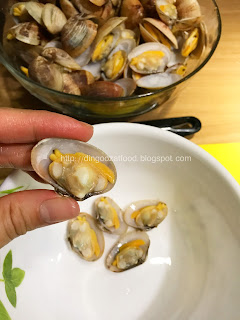
Stir Fried Clam & Gnocchi Dry Curry 香炒马铃薯丸子干咖喱


Stir Fried Clam & Gnocchi Dry Curry  香炒马铃薯丸子干咖喱 - A deliciously spicy dish that combined Italian pasta, clam and local's favourite curry, all in one. Deep fried gnocchi are crisp on the outside and chewy inside. Coated with seafood curry sauce, the taste is unbelievably scrumptious! 


Gnocchi are plump little lumps of pasta made of potato and it's commonly eaten as a form of pasta dish in Italy. It's usually cooked in salted boiling water and considered cooked when they floats to the surface. The Italian usually eat it with pasta sauce as part of their staple dish. Thanks to Casa Rinaldi for sending over the sampling packs to me. :)


In this blog post, I'm sharing an interesting way to cook gnocchi. I have created a mouth watering dish that is more suitable for Asian tastebud, a fusion dish to combine our local favourite dry curry clam and gnocchi. 


Ingredients:

120g Gnocchi 

500g Clam 
(Soak in 1 litre water + 1 tbsp salt) for 2 hours. Rinse under running water, drain and set aside.)

Some oil for cooking


(A)

10g Curry Leaves

20g Shallot (thinly sliced)

1 Red Chili (thinly sliced) 

1 tbsp Seafood Curry Powder


(B)

1/2 tsp White Pepper

1/2 tsp Sugar

100ml Seafood/ Chicken Broth

1/2 tbsp Oyster Sauce 

1/2 tbsp Shao Xing Hua Tiao Wine


(C) Stir to mix well, add as needed. You may not need to add in all.

1/2 tbsp Corn Flour 

1 tbsp Water


If you are sharing this recipe, kindly attach the link to this blog instead of screen capture/ copy & paste/ use in your blog and claimed as your recipe! Thank you. 如果您要分享此食谱,请联系这个部落格的相关链接。敬请不要复制或改篇为自己的食谱。谢谢!  


Method:

1. Bring a pot of water to boil, add clam and stir gently. When most of the clams have opened, remove from heat and drain. Discard any unopened clams. Break off and discard the top shells of the opened clams. Set aside.


2. Heat oil in a frying pan, deep fry gnocchi till the outer layer is crisp. Set aside.


3. Heat oil in a skillet, add in (A), stir to mix well and fry till fragrant.


4. Add in (B) and clams, increase heat and bring to a boil. Reduce heat to low, simmer for 1 minute. 


6. Gradually stir in (C), when the sauce is thicken, add in gnocchi, toss to mix well and coat evenly. Remove from heat and serve right away. If you like my recipe, click hereLIKE & follow Miki's Food Archives Facebook page to receive more recipe updates. Don't forget to change the setting to 'SEE FIRST' if you wish to see my post on your Facebook news feed. Enjoy!

Pikachu Minced Pork Rice Bowl 皮卡丘肉碎盖饭


Pokemon Theme Food Art - Pikachu Minced Pork Rice Bowl 皮卡丘肉碎盖饭. Nothing beat a bowl of warm steamed rice topped with grandma's recipe stir fry minced pork, plus a cute Pikachu fried egg. That's how I turned comfort food into something more interesting, both visually and taste. 


Pikachu Minced Meat Rice Bowl.


Add a twist to the usual home cooked food makes meal time more fun for the little one to eat. This time, I used egg sheet to make the character. Taste wise, it's a perfect match to the entire bowl of minced meat rice. 

Here are some quick notes of how I made this cute and delicious Pikachu rice bowl: 


1. Make the egg sheet.


2. Use a Pikachu (head) cutter, cut out the shape. Do this 2 times. The Pikachu cutter is available for sale, you can order via my online store or click here, send me a PM to place order.


That's the same cutter I used to make cookies.

 Place o
rder via my online store or click here, send me a PM to place order.

3. Use a pair of scissors, cut out Pikachu lightning tail and 2 arms.


If you are sharing this recipe/ blog content, kindly attach the link to this blog. No parts of the content of this blog may be reproduced without prior written permission. All rights reserved. Thank you. 

如果您要分享此食谱,请联系这个部落格的相关链接。敬请不要复制或改篇为自己的食谱。谢谢!

4. Stir fry minced meat - My boy named this Popo's (grandma's) recipe minced meat. A super delicious homey dish that goes really well with rice, recipe credit to my mom. << Click here for full recipe >>


Po Po's Recipe Minced Meat (My Mom's Recipe) 家乡风味 香炒肉碎

<< Click here for full recipe >>


5. Assemble - Place cooked rice in the bowl, I added mashed pumpkin in the rice. Layer with minced meat. Topped with blanched Kai Lan aka Chinese Kale and Pikachu egg sheet. Add facial details using seaweed. 


Thanks for reading, I hope you are inspired after reading my blog. If you love to see my food, click hereLIKE & follow Miki's Food Archives facebook page to receive more recipe updates. Don't forget to change the setting to 'SEE FIRST' if you wish to see my post on your Facebook news feed. Enjoy!
SaveSave

Tuesday, 12 September 2017

Batman Onigiri 蝙蝠侠饭团


Rice Based Superhero Theme Food Art - Batman Onigiri 蝙蝠侠饭团. Boys will be thrilled and girls would love this cute-looking Batman onigiri/ rice ball. 

Making cute food for kid is really fun and I'm so enjoyed doing it. I always chose a healthier option to make my son's food colourful and to make meal time more exciting.  

Batman Onigiri served with Pan Fried Curry Fish Fillet.

>> Get the easiest Pan Fried Curry Fish Fillet recipe here >> 

Here's some quick notes of how I prepared this cute batman theme lunch:

Batman onigiri is easy to make because there's only black and yellow for the outfit and beige for the skin colour. 


Black: Seaweed aka Nori is the perfect ingredients to make Batman's outfit. I use yaki-nori (dry roasted seaweed) in making character food art. It's easier to handle.


Yellow: I used Cheddar cheese to make the eyes and other details in Batman's outfit.

Skin Colour: I added mashed pumpkin to the rice to get the light yellow colour for the skin. Another alternative is egg yolk. 


Thanks for reading, I hope you are inspired after reading my blog. If you love to see my food, click hereLIKE & follow Miki's Food Archives facebook page to receive more recipe updates. Don't forget to change the setting to 'SEE FIRST' if you wish to see my post on your Facebook news feed. Enjoy!

Monday, 11 September 2017

Mini Paw Print Banana Cake 可可香蕉海绵蛋糕(迷你熊爪蛋糕)


Mini Paw Print Banana Cake - Moist, aromatic, spongy and delicious cottony soft banana cakes. An easy and quick way to use up overripe bananas.


Simple ingredients - cake flour, oil, sugar, banana, cocoa powder, eggs...

Whipped up everything using a stand mixer. 
This step is crucial, do not under or over beat the batter.

Portion out 100g batter, mix with 2 tsp cocoa powder. 


Use chocolate batter to make the paw pattern.
Baked in a preheated oven 160'C, 20 minutes.

If you do not have paw mould, just bake it in a loaf pan.
Ideal for kid's snack box/ recess food. 


>> GET FULL RECIPE HERE >> 点击进入...完整食谱 >>